
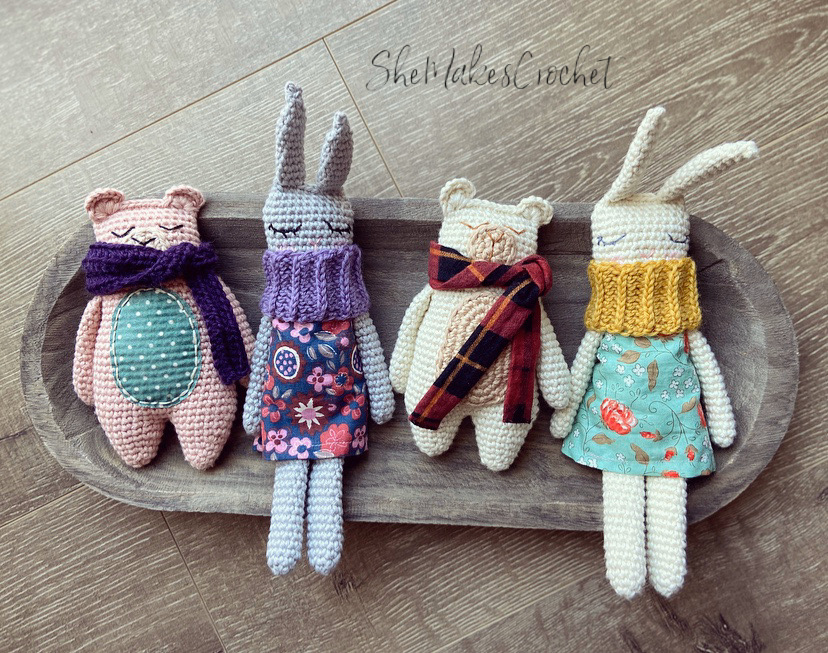
Be sure to check out all of my rag doll patterns! I’ve got a bunny, fox, squirrel, deer and girl.
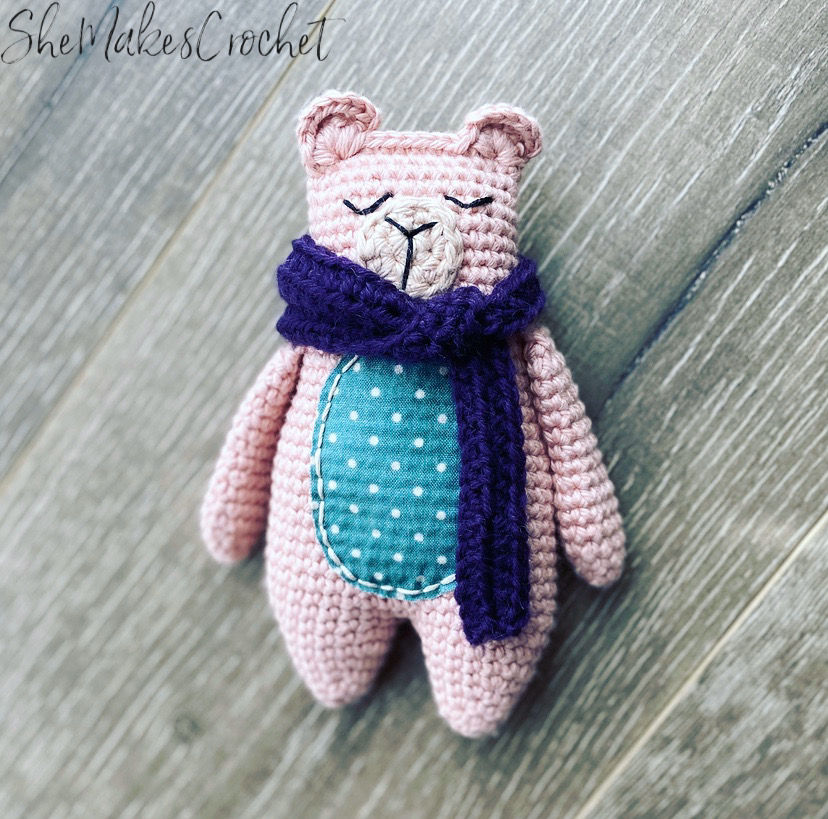
I love these little bears so much! After finishing my Rag Doll Bunny, I knew I was on to an idea that I could grow and do so much more with. I have always loved stuffed bears and find that they can have so much character.
I knew I wanted to keep the same tone as my bunnies. If you haven’t seen them, they were inspired by the beautiful rag dolls people make out of coordinating fabric prints – I think those fabric dolls are so simple and stunning all in one.
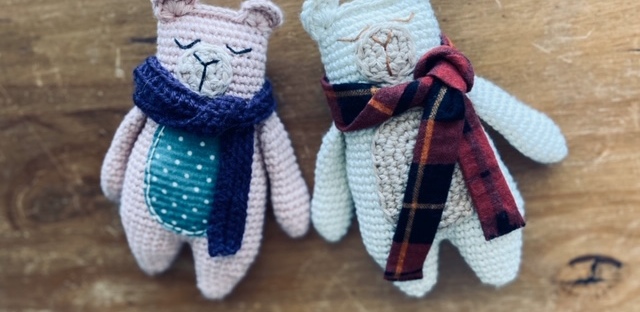
In order to achieve that look, I needed to create a bear that was light, floppy and flat, while keeping the essence of a bear. I knew I needed to work with muted tones and bring in fun pops of color and texture while keeping a simple, embroidered face.
It’s worth enthusiastically stating that this bear (like my bunny) is created without having to stitch on any limbs or ears! You make the arms first and set them aside. Then, work from the bottom up, stitch the arms in as you go and create the ears during the last round. How easy is that!?
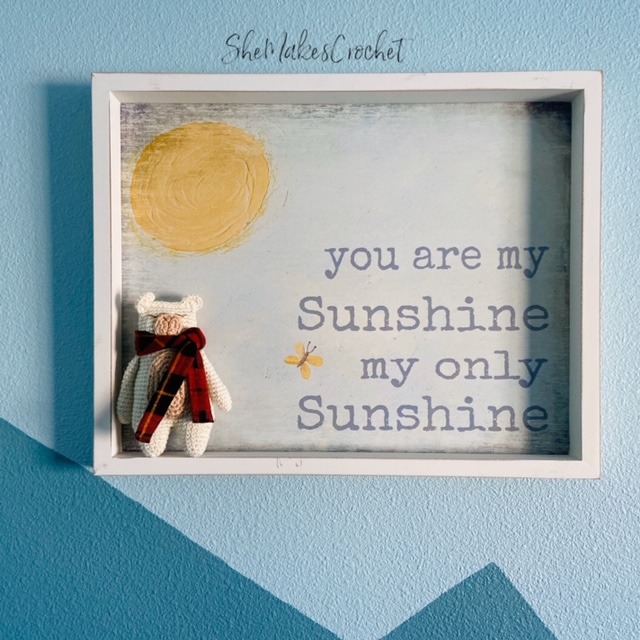
I had so much fun photographing this set. I think these would make stunning gifts for expectant parents. Can you imagine these sitting on a shelf in a nursery? You could easily adjust the colors and fabric prints to coordinate with many different themes.
Rag Doll Bear
Supplies:
- Worsted weight yarn for the bear – I used I Love this Cotton
- Contrasting yarn for the muzzle (and tummy if making the crochet tummy) – I used I Love this Cotton
- Contrasting yarn for the scarf (if making the crochet scarf) – I used Paton’s Classic Wool DK Superwash
- 3.5 mm crochet hook
- Scissors
- Needle for sewing down yarn tails
- Stitch marker (or scrap of yarn) – optional
- Poly-fil or stuffing of choice
- Embroidery Floss
- Needle for embroidery details
- Optional acrylic paint for painting cheeks – I didn’t end up doing this for my bears
- Optional scrap of fabric, straight pins, needle, sewing thread and tape measure if making a fabric scarf or fabric tummy. I also used Pellon Paper-Backed Fusible Web for my fabric tummy.
Finished Dimensions: My bears are 7 inches tall.
Abbreviations and stiches used:
- CH chain
- SC single crochet
- INC increase (i.e. work 2 SC in the same stitch)
- DEC ***decrease (i.e. work 1 SC over two stitches)***
- HDC half double crochet
- FLO front loop only
- BLO back loop only
***Please note, with amigurumi, I recommend making an invisible decrease. See pattern notes if you are unsure of the difference.***
Pattern Notes:
These bears are created amigurumi-ish style with some differences. The arms are created first and the rest of the bear is made as one piece! The arms get crocheted into the body as you go along so there is NO SEWING! Though you will need to sew on the tummy, muzzle and any other details you choose to add.
The arms are not stuffed which adds to that loose, floppy feel. The bear is stuffed at the very end and while it’s recommended to stuff firmly, don’t go overboard with this! You want a nice soft, squish to your doll
The arms are closed off before working into the bear (to keep the stuffing out and to add to the floppy feel). Please reference the closing off instructions below as the pattern will direct you to them later.
Closing Off
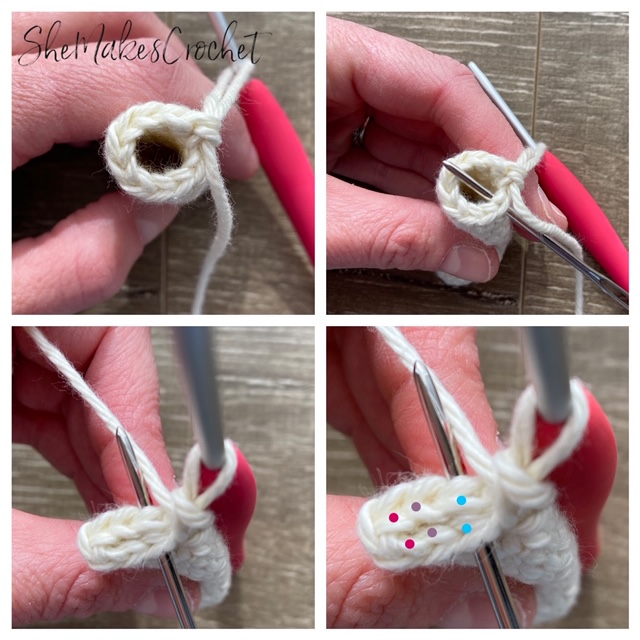
In essence, you will squish the tube flat. There will be 1 unworked stitch on either end and then you will work a SC stitch through stitches on both sides of the tube converting the tube into a single row of stitches.
Image 1: depicts an arm worked through round 15, i.e. the tube of 10 stitches.
Image 2: the needle is serving as a place holder for the skipped stitch. You will insert your hook into the first stitch after the needle AND into the last stitch you just created to work your first SC.
Image 3: shows what your arm will look like after making that first SC through both layers of the tube and the needle highlights the two stitches you will insert your hook into to work the next SC.
Image 4: further clarifies the 4 SC stitches you will complete and as you can see, after you work the blue, purple and pink stitches, there will be 1 stitch left unworked on the end.
Finally, the invisible decrease is recommended as it’s usually neater with this style of crochet. There are lots of great tutorials out there if you need more help. Briefly, insert your hook into the FLO of the next stitch, DO NOT draw up a loop and instead, insert your hook into the FLO of the next stitch after that. It’s a little awkward at first, but you’ll get use to it. Then, yarn over and pull through two loops (i.e. the two front loops) and then yarn over and pull through to complete the stitch.
Pattern:
Using bear color work the arms.
- Round 1: Magic ring and SC 6. Pull ring tight. (6 SC)
- Round 2: *INC, SC in next two. Repeat from * one time. (8 SC)
Round 3: *INC, SC in next three. Repeat from * one time. (10 SC) - Round 4: *INC, SC in next four. Repeat from * one time. (12 SC)
- Rounds 5-7: SC all around. (12 SC)
- Rounds 8: *DEC, SC in next four. Repeat from * one time. (10 SC)
Rounds 9-15: SC all around. (10 SC) - Round 16: Close off the arm by working 4 SC – see closing off instructions in pattern notes above if unsure.
- Break the yarn and complete a second arm. Place both arms aside for now.
Continue to make the legs
- Round 1: Magic ring and SC 6. Pull ring tight. (6 SC)
- Round 2: *INC, SC in next two. Repeat from * one time. (8 SC)
- Rounds 3: *INC, SC in next three. Repeat from * one time. (10 SC)
Rounds 4: *INC, SC in next four. Repeat from * one time. (12 SC) - Rounds 5: *INC, SC in next five. Repeat from * one time. (14 SC)
- Rounds 6: *INC, SC in next six. Repeat from * one time. (16 SC)
- Rounds 7: SC all around. (16 SC)
- Break the yarn and complete a second leg. Do not fasten off after the second leg.
Continue on to the body
Now we will attach the legs and start working the body.

Image 2: after working CH 1.
Image 3: illustrates working up until the first 7 SCs as referenced below.
Image 4: shows what you should have at the end of the round.
- Round 1: CH 1 and pick up second leg, SC in first 7 stitches of second leg, INC in next, INC in next, SC in last 7 stitches of second leg, SC in CH 1, SC in first 7 stitches of first leg, INC in next, INC in next, SC in last 7 stitches of first leg, SC in back loop of CH 1. (38 SC)
It may be helpful (or not) to mark the first stitch of each round as we will be working in continuous rounds.
- Rounds 2-11: SC all around. (38 SC)
Note: I would like to move the seam so that rounds are starting and ending at the side of the body, as such, Round 12 is not a complete round.
- Round 12: (incomplete round to move seam) SC 10
- Round 13: DEC, SC 17, DEC, SC 17. (36 SC)
- Round 14: SC all around. (36 SC)
- Round 15: DEC, SC 16, DEC, SC 16. (34 SC)
- Round 16: SC all around. (34 SC)
- Round 17: DEC, SC 15, DEC, SC 15. (32 SC)
- Rounds 18-19: SC all around. (32 SC)
Attach the arms
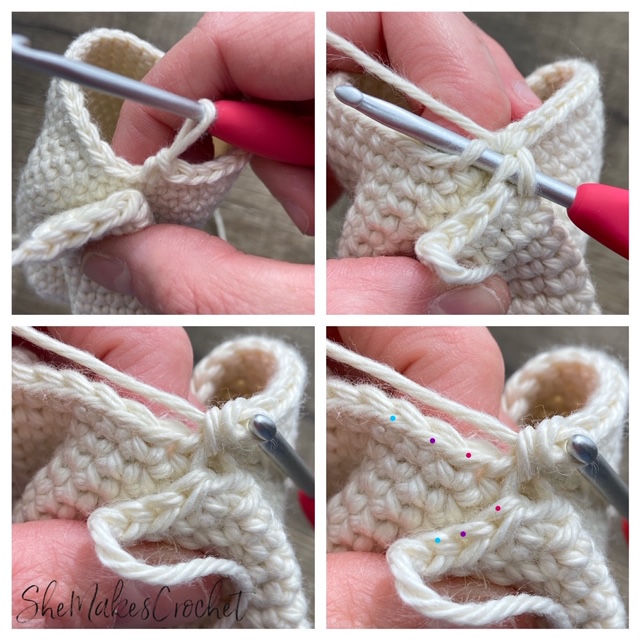
Image 2: illustrates inserting your hook through the BLO of the first stitch of the arm and the FLO of the next stitch of the body.
Image 3: depicts what it looks like after making the first stitch to attach the arm.
Image 4: shows where you will work the remaining three stitches, again through the BLO of the arm and FLO of the body in order to finish attaching the arm.
Note: we will be attaching the arms over the course of 2 rounds.
- Rounds 20-21: SC 15 and attach the first arm over the next 4 stitches, inserting your hook through the BLO of the arm and the FLO of the body. (Refer to the image above for further details if unsure.) SC 12 and then attach the second arm over the next 4 stitches, again by inserting your hook through the BLO of the arm and the FLO of the body as you did for the first arm. SC 29. (32 SC)
- Round 22: DEC, SC 14, DEC, SC 14. (30 SC)
- Rounds 23-25: SC all around. (30 SC)
- Round 26: DEC, SC 13, DEC, SC 13. (28 SC)
- Rounds 27-28: SC all around. (28 SC)
- Round 29: DEC, SC 12, DEC, SC 12. (26 SC)
- Rounds 30-31: SC all around. (26 SC)
Close off the head and create the ears
Stuff your bear, being sure to get stuffing all the way down into his legs. (I sometimes use the back of my crochet hook for this.) Again, you want to stuff the doll firmly, but not too firmly so he will be soft and a bit squishy.
- Initial head closing: Just like you did when closing off the arms, you will squish the head. Skip the first stitch and work a SC through both layers of the tube, inserting your hook into the next stitch (after the skipped stitch) and into the same stitch you just completed. Work a second SC through the next pair of stitches. (See the top two images below.)
- Work the first ear part 1: Turn your work and make 4 SC and a SS into the space you worked the first SC above to close off the head. (See the bottom two images below.) Hint: you may want to draw up slightly longer loops when working these stitches.
- CH 1 and turn.
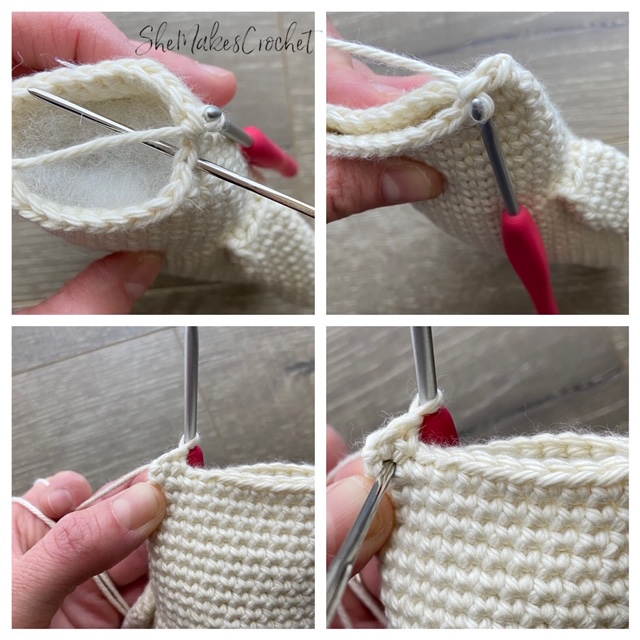
Image 2: depicts what things should look like after making the first two stitches to close off the head.
Image 3: is a view after completing the first two stitches and turning your work.
Image 4: the needle depicts where you will work the 4 SC and 1 SS of the ear.
- Work the first ear part 2: Skip the SS and work 2 SC into the FLO of the next two stitches. SC in the next FLO and 2 SC into the last FLO then (See the top two images below.)
- Make 1 SC into the same space you worked into during part 1 and finally (See the first bottom image below.)
- Make 1 SS through the next pair of stitches on the head. (See second bottom image below.)

Image 2: illustrates the skipped SS and the 4 front loops you will be working SC stitches into (pink dots)
Image 3: the needle is pointing to the place where you will work the final SC of the ear. (The same space you used for part 1.)
Image 4: the needle depicts the pair of stitches you will insert your hook into in order to work the final SS of the ear
- Close the remainder of the head: Work 6 more SC stitches through both layers of the head followed by 1 SS through both layers.
- Work the second ear part 1: work 2 SC through both layers of the head. Hint: at this point, you should have one unworked stitch at the side and the head should be completely closed. (See the first, top image below.)
- Turn your work and create 4 SC and 1 SS through the space where you worked the last SC above. (As you did with the first ear. See the second, top image below.) Just like with the first ear, it may be helpful to draw up slightly longer loops for these stitches. (See first, bottom image below.)
- CH 1 and turn.
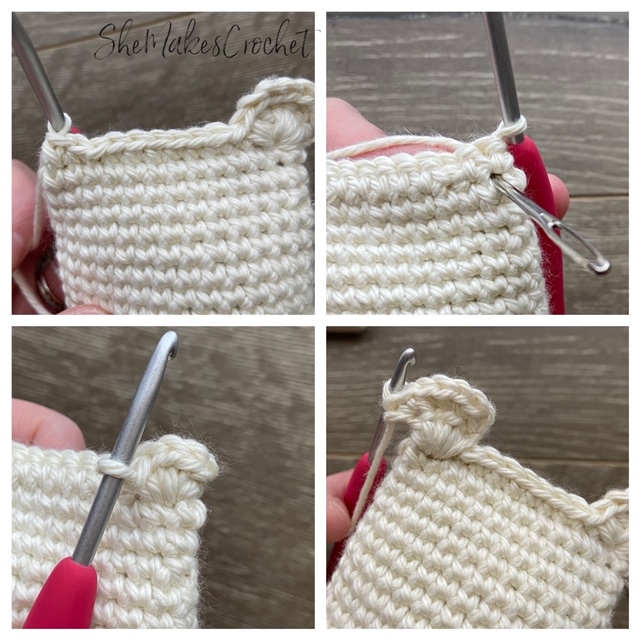
Image 2: the needle is the place holder for where the 4 SC and 1 SS of the second ear will be worked.
Image 3: shows what you should have after making those 4 SC stitches and the 1 SS
Image 4: illustrates after completing a CH 1, turning your work and making the stitches into the FLO as described in part 2 below (and as you did with the first ear).
- Work the second ear part 2: Skip the SS and work 2 SC into the FLO of the next two stitches. SC in the next FLO and 2 SC into the last FLO then (See the first, top image below.)
- Make 1 SC into the same space you worked into during part 1, as you did with the first ear and finally (See the second, top image below.)
- Make 1 SS through that same space as you did above. (See the bottom two images below)
- Break yarn and fasten off.

Image 2: the needle is a place holder for where you will work the final SC and SS of the ear
Image 3: shows the completed ear.
Image 4: again shows the completed ear and the muzzle placement (without the scarf).
Add the Details:

This is always my favorite part about making dolls, but I know that’s not the case for everyone! All these features are optional and can be modified based on your ability and preference. My pink bear has a fabric tummy and a crochet scarf, while the white bear has a crochet tummy and a fabric scarf. I will outline instructions for everything – mix and match accordingly.
Crochet the muzzle
- Round 1: Magic ring and work 2 SC, 2 DC, 2 SC. Pull ring tight. (6 stitches)
- Round 2: 2 SC into first stitch, SC and HDC into next, [DC, CH 1 DC] into next, [DC, CH1, DC] into next, HDC and SC into next and 2 SC into last, SS join. (12 stitches and 2 CHs)
- Break yarn and stitch onto face using the yarn tail.
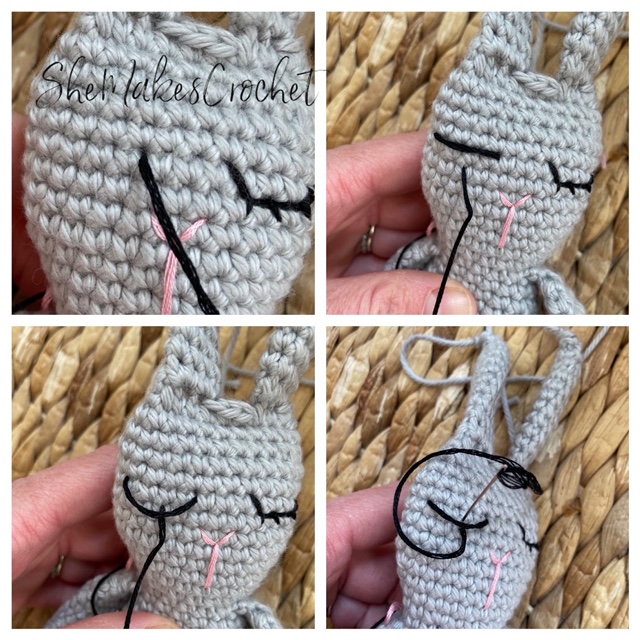
Embroider the face
I use a sharp needle. As you can see for the eye, I stitch a long straight line. Then, I pull the stitch loose and into a “U” shape, next, tack the bottom of the “U” down with a very tiny stitch.

Crochet the scarf
Using scarf color
- Row 1: CH 76 and HDC into second CH from hook and into each remaining CH. (75 HDC)
- Row 2: CH 1, turn. HDC into each stitch. (75 HDC)
- Break yarn. Weave in ends.
Fabric Tummy
- You guys, I didn’t take any pictures of this! I don’t know why, but honestly – as I’ve shared before, my sewing skills are what I would consider to be an advanced beginner at best. As such, my methods may not be the best!
- For the fabric tummy, I tried something that was new to me and used Pellon Paper-Backed Fusible Web. I did this because I have no idea how to make a curved hem. I have two other ideas if you don’t have the adhesive – First would be to zig zag stitch around the raw edge to prevent fraying and then stitch the fabric onto the bear without the adhesive and the zig zag stitch edge would have a decorative effect. You’d need a machine for that option. Second, use something like felt that doesn’t fray. I’m also wondering if a potential third option could be to apply a glue to the edges of the fabric in order to prevent it from fraying before stitching it down.
- Back to my method, I used a sheet of paper to cut an oval to a size of my liking and then followed the directions on the box to apply the fusible web – this method requires applying an iron. Again, I followed the directions on the box and used a damp press cloth and applied the iron for several seconds only. Reminder: my bear was cotton, I would not try this method if you used acrylic yarn.
- Then, I used embroidery floss to back stitch along the perimeter of the fabric because I like the look of the stitches.
- Feel free to use a different way and please share if you know of a better way or have tips for sewing a hem on a circle!

Crochet the tummy
Using contrasting color
- Round 1: Ch 7 and make 2 SC into second CH from hook, 1 SC into the next four CHs, and 2 SC into the last CH – rotate your work and working in the backloops of the starting CH work 2 SC into the first CH, SC into the next four CHs and finally may 2 SC into the last CH. (16 SC)
- Round 2: INC, INC, SC 4, INC, INC, INC, INC, SC 4, INC, INC. (24 SC)
- Round 3: INC, SC, INC, SC, SC 4, *INC, SC, repeat from * 3 more time, SC 4, INC, SC, INC, SC. (32 SC)
- Round 4: INC, SC 12, INC, SC, SC, INC, SC 12, INC, SC, SC. (36 SC)
- I worked several slip stitches (about 5) before fastening off in order to make the shape a little nicer.
- Break yarn and stitch onto body using the yarn tail.
Sew the scarf
My sewing skills fall into the advanced beginner category at best and full disclaimer – this may not be the best way to make a scarf, but it worked for me, so I’ve outlined my process.
I used a sewing machine, BUT I definitely think you could make this scarf by hand! If you use something like felt, you don’t have to worry about fraying and wouldn’t have to do any sewing. Though, I would probably use some embroidery floss to make some tiny stitches to elevate the felt.
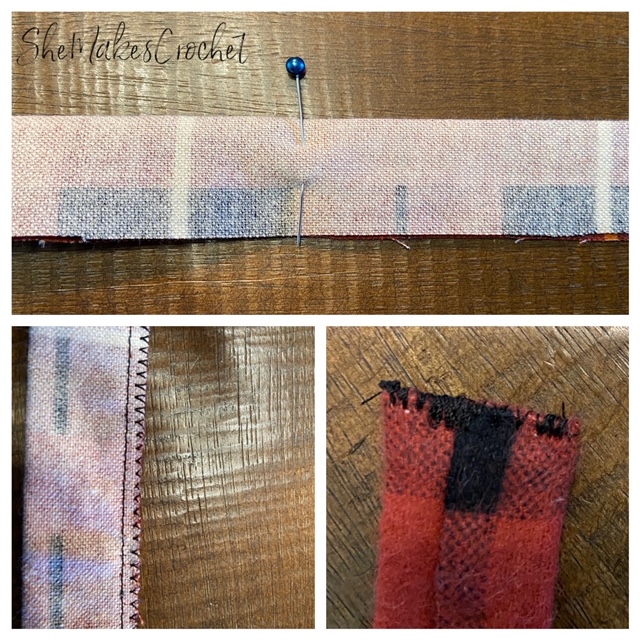
Fold the strip in half with the wrong side facing out and pin into place (image 1).
Stitch along the edge to close off. I also did a zig zag stitch to prevent fraying (image 2).
Turn the tube right side out.
Fold the ends at either side under and inside of the tube.
Stitch the short edges closed. I did a zig zag stitch (image 3).
I love when people share their finished pieces. If you share your work on facebook or instagram, please tag me so I can see it @shemakescrochet.

You are free to share your finished work, to include selling your finished products, but please credit me – SheMakesCrochet – as the pattern designer. Please do not distribute this pattern or any portion of it, instead direct people to my blog. THANK YOU!


lovely bear, thank you for your tutorial.
You’re welcome! I’m glad you like it.
I love this thank you!
You are welcome, and thank you!
Thanks for a lovely pattern. But I have problems with the ears. Do you have a video of how to make them? Just can’t figur out the description. Thanks.
I don’t have a video… I wonder if it will help to restate with less words.
So for the first ear, make 2 SC to close off the top of the head.
Turn your work and make (4 SC and SS) into a stitch that’s near the side of the head and one row below your current row. So in other words, you’ll be making extended SC stitches and an extended SS.
CH 1 and turn your work. The final round for the ear is working into the FLO of those 4 SC (extended) stitches you just made. You will make 2SC into the first, 2SC into the second, SC into the third and 2SC into the fourth.
Now you have to get back down to finish closing the head so make another (extended) SC by working into the same place you used to make the other extended SC stitches.
The final SS should be back at the top of the head to continue closing it off.
The second ear is made the same way – make extended SC stitches into the last stitch in the row below and then working into the FLO of those 4 extended SC stitches you just made. End it by coming back down to the head by working a an extended SC and extended SS down (two rows now) into that same space you worked the 4 extended SC and extended SS.
I was trying to get this made in one piece, but I’d the ears are really challenging still, you could close off the head and fasten off.
Then reattach at the top and side of the head and work something like 5-7 HDC stitches into the same space to make a shell/half circle shape. Fasten off and repeat for the other ear.
I hit reply too soon when I was trying to edit “I’d” to say if in that comment above. Please let me know if you are still having problems! I can try to figure something else out. I’ve never made a video before, but could consider trying that if it would help people.
I’ve made a bear for my friend’s birthday, and I wanted to thank you for such a wonderful pattern that is written out so clearly and for free! I think it’s turned out great – thank you so much! d:^)
Thank you so much for such the sweet note! It’s easy to give things for free when I know people are enjoying them 💕
I am having trouble with the ears. I don’t know what the SS means??
SS means to slip stitch. Does that help?
Bardzo ładny wzór, bardzo dobry opis. Dziękuję. To doskonały pomysł, aby uniknąć przyszywania łap i uszu i bardzo ułatwia pracę. Co prawda korzystam z translatora i nie wszystkie opisy są dobrze przetłumaczone, ale zdjęcia pozwalają zrozumieć, o co chodzi.
Thank you for the comment! I really love the feedback about the pictures being helpful as this pattern is not written in your native language. I’m glad you enjoyed it.
This pattern is so cute & easy to make. I make bears for the hospital, this works up pretty fast. I think the kids will like this.
Oh I love this so much! What a sweet thing to do. I hope these bears work out well for you.
Thank you for this design. There are many refugees from Ukraine in Poland, many of them children. My friend is on duty in a common room in Wrocław, where Ukrainian children sometimes stay. I have already made a dozen or so teddy bears that she gave to children.
Foxes, cats, rabbits and dolls are cute too, but teddy bears are easier to make and knitting faster. However, I changed the look of my face – the bears I make have beaded eyes.
It is such a sad time in our world right now. Thank you so much for your kind heart! I’m sure that those toys are a source of comfort for those children and I hope it reminds them that there is still good in the world. I am very touched you are using my design. Thank you for taking the time to share this message with me.
Can you tell me how big the finished bear will be? Thank you!
It should say in the pattern. They are about 7 inches 🙂