
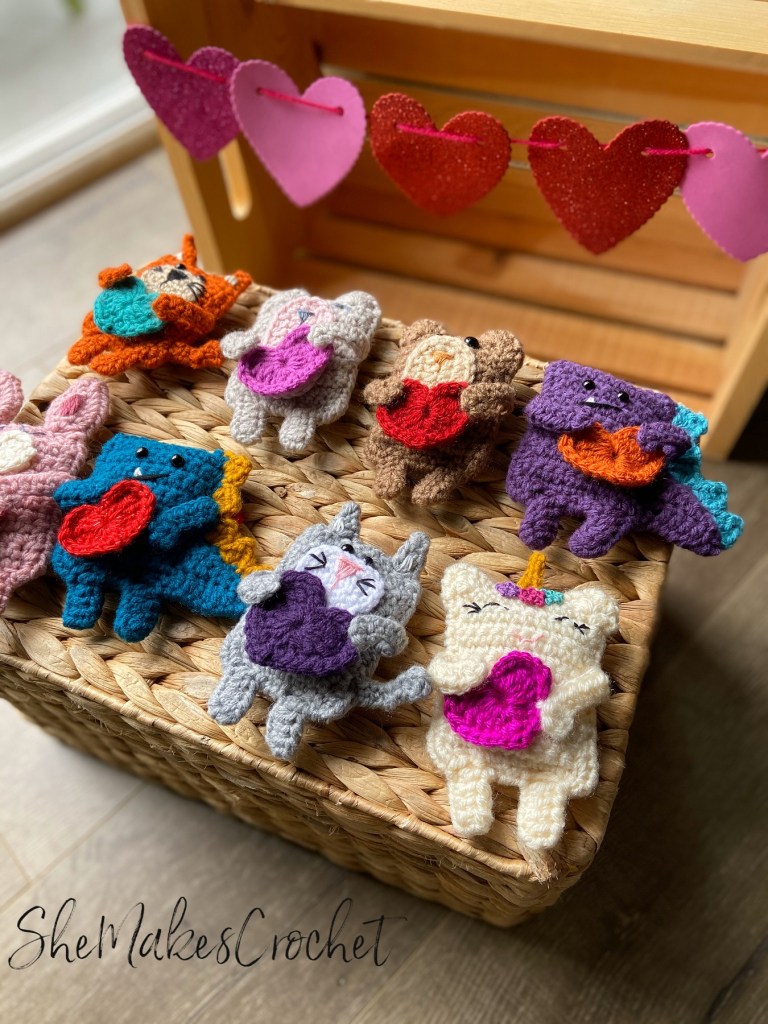
Here it is, the fourth of five Valentine’s Day candygrams. The cat, bear and dinomonster are already posted on the blog. I have one more after this one, so be on the lookout for it sometime in the next couple of days. a bunny who is also posted.
I’m starting to feel a little sad that there aren’t going to be anymore of these. I have enjoyed making them and I’ve made so many – I normally burn out making the same thing. However, these candygrams work up quickly, making them a satisfying project. Not to mention, they are so easy to personalize. Each one turns out different, it’s fun to play with color combinations and probably the best part is that they all look so cute together!
I really love this unicorn candygram, well I really love all of them, but I think this one is just a little extra sweet. The tiny flowers and soft colors are so pretty.
If the thought of crocheting tiny flowers with embroidery floss makes you squirm, don’t be intimidated! First, it’s not as hard as you would imagine it to be. Second, the flowers actually look more realistic if they aren’t perfect so don’t stress over how they are coming together. Third, they are totally optional! You could try something like little pieces of felt, maybe some pretty buttons or beads. I’ve even seen tiny ribbon flowers you can buy at the craft store that you could attach and would be adorable.

Supplies:
- Small amounts of yarn in various colors to achieve desired look. I used worsted weight yarn from my stash – primarily Loops & Threads Impeccable yarn
- Main Color
- Horn Color
- Heart Color
- 3.75 mm crochet hook
- Scissors
- Needle for sewing down yarn tails and stitching panels together
- Embroidery floss
- 1.75 mm crochet hook (if making flowers from embroidery floss)
- Needle for embroidery details
- 6 mm safety eyes (optional – I didn’t use them on any of the unicorns I made, I loved the embroidered eyelashes)
- Small amount of poly-fil or stuffing of choice
Note about supplies: This project can be easily customized to accommodate supplies you may already have on hand. Please be mindful of safety and durability when selecting embellishments, especially if you intend to give this to a child. For example, something like safety eyes could be a choking hazard and you may want to embroider eyes instead. You may also consider gluing googly eyes, using buttons, felt or even puff paint for the details on the face or flowers, if appropriate You could buy tiny ribbon flowers to stitch or glue into place. You could use felt, card stock or foam for the heart instead of crochet. Scrap yarn would make an excellent filling if you don’t have poly-fil and splitting a strand of yarn is a great substitute for embroidery floss.
Finished Dimensions: Finished piece is approximately 5 inches tall
Abbreviations and stitches used:
- CH chain
- SC single crochet
- HDC half double crochet
- DC double crochet
- SS slip stitch
- TR treble crochet
Pattern Notes:
The beginning CH 1 or CH 2 at the start of rows does not count as a stitch throughout unless otherwise specified.
The panels are worked in one continuous piece. In other words, the horn, ears and limbs are crocheted as you make the panel. You will crochet a rectangle shape and when you get to the instructions for Row 15, you will work around the perimeter of the rectangle and this is when the horn, ears and limbs are created. The pattern instructions for this row (Row 15) will be broken down into sides (i.e. head, sides, and bottom) as instructions for each side of the rectangle will vary.
You will make a front and back panel and while similar, they are not exactly the same. To keep the arms flexible, they are only made on the front panel. The horn is also only made on the front panel. The feet and ears are made on both and stitched together, giving them more stability.
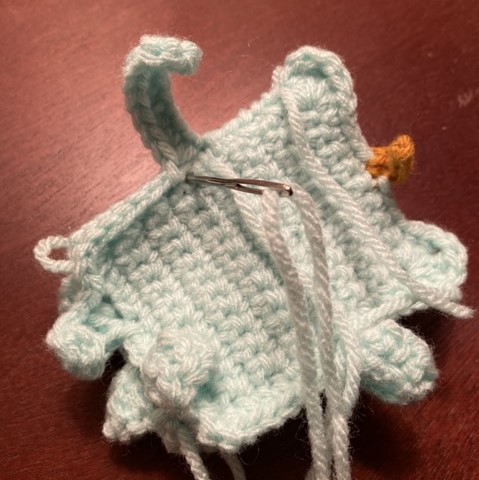
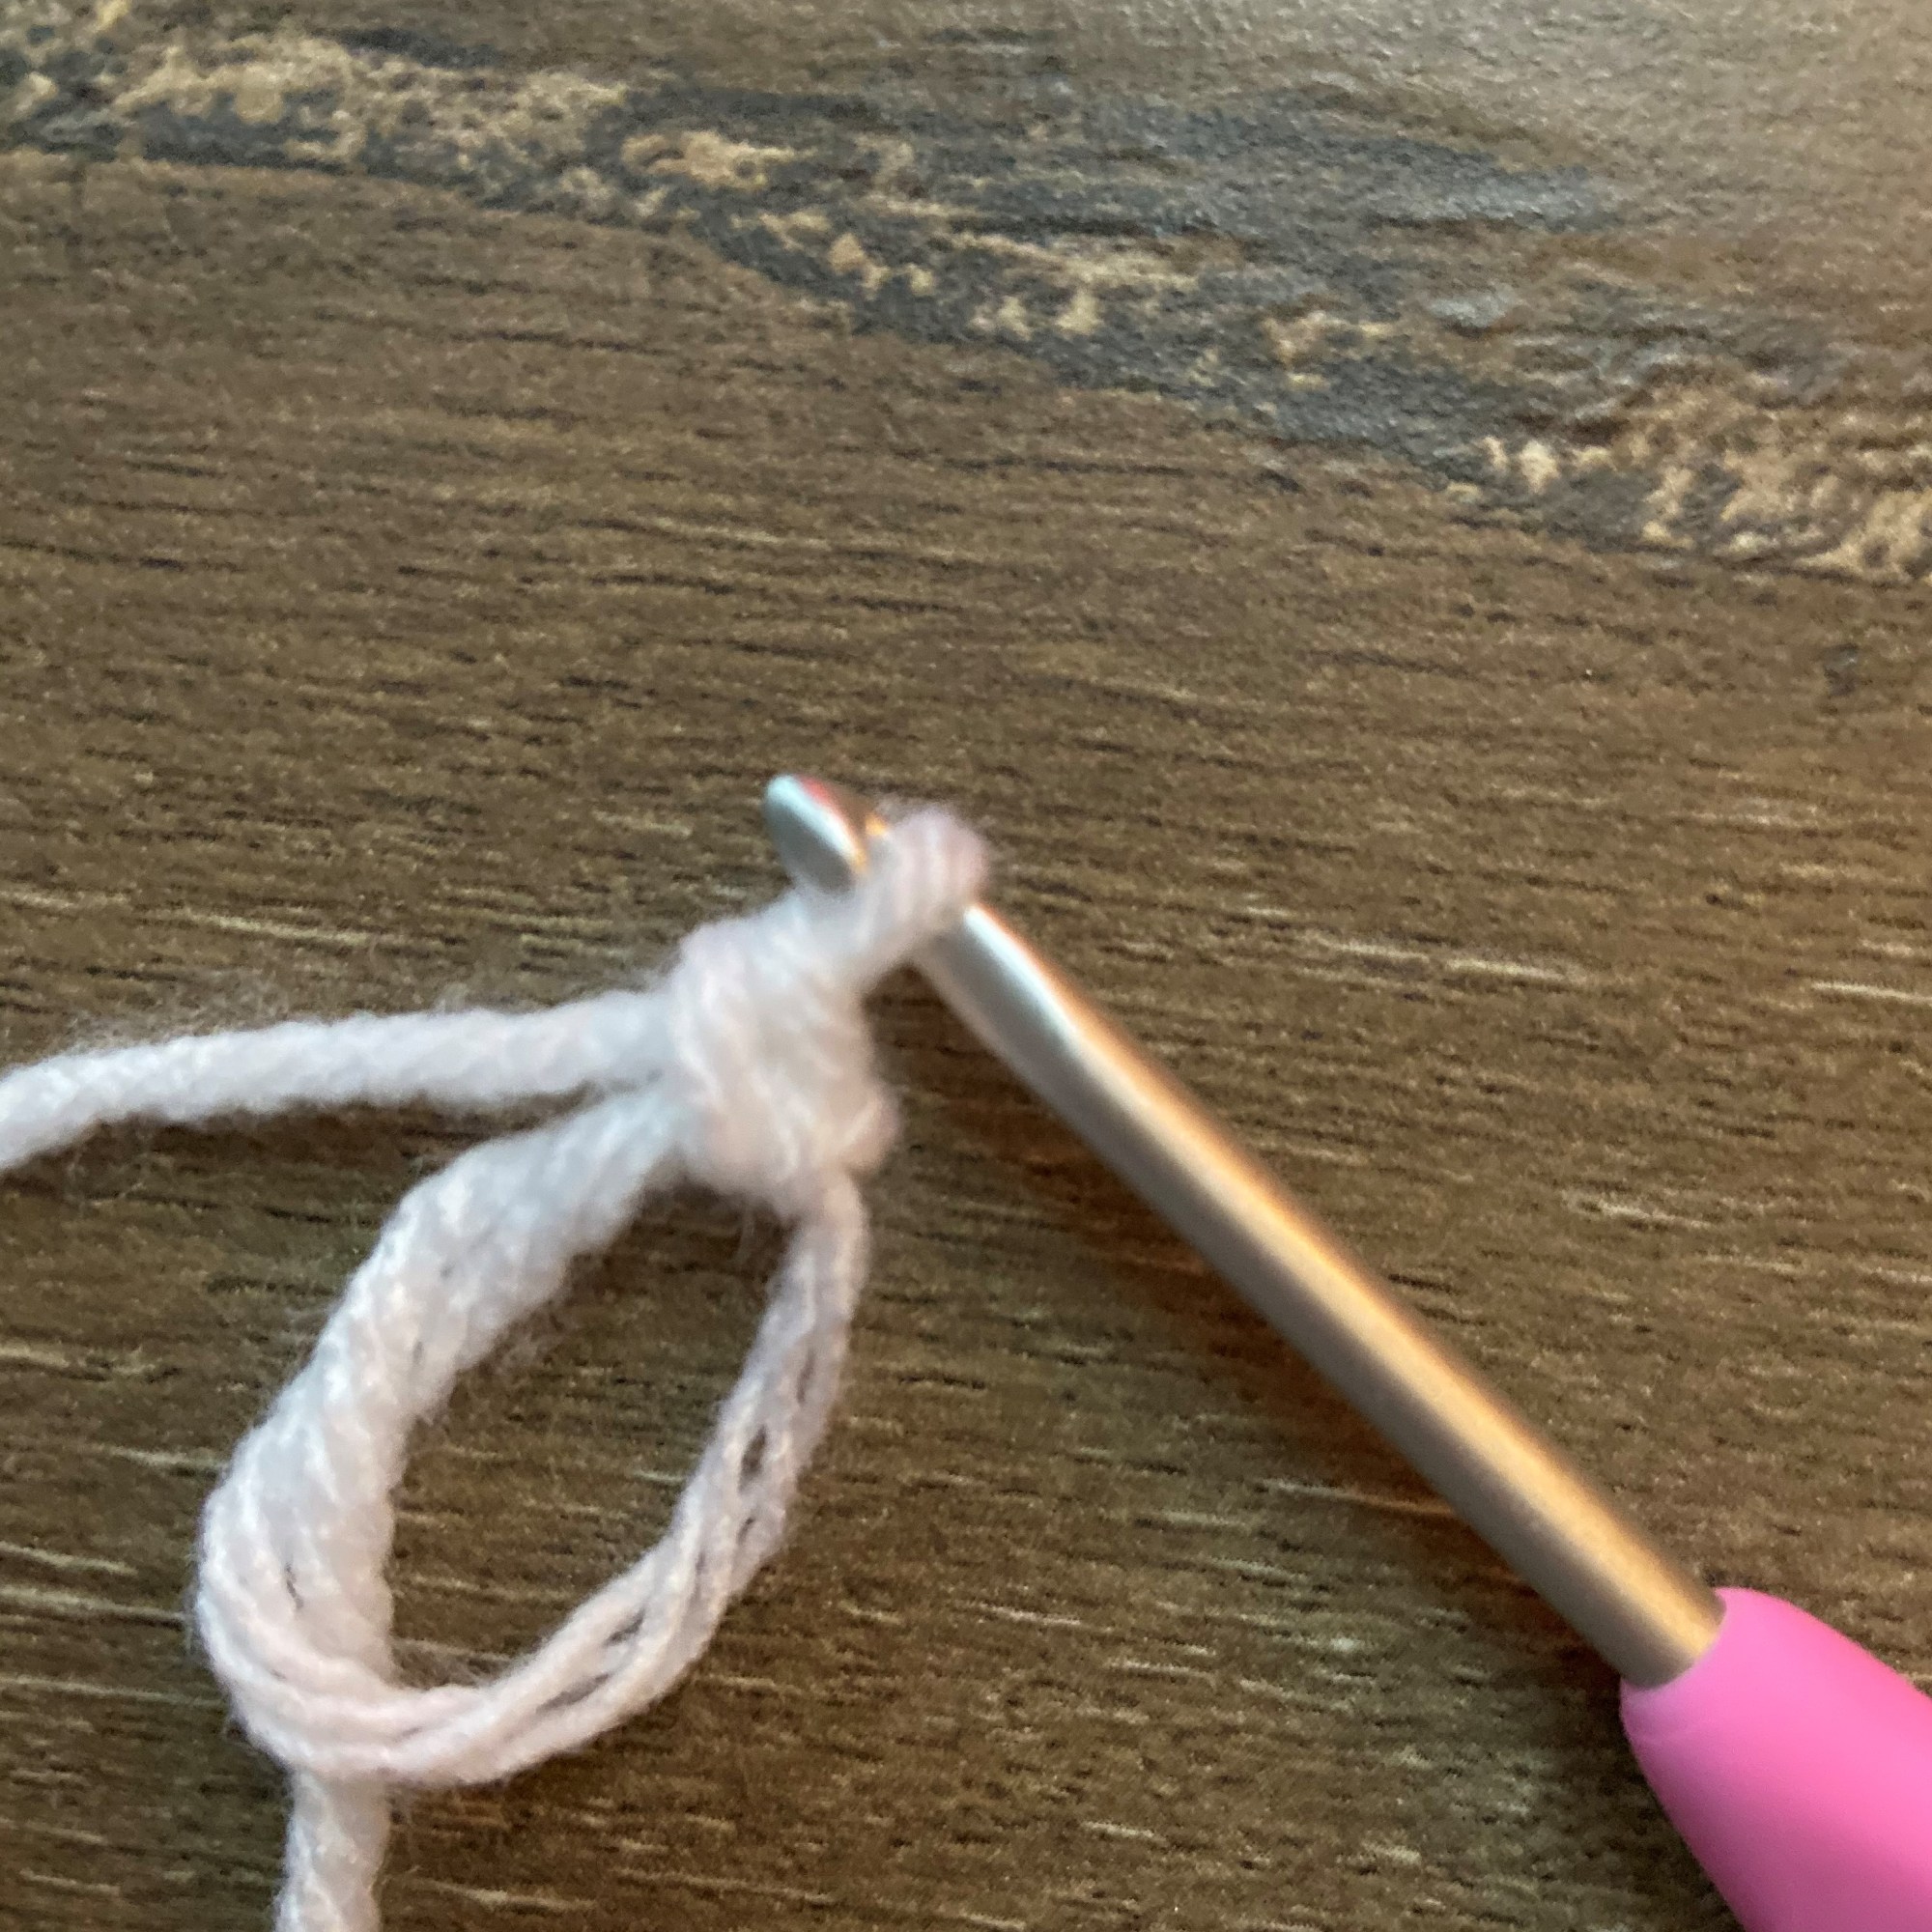
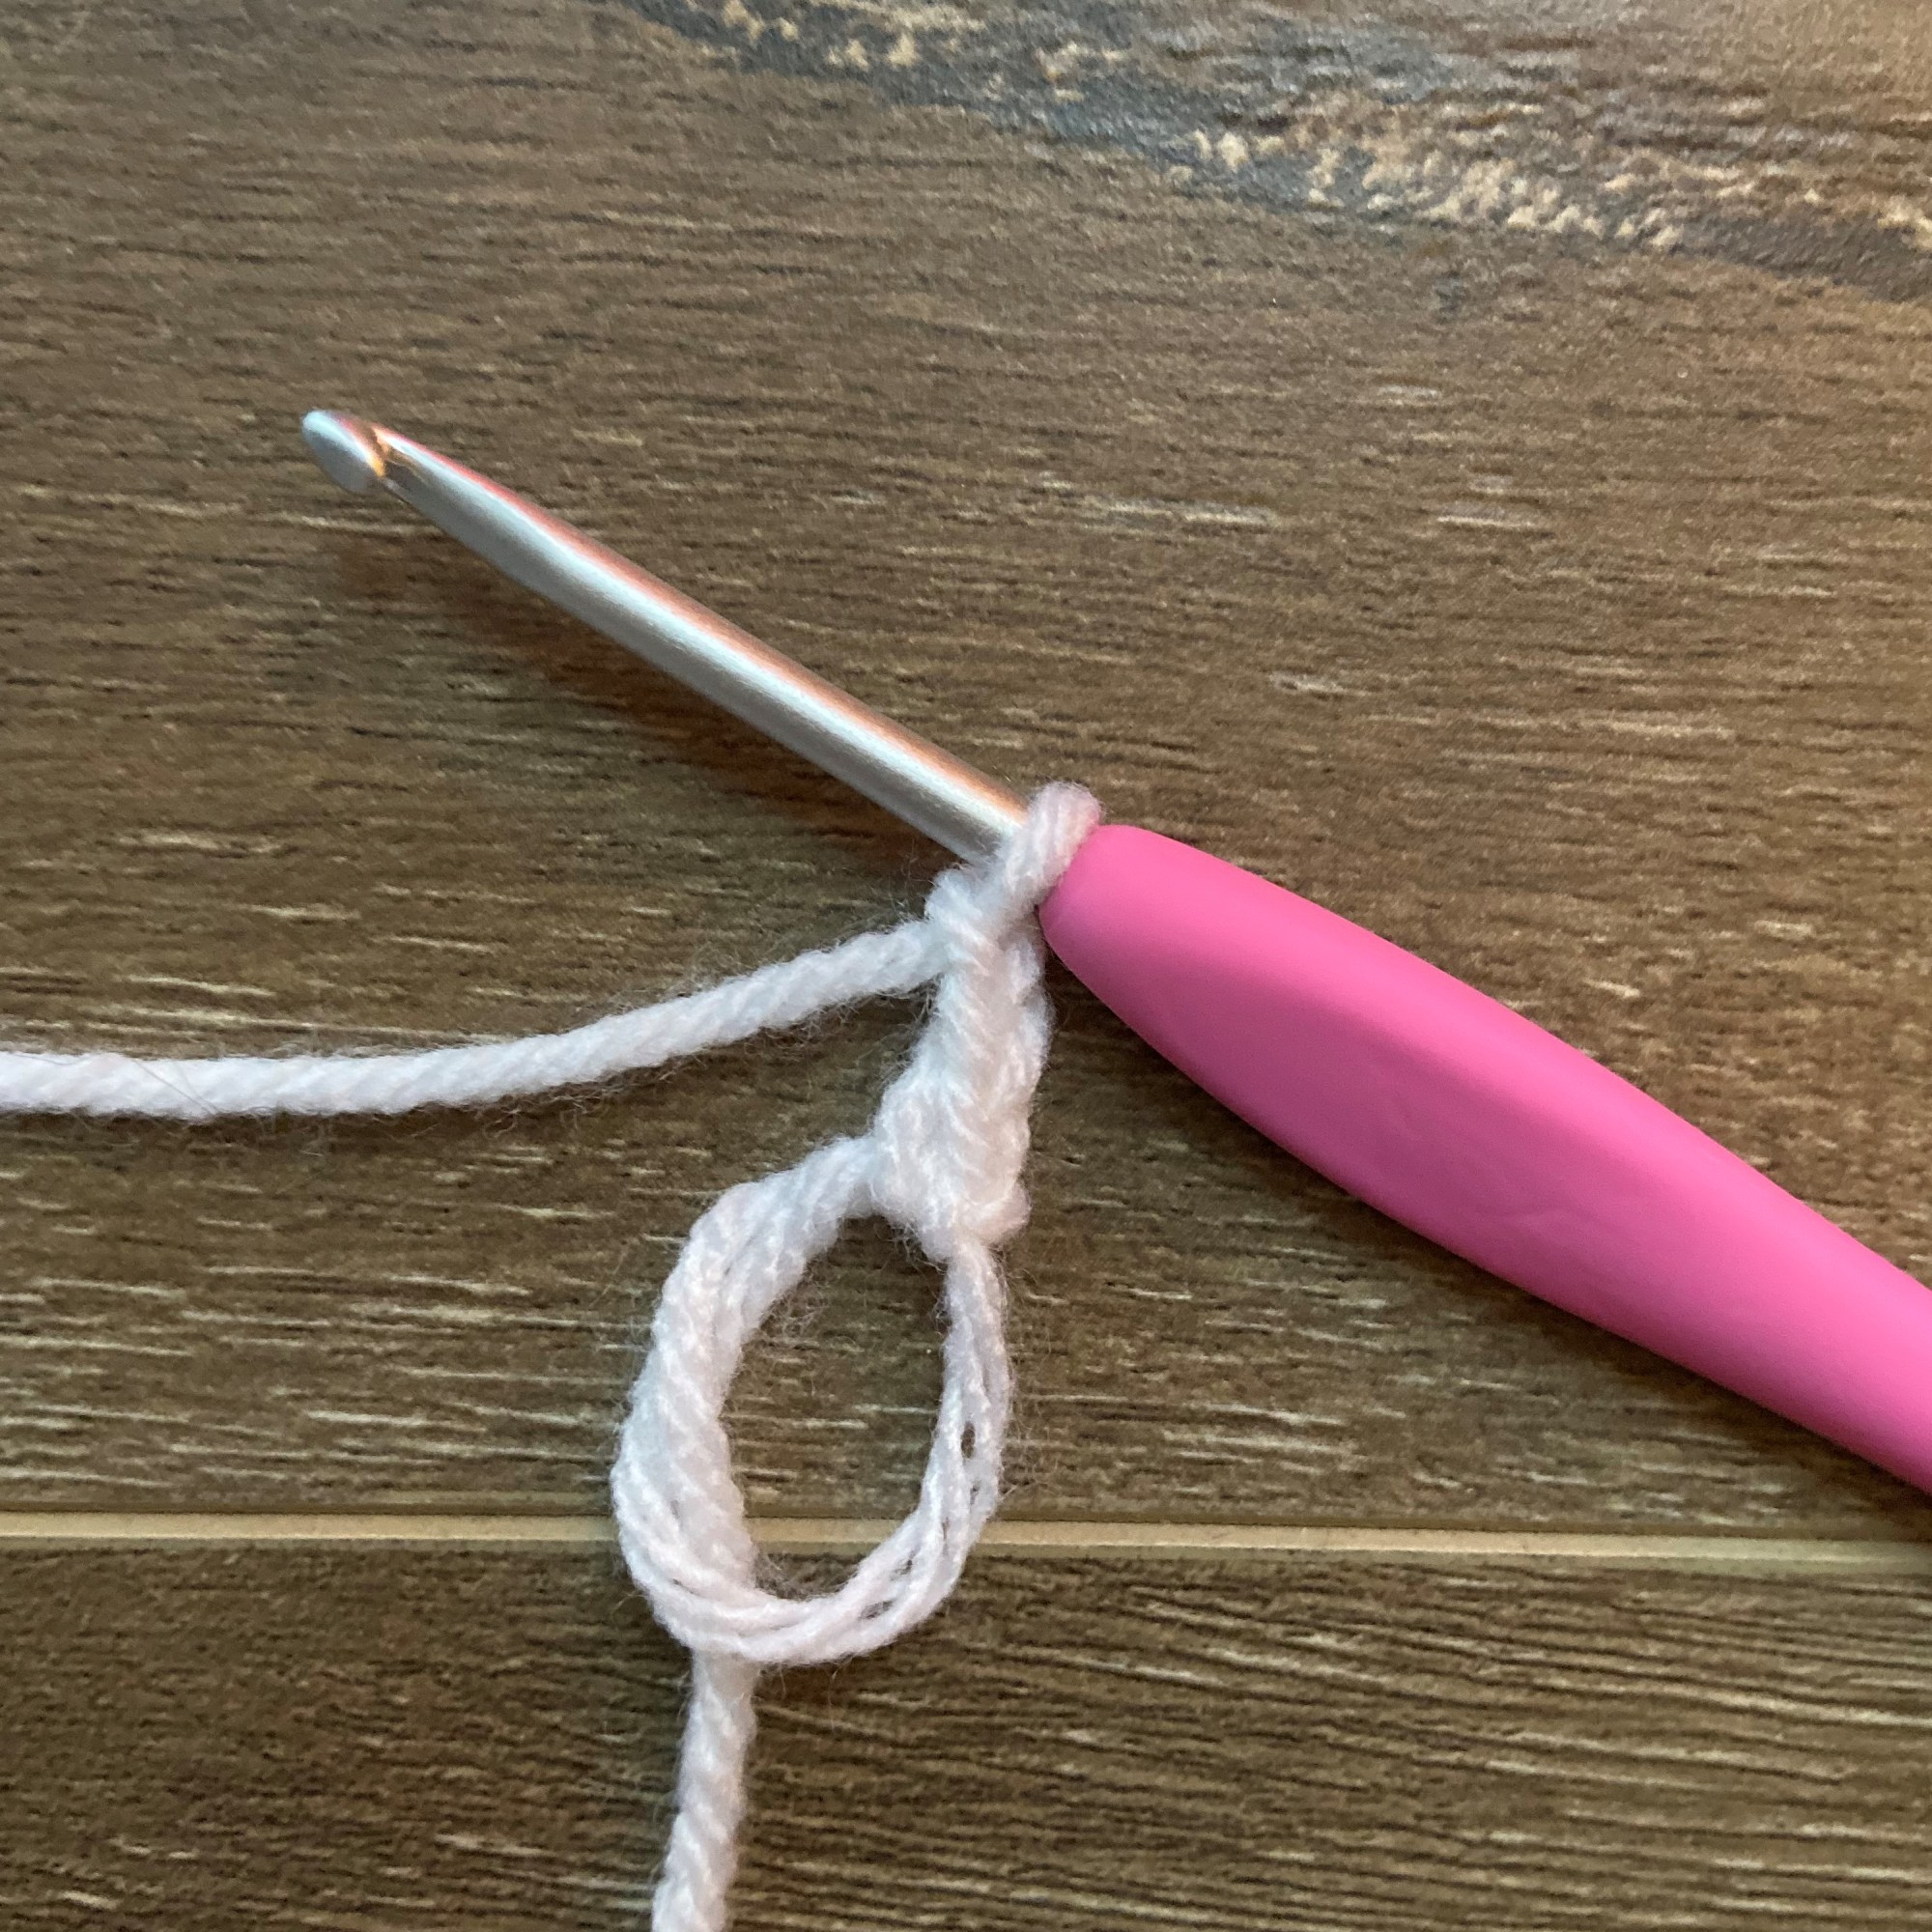
The panels are whip stitched together and are lightly stuffed before closing off completely. The limbs need to be whip stitched around (with exception to the arms and horn) AND the rectangle needs to be closed off to keep the stuffing in that part only. After stitching around a limb (image 1 below), it is recommended to make 2-3 stitches across the bottom of the limb (i.e. along the perimeter of the rectangle) to close it off (images 2 and 3) before continuing to whip stitch around the remainder of the panel.

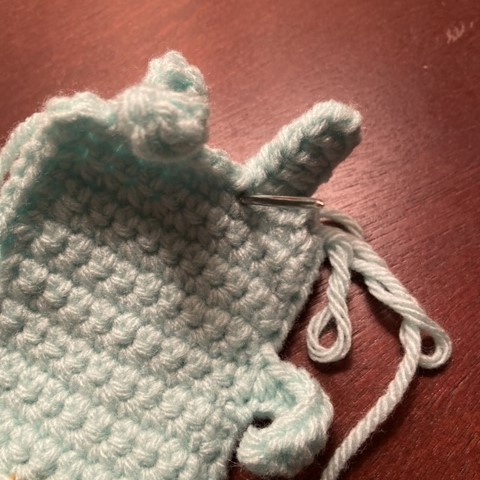

The arms and horn are only worked on one panel and should be flexible – do not whip stitch around the arms or horn! Instead, when you reach an arm or the horn, work 1-3 stitches across the base (i.e. along the perimeter of the rectangle) to close it off. See images below:


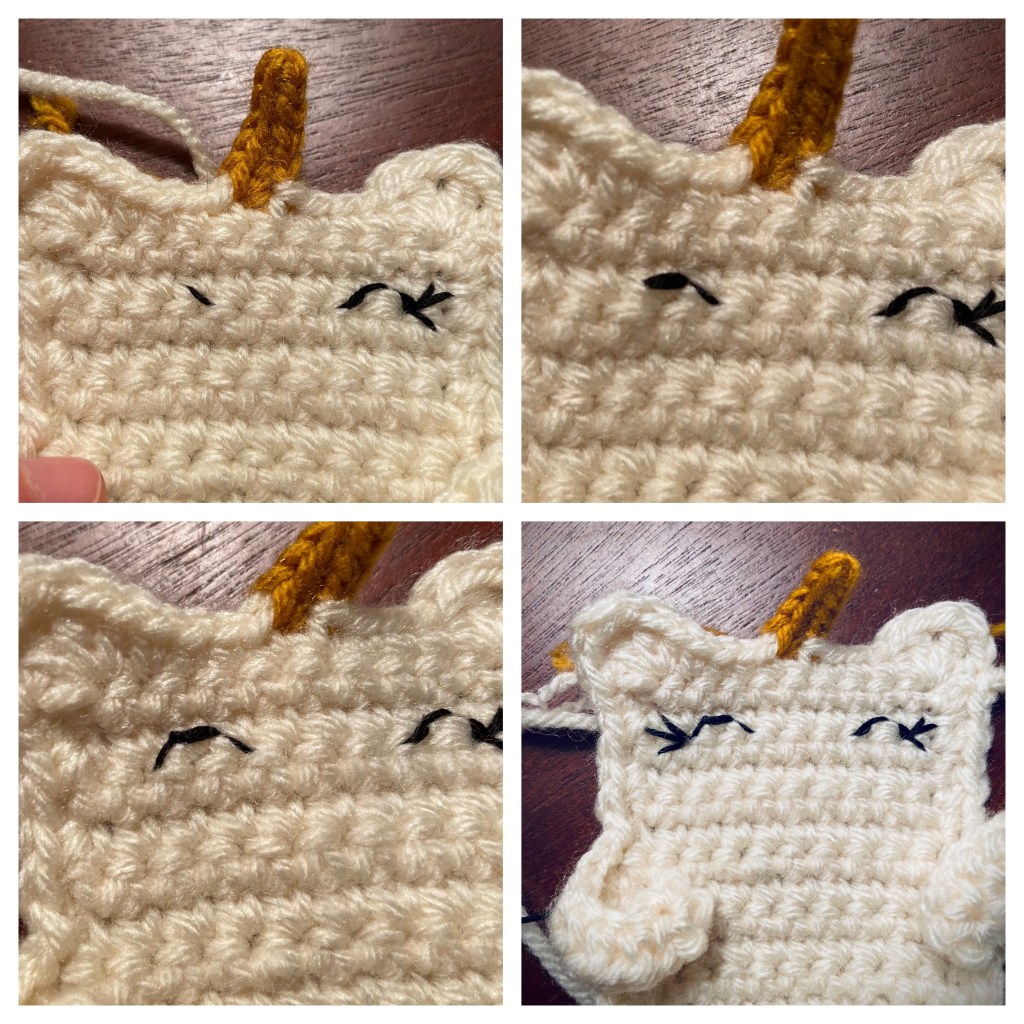
Finally, when embroidering details, I find it works best to use a sharp needle and try to make stitches that penetrate through the fibers of the yarn, not in the gaps between crochet stitches. See images below to further illustrate how I embroidered the face:
Pattern Front Panel:
Using main color
Row 1: CH 11, SC in second CH from hook and in each remaining CH (10 SC)
Row 2: CH 1, Turn. SC in each stitch across (10 SC)
Row 3-14: Repeat Row 2
Row 15: *this Row is worked along the perimeter of the rectangle and will be broken down into sides*
Head: Turn. Do NOT CH and work the following in the first stitch: DC, CH 1, TR, CH 1, DC, HDC. (Hint: the next stitch of the row may be buried under the ear.) SC in the next 4 stitches and change to the horn color on the final yarn over of the last SC. CH 6 and SS in second CH from hook, SS in next, SC in next two CHs and HDC in next changing back to the main color on the final yarn over. Do NOT skip any stitches and SC in the next 4 stitches. Work the following in the last stitch: HDC, DC, CH 1, TR, CH 1, DC.
Edge: Rotate work. Hint you are working along the edge into the sides of rows; however, I will refer to these spaces as stitches. CH 1 and work 5 SC along the edge. SS in next stitch of the edge and CH 9. Work 4 SC in second CH from hook and 1 HDC in next 6 CHs (first arm made). Skip 1 stitch along the edge and SS. Work 5 SC along the edge and make 3SC in the last stitch of the edge.
Bottom: Rotate work. Hint: you should be working in the backside of the starting CH; however, I will refer to these as stitches. SS into first stitch and CH 7. DC in third CH from hook and make 1 DC in next three CHs (first leg made). Skip 2 stitches (starting CH of Row 1) and SS into next. SC in next 2 stitches and SS into next. CH 7 and DC in third CH from hook, make 1 DC in next three CHs (second leg made), skip 2 stitches (starting CH of Row 1) and SS into the last.
Edge: Rotate work. Hint you are working along the edge into the sides of rows; however, I will refer to these spaces as stitches. Work 3 SC in first stitch of edge. SC in next 5 stitches. SS in next stitch of edge and CH 9. Work 4 SC in second CH from hook and 1 HDC in next 6 CHs (second arm made). Skip 1 stitch along the edge and SS. Work 5 SC along edge and SS to join. Break yarn.
Pattern Back Panel:
Using main color
Row 1: CH 11, SC in second CH from hook and in each remaining CH (10 SC)
Row 2: CH 1, Turn. SC in each stitch across (10 SC)
Row 3-14: Repeat Row 2
Row 15: *this Row is worked along the perimeter of the rectangle and will be broken down into sides*
Head: Turn. Do NOT CH and work the following in the first stitch: DC, CH 1, TR, CH 1, DC, HDC. (Hint: the next stitch of the row may be buried under the ear.) SC in the next 8 stitches. Work the following in the last stitch: HDC, DC, CH 1, TR, CH 1, DC.
Edge: Rotate work. Hint you are working along the edge into the sides of rows; however, I will refer to these spaces as stitches. CH 1 and work 13 SC along the edge and make 3 SC in the last stitch of the edge.
Bottom: Rotate work. Hint: you should be working in the backside of the starting CH; however, I will refer to these as stitches. SS into first stitch and CH 7. DC in third CH from hook and make 1 DC in next three CHs (first leg made). Skip 2 stitches (starting CH of Row 1) and SS into next. SC in next 2 stitches and SS into next. CH 7 and DC in third CH from hook, make 1 DC in next three CHs (second leg made), skip 2 stitches (starting CH of Row 1) and SS into the last.
Edge: Rotate work. Hint you are working along the edge into the sides of rows; however, I will refer to these spaces as stitches. Work 3 SC in first stitch of edge and work 13 SC in remaining stitches of the edge. SS to join. Break yarn.
Pattern Flower Embellishments:
Note: for clarity, images are depicted using yarn and a larger hook. The third image shows the loops to SS into on the side of the SC stitch:

Using embroidery floss and 1.75 mm crochet hook
Row 1: Magic ring, CH 1, *SC, CH 2 and SS into SC (picot made)* repeat x5 total and join to first SC (5 SC picots)
Break thread. Leave a long tail for sewing down.

Assembly:
- Using embroidery floss and picture as a guide, stitch a face onto the front panel – I chose to do eyes and a mouth, see pattern notes for further instructions if unsure. Alternately, you could use safety eyes, place and secure them now if using.
- Make 1-2 stitches to tack flowers down at the base of the horn.
- Place the front and back panels together with the right sides facing to the outside (wrong sides facing the inside) and whip stitch along the perimeter using a long strand of the main color. You will need to whip stitch around the feet and ears (do not stitch around the arms or the horn). You will also need to make a couple running stitches along the perimeter of the rectangle at the base of the ears, arms, feet and horn. See pattern notes if you need more clarification. Before closing the entire piece, insert a small amount of poly-fil and sew shut.
- Weave in any remaining ends.
Pattern Heart:
Using heart color
Round 1: Magic ring, CH 2, 3 TR, 2 DC, HDC, CH 1, SC, CH 1, HDC, 2 DC, 3 TR, CH 2 and SS into ring. Pull to close, but don’t tighten all the way just yet.
Round 2: CH 2, work 3 SC into first stitch, SC and HDC into next stitch, SC in next 4 stitches and SC into CH space, CH 1, DC into next stitch, CH 1, SC into CH space and SC in next 4 stitches, HDC and SC into next, 3 SC into last stitch, CH 2 and SS into the ring again.
Break yarn and leave a long tail for stitching. Pull ring taught.


Putting It All Together:
Before proceeding, you should have an idea of what you will be inserting if anything at all because these are adorable in of themselves – who wouldn’t enjoy seeing that bear with his outstretched arms?!
You may choose to stitch the hearts directly onto the body and make a stitch or two on the hands to pin them in place as if holding the heart. You could sew down the hearts and leave the arms empty. If you would like to tuck something inside of the heart such as a lollipop, pencil, cute eraser, chocolate or handwritten note just sew down a portion of the heart and leave part of it open to slip in the item of your choosing. You could consider attaching a little Velcro to a colorful foam heart cutout and to the hands in order to deliver a kind message or use washi tape to attach a small item to the foam. There are seriously so many possibilities!
Have fun making these and I hope you share your finished work – you can do so on Facebook with the tag @shemakescrochet- I would love to see what you come up with!

You are free to share your finished work, to include selling your finished products, but please credit me – SheMakesCrochet – as the pattern designer. Please do not distribute this pattern or any portion of it, instead direct people to my blog. THANK YOU!


Very cute 🙂
Thank you!