

I remember seeing an adorable tooth fairy pillow years ago when my oldest was a baby. The idea of making him one has been hanging out in my mind ever since. He’s now 6, he hasn’t lost a tooth, he doesn’t even have a loose tooth, but friends and classmates are beginning to lose teeth. He brings it up to me often, it’s going to be a big deal when it finally happens! It’s the perfect reason to come up with something special to celebrate the occasion.
While working on these, I realized they could be used for so many other reasons than a tooth fairy pillow. If the tooth fairy doesn’t visit your home, you can totally omit the back pocket and simply use the pillow as a gift for a child who looses his/her first tooth. How fun would it be, if you are a teacher, to keep these tucked away to give to your students who lose a tooth!? And then there are adults. I immediately realized the obvious, wonderful people who work in the dental industry as adults who would appreciate these. It could be a cute gift to celebrate the completion of schooling or something thoughtful for anyone who works in the field. Then, I thought about all those people who are fearful of going to the dentist or who have major dental work done. Surely some of those people may find a little humor in one of theses! Think someone who needs a root canal, got fitted for braces, had a tooth injured playing a sport, etc. These could be useful for so many occasions! What I am getting at is, if you don’t have a young child in your life and you want to make one of these adorable teeth, you definitely should.
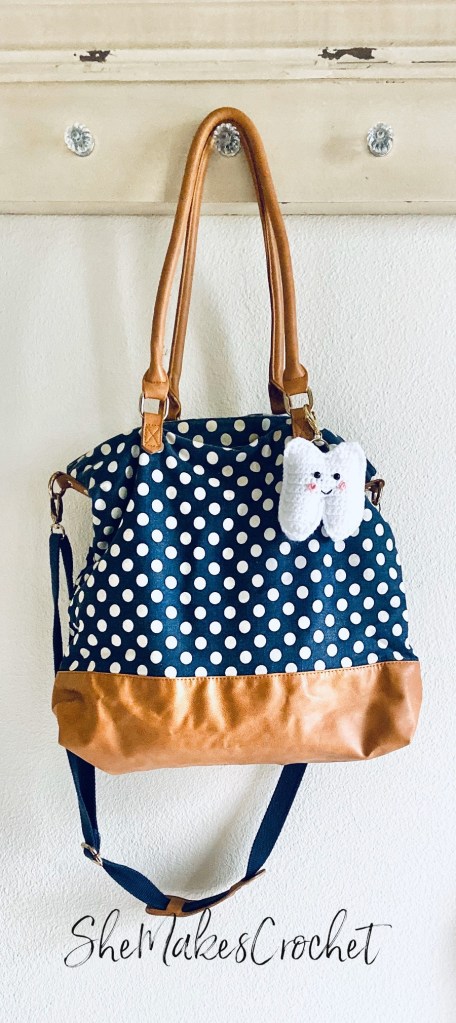
I designed a large version and a small version. The small version is approximately 4 inches. It works up quickly. I think it would look cute attached to a key ring if you are someone who REALLY loves teeth.

The large tooth is approximately 7.5 inches tall and is the “base” that coordinates with all the cute additions. Did I mention, I have three super cute modifications you can make to these teeth? I’m sure you noticed them in the picture above. They make them even more fun and personalized, though they are super cute without the additions too. I’m bringing the dinomonster back – if you missed my candygram patterns, that’s a dinosaur and a monster rolled into one, there is also a superhero and fairy. As always, I love them all and can’t possibly choose a favorite.
I’ll update when the other versions are live, you can expect them very soon! My computer time is limited to naps these days, so it can be a slow process moving my patterns and images onto my blog. I’ll also update Facebook and Instagram if you want to look out for them there as well. All of my tooth pillow patterns are available. You can get the dinomonster here, superhero here and fairy here.
Small Tooth Pillow
Supplies:
- Worsted weight yarn – I used Big Twist Value in white
- 3.75 mm crochet hook
- 1.75 mm crochet hook (if making cheeks)
- Scissors
- Needle for sewing down yarn tails
- Embroidery floss
- Needle for embroidery details
- 6 mm safety eyes
- Poly-fil or stuffing of choice
- Small piece of felt (optional, I chose not to do a pocket on the small tooth)
- Small piece of ribbon for hanging (optional, I chose to attach a key ring)
Note about supplies: Please be mindful of safety and durability when selecting embellishments, especially if you intend to give this to a small child. For example, something like safety eyes could be a choking hazard and you may want to embroider eyes instead. If you don’t have felt, you could crochet a small rectangle for the pocket; I would do this in single crochet to make a tight fabric.
Finished Dimensions: Finished piece is approximately 4 inches tall
Abbreviations and stiches used:
- CH chain
- SC single crochet
- INC increase (i.e. work 2 SC in the same stitch)
- DEC decrease (i.e. work one SC over two stitches, see pattern notes if unsure)
- SS slip stitch
Pattern Notes:
The beginning CH 1 at the start of rows does not count as a stitch throughout unless otherwise specified.
To work a DEC, insert hook into next stitch, yarn over and pull up one loop (2 loops on hook). Insert hook into the next stitch, yarn over and pull up one loop (3 loops on hook). Yarn over and pull through all loops on hook. You have created one SC stitch worked over two stitches, decreasing your stitch count by one.
When embroidering details, I find it works best to use a sharp needle and try to make stitches that penetrate through the fibers of the yarn, not in the gaps between crochet stitches. While you need to pull your working thread taught, don’t pull it too tightly.
This piece is worked by crocheting a front and back panel. Each panel is worked from bottom to top. Then, the two panels are crocheted together and the piece is stuffed.

Pattern:
Bottom Leg #1
Row 1: CH 3, SC in second CH from hook and in last CH (2 SC)
Row 2: CH 1, turn. INC in each stitch (4 SC)
Row 3: CH 1, turn. SC, SC, INC, INC (6 SC)
Row 4: CH 1, turn. SC in each stitch (6 SC)
Row 5: CH 1, turn. INC, SC in remaining stitches (7 SC)
Row 6: CH 1, turn. SC in each stitch (7 SC)
Row 7-8: CH 1, turn. Repeat Row 6
Break yarn and set aside for now.
Bottom Leg #2
Row 1: CH 3, SC in second CH from hook and in last CH (2 SC)
Row 2: CH 1, turn. INC in each stitch (4 SC)
Row 3: CH 1, turn. INC, INC, SC, SC (6 SC)
Row 4: CH 1, turn. SC in each stitch (6 SC)
Row 5: CH 1, turn. SC in first five stitches, INC in last (7 SC)
Row 6: CH 1, turn. SC in each stitch (7 SC)
Row 7-8: CH 1, turn. Repeat Row 6
DO NOT fasten off!
From here you will crochet rows that span across both legs. Each leg has a final stitch count of 7 and you will CH 1 between the legs (which will count as a stitch) bringing your new stitch count to 15 SC. Be mindful of yarn tails, you want the yarn tail at the end of Row 8 for bottom leg #1 to be to the right so your stitches face the same way throughout.

Continuing from bottom leg #2
Row 9: CH 1, turn. SC across, CH 1, and continue to SC across bottom leg #1 (7 SC, CH 1, 7 SC)
Row 10: CH 1, turn. SC across (including into the CH 1 between legs) (15 SC)
Row 11: CH 1, turn. SC across (15 SC)
Row 12-16: Repeat Row 11
From here you will work the top bump of the tooth which will be done working on one half of the panel, leaving the other half unworked. Then, you will attach your yarn and work the second top bump in the remaining half of stitches.

First Top Bump
Row 17: CH 1, turn. SC in next five stitches, DEC (6 SC)
Row 18: CH 1, turn, SKIP first stitch, SC in next five stitches (5 SC)
Row 19: CH 1, turn, SKIP first stitch, SC in next two, DEC (3 SC)
Break yarn.
Second Top Bump
Return to Row 16 to work the unworked stitches from Row 17
SKIP one stitch, insert hook into the next stitch, draw up a loop, and CH 1
Row 17: SKIP the first stitch and SC in last six stitches (6 SC)
Row 18: CH 1, turn. SC in next 4 stitches, DEC (5 SC)
Row 19: CH 1, turn. SKIP the first stitch, SC in next two, DEC (3 SC)
Break yarn and set aside for now.
Repeat the instructions to create a second panel.
Stitch Panels Together:
Line up the panels. You will notice along the edges, a series of bumps and loops – a loop is the side of a stitch at the end of a row and a bump is the backside of the CH at the start of a row. I like to crochet into these bumps and loops because it ensures I do only one stitch per row and this method leaves minimal gaps. However, you are free to work stitches along the edges using whatever method works for you, just try to place your stitches evenly apart.

Again, it’s probably becoming apparent that these images are for the large tooth! It is the same method, just with a larger piece and different stitch counts.
I like to start at the top, left side. Insert hook into the first stitch of both panels, draw up a loop and CH 1. SC in the same stitch and in each remaining stitch until you reach the space between the two legs. At this point, I recommend a SC decrease worked over 3 stitches. In other words, insert your hook into the last stitch of the bottom leg, yarn over and pull through (2 loops on hook), insert hook into the skipped stitch between legs, yarn over and pull through (3 loops on hook), insert hook into the first stitch of next bottom leg, yarn over and pull through (4 loops on hook), yarn over and pull through all loops on hook.
Continue working one SC in each stitch until you reach the top bump. I recommend making 3 SC in the top right “corner”, I do this in the right most stitch of Row 19. At this point, I recommend placing safety eyes and securing the backs, if using. This is also a good time to stuff the piece. Then, continue making one SC until you get to the top left “corner”. Again, I recommend making 3 SC in this corner or in the left most stitch of Row 19. SS to join to starting SC, fasten off, and weave in yarn tails.

Putting it all Together:
- Using embroidery flossy and a sharp needle, embroider a mouth.
- If making cheeks, use embroidery floss (or split a strand of yarn) and the 1.75 mm crochet hook to make a small circle i.e. work 5-6 SC into a magic ring, SS to join to first stitch. Stitch in place using the tail.
- If attaching a pocket to the back, cut a rectangle from a piece of felt. I chose not to do this with the smaller version. Note: you may choose to crochet a pocket if you prefer.
- If embroidering a name or initials on the pocket, do so now using embroidery floss and a sharp needle. Secure the thread with a knot and trim the ends. You may want to use a super small, thin dab of glue to further secure the ends.
- Center the pocket onto the backside of the tooth. Use a sharp needle and embroidery floss to attach the pocket along three edges only (i.e. sides and bottom).
- (Optional) Attach a ribbon to hang from a bedpost to make the tooth fairy’s job easier!
You are welcome to tag me on Facebook or Instagram @shemakescrochet. I love to see your finished work.
You are free to share your finished work, to include selling your finished products, but please credit me – SheMakesCrochet – as the pattern designer. Please do not distribute this pattern or any portion of it, instead direct people to my blog. THANK YOU!


3 thoughts on “Small Tooth Pillow”