

I’m so excited to share my tooth pillow collection with you! Yes, I said tooth pillow collection; I made a lot of these. There is one adorably small tooth (about 4.5 inches), which is already posted here. I also created three, fun modifications for a large version of that adorably small tooth (about 7 inches tall). In addition to this cutie, there will also be is a superhero tooth and a fairy (or maybe, more accurately named ballerina) tooth that will be posted soon are posted. And it’s worth adding, you have the option to make the tooth panel listed in this post without the additions if you just want a simple, large tooth.
I asked which you’d like to have up on the blog first and you answered. It was overall pretty close, but this little guy came out on top. The dinomonster is back! I’m not sure if I’m the first person to ever create this creature… maybe I am? The idea was born from my dinomonster candygram when I tried to make a dinosaur, but felt like he looked like a monster and the more I looked at him, the more confused I became about what he was – hence my very creative name.
This pillow is created by making two, simple tooth panels. Then, a tail – I did stripes for mine, but that’s optional! In addition to the tail, you’ll also need to stitch up some strips of spikes. Everything gets layered and stacked sandwich style before crocheting around the whole tooth and closing it off. Easy!

Dinomonster Tooth Pillow
Supplies:
- Worsted weight yarn – I used Big Twist Value in white
- Small amounts of yarn (the same weight you used for the tooth) in contrasting colors. You will need at least one tail color and a color for the spikes at a minimum.
- 3.75 mm crochet hook
- Scissors
- Needle for sewing down yarn tails
- Embroidery floss
- Needle for embroidery details
- 9 mm safety eyes or 12 mm animal eyes (I used 12 mm animal eyes)
- Straight pins (optional for sewing)
- Poly-fil or stuffing of choice
- Small piece of felt (optional for a tooth fairy pocket)
- Small piece of ribbon for hanging (optional)
Note about supplies: Please be mindful of safety and durability when selecting embellishments, especially if you intend to give this to a small child. For example, something like safety eyes or animal eyes could be a choking hazard and you may want to embroider eyes instead. If you don’t have felt, you could crochet a small rectangle for the pocket; I would do this in single crochet to make a tight fabric. Splitting a strand of yarn is a great substitute for embroidery floss.
Finished Dimensions: Finished piece is approximately 7.5 inches tall
Abbreviations and stiches used:
- CH chain
- SC single crochet
- INC increase (i.e. work 2 SC in the same stitch)
- DEC decrease (i.e. work one SC over two stitches, see pattern notes if unsure)
- SS slip stitch
Pattern Notes:
The beginning CH 1 at the start of rows does not count as a stitch throughout unless otherwise specified.
To work a DEC, insert hook into next stitch, yarn over and pull up one loop (2 loops on hook). Insert hook into the next stitch, yarn over and pull up one loop (3 loops on hook). Yarn over and pull through all loops on hook. You have created one SC stitch worked over two stitches, decreasing your stitch count by one.
When embroidering details, I find it works best to use a sharp needle and to try to make stitches that penetrate through the fibers of the yarn, not in the gaps between crochet stitches. While you need to pull your working thread taught, don’t pull it too tightly.
This piece is worked by crocheting a front and back panel. Each panel is worked from bottom to top. Then, the two panels are crocheted together and the piece is stuffed.
Pattern:
Using white
Bottom Leg #1
Row 1: CH 3, SC in second CH from hook and in last CH (2 SC)
Row 2: CH 1, turn. INC in each stitch (4 SC)
Row 3: CH 1, turn. SC, SC, INC, INC (6 SC)
Row 4: CH 1, turn. SC in each stitch (6 SC)
Row 5: CH 1, turn. INC, SC in remaining stitches (7 SC)
Row 6: CH 1, turn. SC in each stitch (7 SC)
Row 7-8: CH 1, turn. Repeat Row 6
Row 9: CH 1, turn. INC, SC in each stitch (8 SC)
Row 10: CH 1, turn. SC in each stitch (8 SC)
Row 11: Repeat Row 10
Row 12: CH 1, turn. INC, SC in each stitch (9 SC)
Row 13: CH 1, turn. SC in each stitch (9 SC)
Row 14: Repeat Row 13
Row 15: CH 1, turn. INC, SC in each stitch (10 SC)
Row 16: CH 1, turn. SC in each stitch (10 SC)
Row 17: Repeat Row 16
Row 18: CH 1, turn. INC, SC in each stitch (11 SC)
Row 19: CH 1, turn. SC in each stitch (11 SC)
Break yarn and set aside for now.
Bottom Leg #2
Row 1: CH 3, SC in second CH from hook and in last CH (2 SC)
Row 2: CH 1, turn. INC in each stitch (4 SC)
Row 3: CH 1, turn. INC, INC, SC, SC (6 SC)
Row 4: CH 1, turn. SC in each stitch (6 SC)
Row 5: CH 1, turn. SC in first five stitches, INC in last (7 SC)
Row 6: CH 1, turn. SC in each stitch (7 SC)
Row 7-8: CH 1, turn. Repeat Row 6
Row 9: CH 1, turn. SC in first six stitches, INC in last (8 SC)
Row 10: CH 1, turn. SC in each stitch (8 SC)
Row 11: Repeat Row 10
Row 12: CH 1, turn. SC in first seven stitches, INC in last (9 SC)
Row 13: CH 1, turn. SC in each stitch (9 SC)
Row 14: Repeat Row 13
Row 15: CH 1, turn. SC in first 8 stitches, INC in last (10 SC)
Row 16: CH 1, turn. SC in each stitch (10 SC)
Row 17: Repeat Row 16
Row 18: CH 1, turn. SC in first nine stitches, INC in last (11 SC)
Row 19: CH 1, turn. SC in each stitch (11 SC)
DO NOT fasten off!
From here you will crochet rows that span across both legs. Each leg has a final stitch count of 11 and you will CH 1 between the legs (which will count as a stitch) bringing your new stitch count to 23 SC. Be mindful of yarn tails, you want the yarn tail at the end of Row 19 for bottom leg #1 to be to the right so your stitches face the same way throughout.

Bottom leg #1 with the tail to the right prior to working Row 20 (image 1). Work across bottom leg #2 (image 2), CH 1 (image 3), and continue across bottom leg #1 (image 4).
Continuing from bottom leg #2
Row 20: CH 1, turn. SC across, CH 1, and continue to SC across bottom leg #1 (11 SC, CH 1, 11 SC)
Row 21: CH 1, turn. SC across (including into the CH 1 between legs) (23 SC)
Row 22: CH 1, turn. SC across (23 SC)
Row 23-35: Repeat Row 22
From here you will work the top bump of the tooth which will be done working on one half of the panel, leaving the other half unworked. Then you will attach your yarn and work the second top bump in the remaining half of stitches.

Pattern worked through Row 35 (image 1). After completing the first top bump (image 2). Return to Row 35, skip one stitch and insert hook (image 3), draw up a loop and CH1 (image 4).
First Top Bump
Row 36: CH 1, turn. SC in next nine stitches, DEC (10 SC)
Row 37: CH 1, turn, SKIP first stitch, SC in next nine stitches (9 SC)
Row 38: CH 1, turn, SKIP first stitch, SC in next six, DEC (7 SC)
Break yarn.
Second Top Bump
Return to Row 35 to work the unworked stitches from Row 36
SKIP one stitch, insert hook into the next stitch, draw up a loop, and CH 1
Row 36: SKIP the first stitch and SC in last ten stitches (10 SC)
Row 37: CH 1, turn. SC in next eight stitches, DEC (9 SC)
Row 38: CH 1, turn. SKIP the first stitch, SC in next six, DEC (7 SC)
Break yarn and set aside for now.
Repeat the instructions to create a second panel. Place both panels aside for now.
Tail (First Panel):
Using tail color(s)
Note: If you’d like a striped tail, you will need to change colors every couple of rows.
Row 1: CH 13, SC in second CH from hook and in each remaining CH (12 SC)
Row 2: CH 1, turn. SKIP first stitch, DEC, SC in remaining stitches (10 SC)
Row 3: CH 1, turn. SC across (10 SC)
Row 4: CH 1, turn. SKIP first stitch, SC across (9 SC)
Row 5: CH 1, turn. SC across (9 SC)
Row 6: CH 1, turn. SKIP first stitch, SC across (8 SC)
Row 7: CH 1, turn. SC across (8 SC)
Row 8: CH 1, turn. SKIP first stitch, SC across (7 SC)
Row 9: CH 1, turn. SC across (7 SC)
Row 10: CH 1, turn. SKIP first stitch, SC across (6 SC)
Row 11: CH 1, turn. SC across (6 SC)
Row 12: CH 1, turn. SKIP first stitch, SC across (5 SC)
Row 13: CH 1, turn. SC across (5 SC)
Row 14-15: Repeat Row 13
Row 16: CH 1, turn. SKIP first stitch, SC across (4 SC)
Row 17: CH 1, turn. SKIP first stitch, SC across (3 SC)
Row 18: CH 1, turn. INC, DEC (3 SC)
Row 19: CH 1, turn. SKIP first stitch, SC, INC (3 SC)
Break yarn and set aside.
Tail (Second Panel):
Using tail color(s)
Note: If you’d like a striped tail, you will need to change colors every couple of rows.
Row 1: CH 13, SC in second CH from hook and in each remaining CH (12 SC)
Row 2: CH 1, turn. SC in first eight stitches, DEC, DEC (10 SC)
Row 3: CH 1, turn. SC across (10 SC)
Row 4: CH 1, turn. SC in first eight stitches, DEC (9 SC)
Row 5: CH 1, turn. SC across (9 SC)
Row 6: CH 1, turn. SC in first seven stitches, DEC (8 SC)
Row 7: CH 1, turn. SC across (8 SC)
Row 8: CH 1, turn. SC in first six stitches, DEC (7 SC)
Row 9: CH 1, turn. SC across (7 SC)
Row 10: CH 1, turn. SC in first five stitches, DEC (6 SC)
Row 11: CH 1, turn. SC across (6 SC)
Row 12: CH 1, turn. SC in first four stitches, DEC (5 SC)
Row 13: CH 1, turn. SC across (5 SC)
Row 14-15: Repeat Row 13
Row 16: CH 1, turn. SC in first three stitches, DEC (4 SC)
Row 17: CH 1, turn. SC in first two stitches, DEC (3 SC)
Row 18: CH 1, turn. DEC, INC (3 SC)
Row 19: CH 1, turn. INC, DEC (3 SC)
Break yarn and set aside for now.
Tail Spikes:
Using spike color
Row 1: CH 17 and SS in second CH from hook.
*CH 6 and SS in second CH from hook, SC in next CH, HDC in next, DC in next, SKIP two CH from starting CH and SS in next four CHs*
Repeat from * two more times, omitting final 3 SS on second repeat (i.e. SS one time at the end of the final repeat)
Break yarn leaving a long tail for sewing. Repeat instructions.

Assemble the Tail:
- Line up the tail spikes and using the long tail, stitch the two pieces together along the top edge.
- Layer one tail panel, the tail spikes and the second tail panel with the spikes sticking out from the tail and stitch into place. You will make running stitches through all three layers when you are at a spike. You will make stitches through the two tail panels only between spikes.
- In addition to color changes every couple of rows, I also chose to embroider a few lines onto my tail as well using the same yarn I used for the spikes. These things are completely optional!
- Set tail aside.
Head and Body Spikes:
Using spike color
Note: This is the same process only with a longer strip of spikes.
Row 1: CH 33 and SS in second CH from hook, SS in next two CHs.
*CH 6 and SS in second CH from hook, SC in next CH, HDC in next, DC in next, SKIP two CH from starting CH and SS in next four CHs*
Repeat from * 4 more times, omitting final 2 SS on final repeat (i.e. SS two times at the end of the final repeat)
Break yarn leaving a long tail for sewing. Repeat instructions.
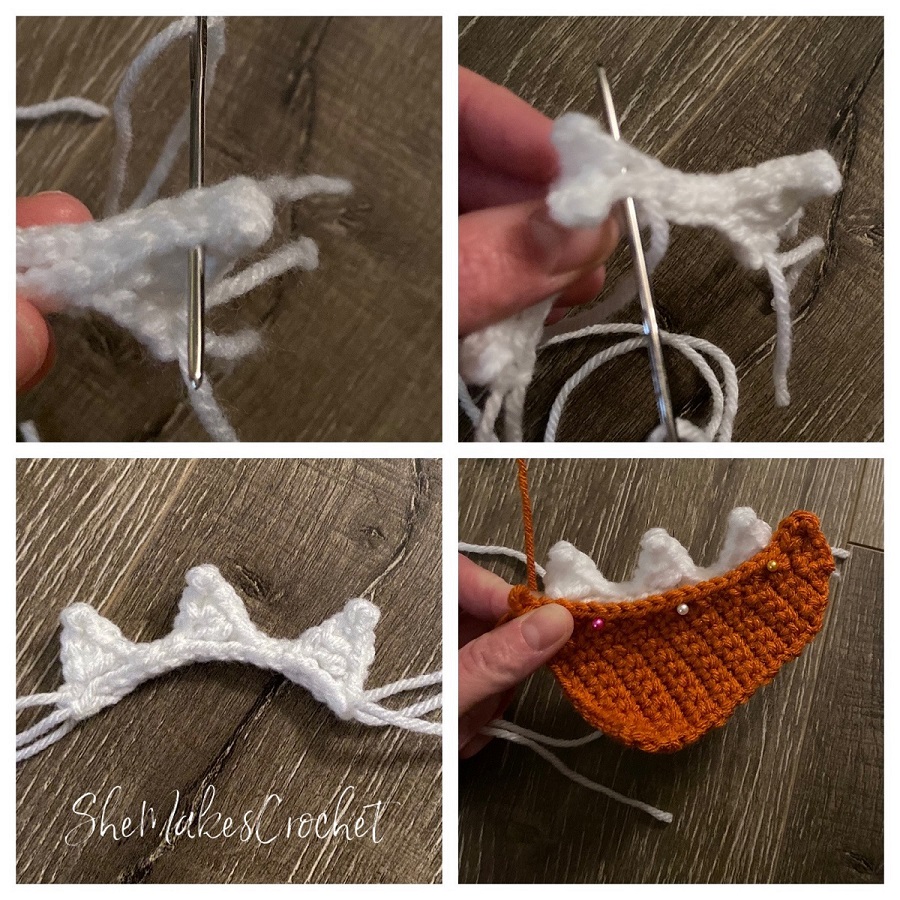
Line up the head and body spikes. Using the long tail, stitch the two pieces together along the top edge.
Attach The Tail, The Head and Body Spikes and Safety Eyes (if using):
- Layer one tooth panel, the tail and the second tooth panel with the tail poking out to the side.
- Use a long strand of white (or the tooth panel color) to stitch through all three layers in order to secure the tail into place
- Next add the head and body spikes between the two tooth panels going up the side and top. It may be helpful to use pins here.
- Continue using white (or the tooth panel color) to stitch the spikes into place the same way you did for the tail spikes i.e. stitch through all three layers when you are at a spike and stitch through the two tooth panels only between spikes.
- Attach the safety eyes to the front side and lock the backs into place.
Stitch Panels Together:
You will notice along the edges of your tooth panels, a series of bumps and loops – a loop is the side of a stitch at the end of a row and a bump is the backside of the CH at the start of a row. I like to crochet into these bumps and loops because it ensures I do only one stitch per row and this method doesn’t leave gaps. However, you are free to work stitches along the edges using whatever method works for you, just try to place your stitches evenly apart.

Bumps and loops along the edge of the panel (image 1). Images 2-3 depict where I like to work the SC DEC over three stitches (which is optional). Just before working the 3 SC corner (image 4).
I like to start at the top, left side. Insert hook into the first stitch of both panels, draw up a loop and CH 1. SC in the same stitch and in each remaining stitch until you reach the space between the two legs. At this point, I recommend a SC decrease worked over 3 stitches. In other words, insert your hook into the last stitch of the bottom leg, yarn over and pull through (2 loops on hook), insert hook into the skipped stitch between legs, yarn over and pull through (3 loops on hook), insert hook into the first stitch of next bottom leg, yarn over and pull through (4 loops on hook), yarn over and pull through all loops on hook.
Continue working one SC in each stitch until you reach the tail. Work SS into the top panel only over the section of where you stitched the tail. Then, alternate working SC stitches through both tooth panels between spikes and SS through the top panel only at the spikes. When you reach the top bump, I recommend making 3 SC in that top right “corner”, I do this in the right most stitch of Row 38. This is also a good time to stuff the piece. Then, continue alternating SC and SS for the remaining spikes at the top of the head. After getting past all the spikes resume making SC stitches across the top through both panels until you get to the top left “corner”. Again, I recommend making 3 SC in this corner or in the left most stitch of Row 38. SS to join to starting SC, fasten off, and weave in yarn tails.


Putting it all Together:
- Using embroidery flossy and a sharp needle, embroider a mouth and optional teeth. You could also consider making a mouth out of felt pieces.
- If attaching a pocket to the back, cut a rectangle from a piece of felt – my rectangle is approximately 3.75 inches long by 2.25 inches tall. Note: You may choose to crochet a pocket if you prefer.
- If embroidering a name or initials to the pocket, do so now using embroidery floss and a sharp needle. Tie off the thread and clip the ends. You may consider using a very small, thin layer of glue to further secure the thread.
- Center the pocket onto the backside of the tooth. Use a sharp needle and embroidery floss to attach the pocket along three edges only (i.e. sides and bottom). I find the best way to do this is to backstitch.
- If attaching ribbon in order to hang your tooth, cut the desired amount – at least 12 inches – insert between stitches at the top, back panel and tie or stitch closed to make a loop.
I would love to see what you create! Please feel free to tag me on facebook or instagram @shemakescrochet.
You are free to share your finished work, to include selling your finished products, but please credit me – SheMakesCrochet – as the pattern designer. Please do not distribute this pattern or any portion of it, instead direct people to my blog. THANK YOU!


3 thoughts on “Dinomonster Tooth Pillow”