
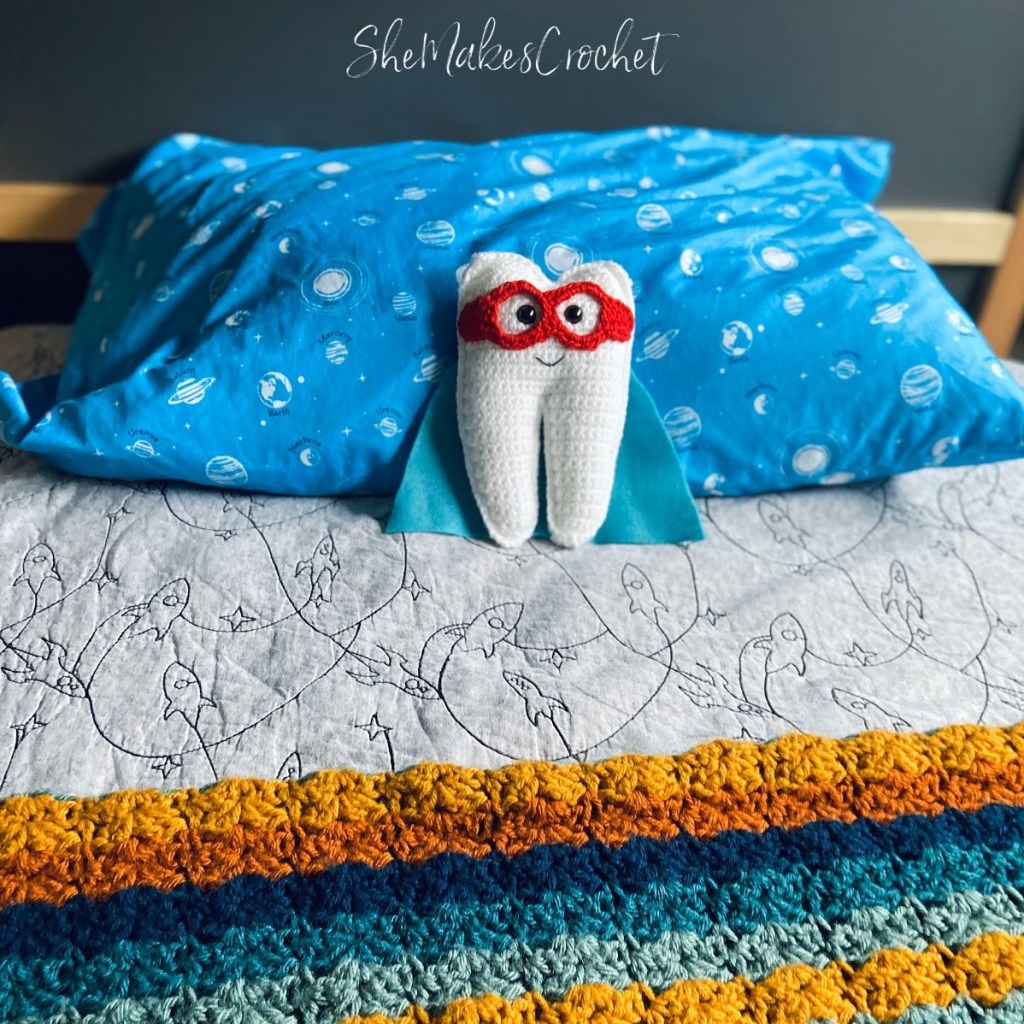
The superhero tooth is next up for my tooth fairy pillow collection! If you don’t know, there are more of these. I have a dinomonster you can checkout here and later this week, I will have a fairy posted and a fairy here. I also have a small version here if you want a simple and cute tooth without the added features. Finally, you are free to use this pattern to crochet the tooth panels and leave off all the extra elements if you just want an adorable tooth and need it bigger than the small version.
I think there is something so adorable about children and superheroes! A superhero tooth was a must for me and I absolutely had my son in mind when I made this one using his favorite color. I added an emblem with his initial to the back of the cape which is a sweet, personalized touch and completely optional! These superheroes would be adorable with a plain cape; you could do some sort of iron-on patch or decal. You could even paint an emblem, or cut out a simple shape like a heart or embroider one! This is so easy to customize for your craft stash. I love those types of projects.
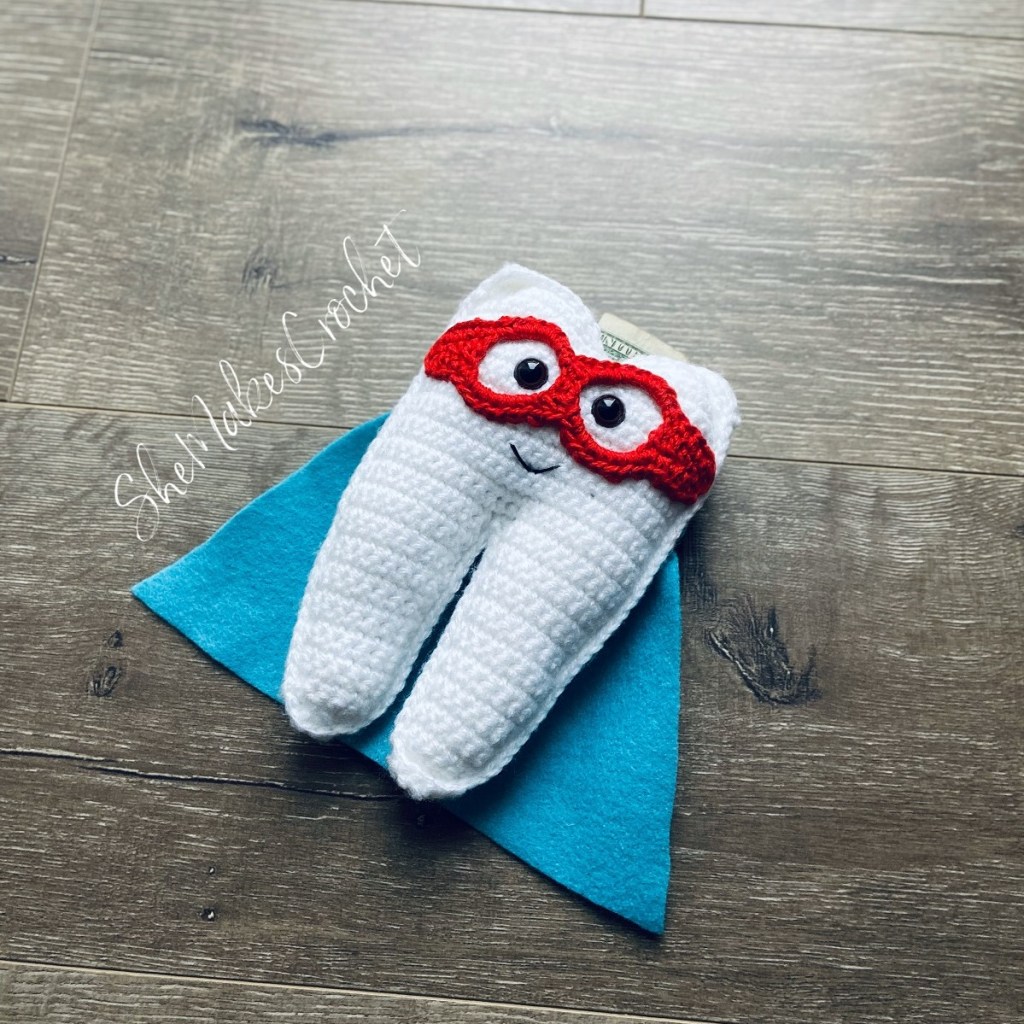
This tooth, like the previous two, is created from two, tooth panels that get crocheted together. Next, crochet a face mask, I used a mercerized cotton for this. I like that the cotton gives a clean look, but it’s totally fine to use acrylic or whatever you have on hand. A bit of an aside, but if you’ve never used mercerized cotton for amigurumi, you definitely should try it. The results are gorgeous and years later, your items will continue to look pristine. Anyway, back to this adorable, little guy. After making the mask using whatever yarn you have on hand, grab some felt and glue – I used hot glue – to create the cape. Easy!
I did not write out instructions to crochet a cape, but you definitely could crochet one. However, I think the addition of felt really elevates the finished product. I am a huge fan of mixing crochet with other textural elements. My opinion, the felt (or some other fabric if you feel like sewing) is a must!


Superhero Tooth Pillow
Supplies:
- Worsted weight yarn
- I used Big Twist Value in white
- Contrasting color for face mask – I used 24/7 Cotton in red
- 3.75 mm crochet hook
- Scissors
- Needle for sewing down yarn tails
- Embroidery floss
- Needle for embroidery details
- 9 mm safety eyes or 12 mm animal eyes (I used 12 mm animal eyes)
- Straight pins (optional for sewing down embellishments)
- Poly-fil or stuffing of choice
- Felt in various colors
- Full sheet of felt for cape and optional pocket
- Additional scraps of felt for embellishments
- Printer if using the printed pattern for the cape, you may also draw your own!
- Optional stencils, cup etc. for tracing to make felt cutouts and a pen or marker
- Glue – I used hot glue
Note about supplies: Please be mindful of safety and durability when selecting embellishments, especially if you intend to give this to a small child. For example, something like safety eyes or animal eyes could be a choking hazard and you may want to embroider eyes instead.
Finished Dimensions: Finished piece is approximately 7.5 inches tall
Abbreviations and stiches used:
- CH chain
- SC single crochet
- INC increase (i.e. work 2 SC in the same stitch)
- DEC decrease (i.e. work one SC over two stitches, see pattern notes if unsure)
- SS slip stitch
Pattern Notes:
The beginning CH 1 at the start of rows does not count as a stitch throughout unless otherwise specified.
To work a DEC, insert hook into next stitch, yarn over and pull up one loop (2 loops on hook). Insert hook into the next stitch, yarn over and pull up one loop (3 loops on hook). Yarn over and pull through all loops on hook. You have created one SC stitch worked over two stitches, decreasing your stitch count by one.
When embroidering details, I find it works best to use a sharp needle and to try to make stitches that penetrate through the fibers of the yarn, not in the gaps between crochet stitches. While you need to pull your working thread taught, don’t pull it too tightly.
This piece is worked by crocheting a front and back panel. Each panel is worked from bottom to top. Then, the two panels are crocheted together and the piece is stuffed.

Pattern:
Bottom Leg #1
- Row 1: CH 3, SC in second CH from hook and in last CH (2 SC)
- Row 2: CH 1, turn. INC in each stitch (4 SC)
- Row 3: CH 1, turn. SC, SC, INC, INC (6 SC)
- Row 4: CH 1, turn. SC in each stitch (6 SC)
- Row 5: CH 1, turn. INC, SC in remaining stitches (7 SC)
- Row 6: CH 1, turn. SC in each stitch (7 SC)
- Row 7-8: CH 1, turn. Repeat Row 6
- Row 9: CH 1, turn. INC, SC in each stitch (8 SC)
- Row 10: CH 1, turn. SC in each stitch (8 SC)
- Row 11: Repeat Row 10
- Row 12: CH 1, turn. INC, SC in each stitch (9 SC)
- Row 13: CH 1, turn. SC in each stitch (9 SC)
- Row 14: Repeat Row 13
- Row 15: CH 1, turn. INC, SC in each stitch (10 SC)
- Row 16: CH 1, turn. SC in each stitch (10 SC)
- Row 17: Repeat Row 16
- Row 18: CH 1, turn. INC, SC in each stitch (11 SC)
- Row 19: CH 1, turn. SC in each stitch (11 SC)
Break yarn and set aside for now.
Bottom Leg #2
- Row 1: CH 3, SC in second CH from hook and in last CH (2 SC)
- Row 2: CH 1, turn. INC in each stitch (4 SC)
- Row 3: CH 1, turn. INC, INC, SC, SC (6 SC)
- Row 4: CH 1, turn. SC in each stitch (6 SC)
- Row 5: CH 1, turn. SC in first five stitches, INC in last (7 SC)
- Row 6: CH 1, turn. SC in each stitch (7 SC)
- Row 7-8: CH 1, turn. Repeat Row 6
- Row 9: CH 1, turn. SC in first six stitches, INC in last (8 SC)
- Row 10: CH 1, turn. SC in each stitch (8 SC)
- Row 11: Repeat Row 10
- Row 12: CH 1, turn. SC in first seven stitches, INC in last (9 SC)
- Row 13: CH 1, turn. SC in each stitch (9 SC)
- Row 14: Repeat Row 13
- Row 15: CH 1, turn. SC in first 8 stitches, INC in last (10 SC)
- Row 16: CH 1, turn. SC in each stitch (10 SC)
- Row 17: Repeat Row 16
- Row 18: CH 1, turn. SC in first nine stitches, INC in last (11 SC)
- Row 19: CH 1, turn. SC in each stitch (11 SC)
DO NOT fasten off!
From here you will crochet rows that span across both legs. Each leg has a final stitch count of 11 and you will CH 1 between the legs (which will count as a stitch) bringing your new stitch count to 23 SC. Be mindful of yarn tales, you want the yarn tale at the end of Row 19 for bottom leg #1 to be to the right so your stitches face the same way throughout.

Continuing from bottom leg #2
- Row 20: CH 1, turn. SC across, CH 1, and continue to SC across bottom leg #1 (11 SC, CH 1, 11 SC)
- Row 21: CH 1, turn. SC across (including into the CH 1 between legs) (23 SC)
- Row 22: CH 1, turn. SC across (23 SC)
- Row 23-35: Repeat Row 22
From here you will work the top bump of the tooth which will be done working on one half of the panel, leaving the other half unworked. Then you will attach your yarn and work the second top bump in the remaining half of stitches.

First Top Bump
- Row 36: CH 1, turn. SC in next nine stitches, DEC (10 SC)
- Row 37: CH 1, turn, SKIP first stitch, SC in next nine stitches (9 SC)
- Row 38: CH 1, turn, SKIP first stitch, SC in next six, DEC (7 SC)
Break yarn.
Second Top Bump
Return to Row 35 to work the unworked stitches from Row 36
SKIP one stitch, insert hook into the next stitch, draw up a loop, and CH 1
- Row 36: SKIP the first stitch and SC in last ten stitches (10 SC)
- Row 37: CH 1, turn. SC in next eight stitches, DEC (9 SC)
- Row 38: CH 1, turn. SKIP the first stitch, SC in next six, DEC (7 SC)
Break yarn and set aside for now.
Repeat the instructions to create a second panel.
Stitch Panels Together:
Line up the panels. You will notice along the edges, a series of bumps and loops – a loop is the side of a stitch at the end of a row and a bump is the backside of the CH at the start of a row. I like to crochet into these bumps and loops because it ensures I do only one stitch per row and this method doesn’t leave noticeable gaps. However, you are free to work stitches along the edges using whatever method works for you, just try to place your stitches evenly apart.
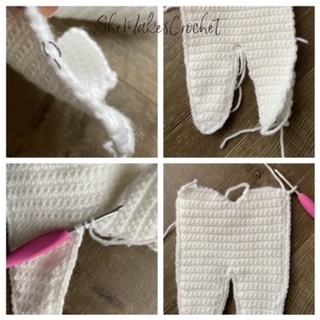
I like to start at the top, left side. Insert hook into the first stitch of both panels, draw up a loop and CH 1. SC in the same stitch and in each remaining stitch until you reach the space between the two legs. At this point, I recommend a SC decrease worked over 3 stitches. In other words, insert hook into the last stitch of the bottom leg, yarn over and pull through (2 loops on hook), insert hook into the skipped stitch between legs, yarn over and pull through (3 loops on hook), insert hook into the first stitch of next bottom leg, yarn over and pull through (4 loops on hook), yarn over and pull through all loops on hook.
Continue working one SC in each stitch until you reach the top bump. I recommend making 3 SC in the top right “corner”, I do this in the right most stitch of Row 38. At this point, I recommend placing the safety eyes and securing the backs, if using. This is also a good time to stuff the piece. Then, continue making one SC until you get to the top left “corner”. Again, I recommend making 3 SC in this corner or in the left most stitch of Row 38. SS to join to starting SC, fasten off, and weave in yarn tails.
Mask:
Using contrasting color
Note: You will be working on both sides of starting CH.
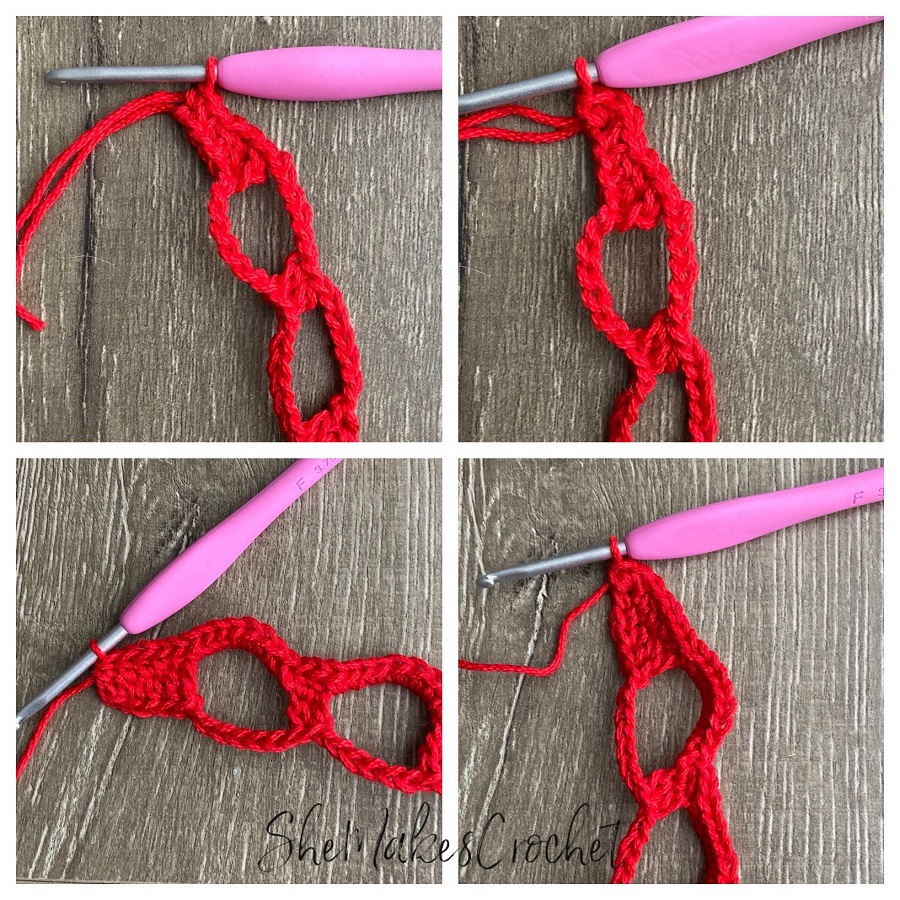
Row 1: CH 25, SC in second CH from hook. Then, SC, HDC, DC, DC, CH 6, SKIP six on starting CH and HDC in next two CHs, CH 6, SKIP six on starting CH and DC in next two CHs, HDC and SC in last two CHs.
Rotate your work, make 2 SC into the side and rotate your work again. You should be at the back loops of the starting CH.
HDC, HDC, HDC, SC, SC, then make 8 SC in the skipped six CHs, HDC, HDC, then make 8 SC in the skipped six CHs, SC, SC, HDC, HDC, HDC.
Rotate your work, make 2 SC into the side and rotate your work again. You should back at the start of Row 1.
Row 2: HDC, HDC, HDC, SC, SC, then make 8 SC in the CH six, HDC, HDC, then make 8 SC in the CH six, SC, SC, HDC, HDC, HDC and SS to join.
Break yarn, leaving a long tail for sewing.
Cape:

- Print pattern for cape and cut out. Note: The cape pattern has a pocket built into the top to minimize sewing. If you wish to not use the pocket, you could trim a couple of inches from the top before proceeding.
- Trace cape pattern onto a sheet of felt and cut out.
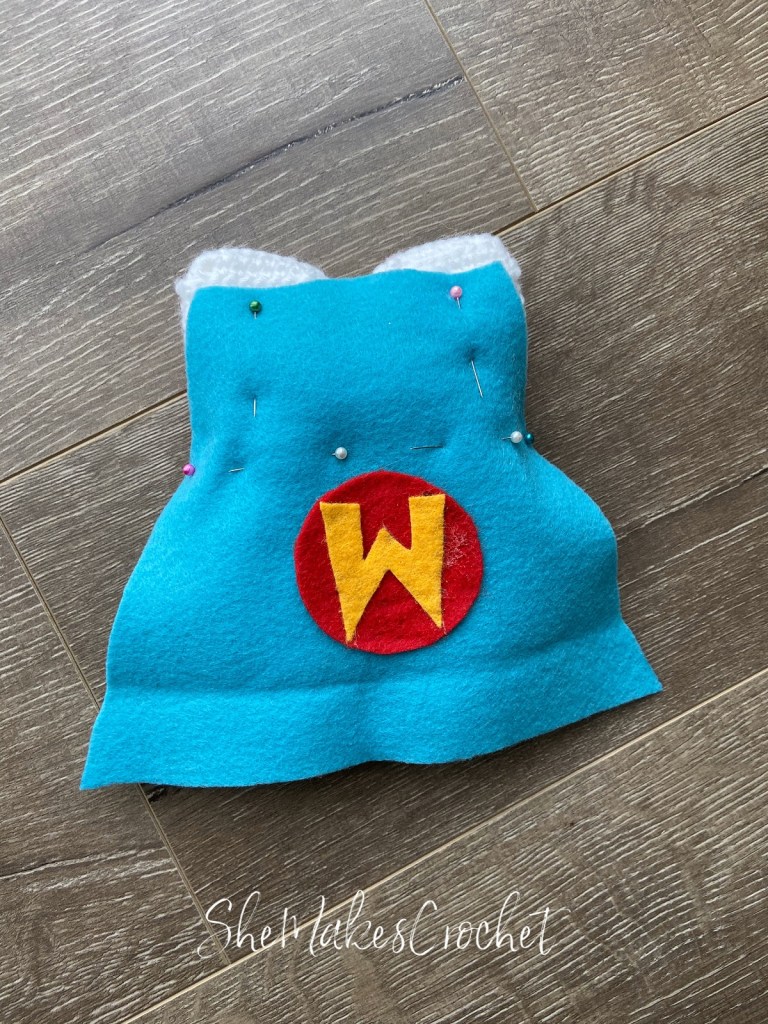
- Create and attach any embellishments to the cape (optional). I chose to trace an item from my kitchen to create the circle shape and I free-handed the “W”. I used hot glue to attach the “W” to the circle and the circle to the cape.
- Using embroidery floss and a sharp needle attach the cape to the back of the tooth. If using the optional felt pocket, create it now by stitch along the two sides of the pocket and across the bottom. If not using the felt pocket, sew along the top edge of the cape.


Putting it all Together:
- Pin mask into place on the front of panel, centering eyes and stitch into place.
- Using embroidery floss and a sharp needle, embroider a mouth.
- If attaching ribbon in order to hang, cut desired amount – I recommend at least 12 inches – insert around a stitch at the top of the back panel and tie or stitch closed to make a loop.

I love to see your finished work! Please tag me on Facebook or Instagram @shemakescrochet
You are free to share your finished work, to include selling your finished products, but please credit me – SheMakesCrochet – as the pattern designer. Please do not distribute this pattern or any portion of it, instead direct people to my blog. THANK YOU!


3 thoughts on “Superhero Tooth Pillow”