

EDIT: If you love this blanket, be sure to check out my Felix Remixed Blanket! It is the same type of crochet fun, but with a totally different result. You can find the pattern on my blog and it is also available to download on Ravelry.
I’m so excited to start this project with all of you! As mentioned in my introduction post, this is a really informal process, meaning I don’t have a concrete timeline for releasing all the parts; I’m still working on my blanket! Though, I can say you will have the entire pattern in a reasonable length of time – I’m almost finished. If that’s ok with you, I’d love for you to join along.
I hope you all had time to organize your scraps and review how to work a c2c stitch if you are unfamiliar with that. Also, if you haven’t already, please consider joining our Facebook group or ravelry group SheMakesCrochet Designs because I’m sure I speak for everyone when I say we’d love to see your progress pictures!
The supply list can be found on my introduction post – basically you need yarn from your stash and your favorite hook.
Edit: Part 2 is complete and can be found here. I’ve also go an entire post devoted to tips and techniques including several videos and a chart here!
Edit: Part 3 (the final part) is complete and can be found here.
AND if you’d like a coloring sheet to help you map out your design and color arrangements before you get started, be sure to check out the end of my tips and techniques post which is linked above!
EDIT: I’ve got a full video tutorial of the entire pattern posted on YouTube!
Part 1: Right Side
You will need to read the notes to familiarize yourself with a couple of techniques I used in order to get all the pieces to fit together as you layer on each block one at a time.
At the end of this section, you will have the entire right edge of your blanket complete from top to bottom, excluding a border! Keep in mind that whatever length you make this panel will be the length of your blanket. My blanket is 51.5 inches tall by 63.5 inches wide if anyone is curious.
Abbreviations and stiches used:
- DC double crochet
- SS slip stitch
- CH chain
- INC increase (i.e. CH 6 and add a stitch at the start of the row)
- DEC decrease (i.e. CH 3 and SS into the next CH 3 space to remove a block at the start of the row)***
- FINC floating increase (i.e. add a block without a base) – this will be explained more below
***Note: I know many tutorials say to SS 3 times and into the next CH 3 space. I would like you to CH 3 and then SS into the next CH 3 space. This piece is a little unconventional in its construction at times and you will need those CH 3 loops on occasion. There are many places where you won’t use them, like along the edge (if you prefer to SS), but to keep things consistent, I did all of my DEC with a CH 3 and so that is how the pattern is written.
Note: Throughout, I will refer to things like the right edge of the blanket or the left layer of blocks and these directional terms are from the perspective of you looking at the right side of your work such that the right edge of the blanket is on your right side, etc. (I crochet right handed.)
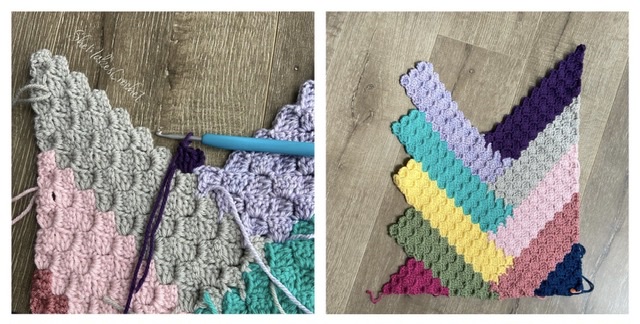
As previously mentioned, this blanket is worked using c2c. I used DC stitches and a CH 6, but you may adjust that to your preference or tension. It is mostly very straightforward c2c; however, things get a little creative in a few spots:
- Creating an Odd Shape to make the base for layering blocks
- Attaching Blocks as you layer them
- Creating a Floating Increase (FINC) where you build c2c blocks without anything underneath to work into.

You can see each of those items in the image above. The Odd Shape is the magenta triangle on the bottom left. (You will see more of how it is “odd” when you start to construct it.) The blocks on the left illustrate the FINC I was referring to. Finally, you should see that the blocks are interconnected and need to be attached as you create them. I will outline each of those processes now below and you may refer back as needed once we get into the pattern.
Note: Images are (always) read LEFT to RIGHT and TOP to BOTTOM.
Creating an Odd Shape
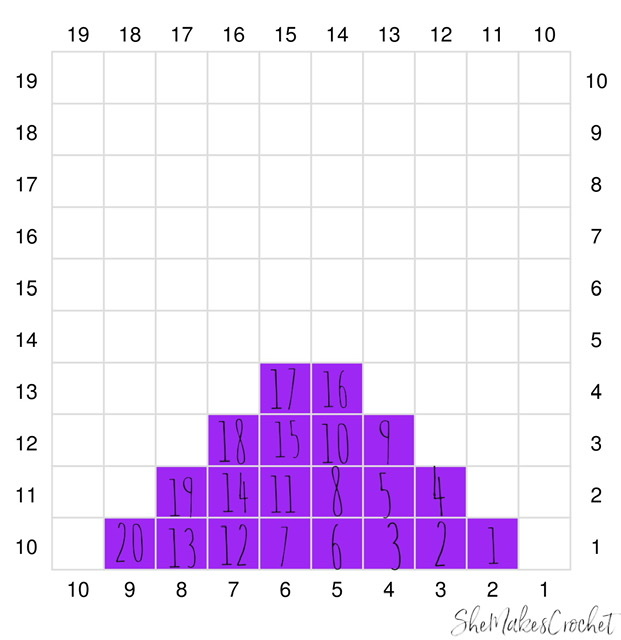
I included a graph for the visual people. It may be helpful to take a quick glance at it. The biggest thing to notice is that you will work right to left and go up and down the same side as with typical c2c; however, this is not the typical c2c triangle with a straight edge on two sides. To get this shape you will need to alternate starting a row on a decrease and on an increase. This will feel cumbersome because it’s unusual to decrease after only one stitch and it will look odd to not have the normal straight edges, but push those feelings aside and stick to the pattern!
Be sure to take note of my starting yarn tail in the images – this piece is created by working up and down the same side – in other words moving away from your starting yarn tail.

Image 2: CH 3 to start the DEC.
Image 3: Turn your work.
Image 4: The purple dot is illustrating the only CH 3 loop available to SS into – SS there.
Image 5: SS complete.
Image 6: Work 1 c2c stitch. (Row 2 complete)

Image 2: The purple dot is showing where you will your next c2c after completing the INC.
Image 3: Row 3 complete.
Image 4: CH 3 to start the DEC. Image 5: Turn your work. The pink dot shows where to SS to complete the DEC. Image 6: 2 c2c stitches worked down the side – Row 4 complete.
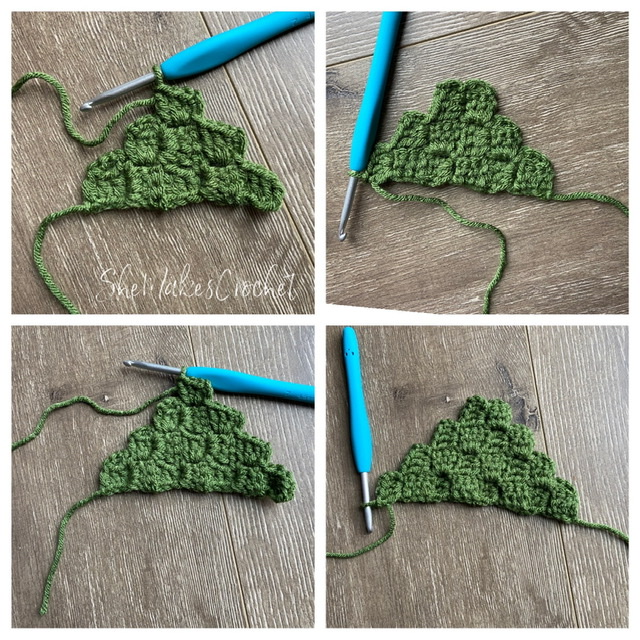
Image 2: DEC and work down – Row 6 complete. Image 3: INC and work up – Row 7 complete. Image 4: DEC and work down – Row 8 complete.
Attaching Blocks

Image 2: SS into the last space and CH 3 as you normally would.
Image 3: SS into the right corner of the corresponding block above.
Image 4: continue working your c2c by making 3 DC as you normally would.
Image 5: SS into the left corner of the corresponding stitch above (the same stitch as before) . *Note: After creating these pictures, I realized it looks a lot neater to SS into an actual CH stitch at the corner instead of the gap as I have pictured. The pink dot illustrates the preferred location to SS.
Image 6: final c2c of the row is complete and linked to its neighboring stitches.
In some cases, you will be finished at image 6 and you simply cut your yarn, leaving a long tail and fasten off. In other cases, you still may have more c2c stitches (rows) to work from this trapped position. In those cases, you will:
Maneuver Out of the Trapped Position

Image 2: SS into the CH 3 space of the last c2c stitch you made.
Image 3: CH 3.
Image 4: Continue working 3 DC stitches to complete your c2c stitch as you normally would.
Floating Increase
I don’t know if I am the only person to ever come up with this, but I’ve never seen it before. The FINC is my solution to a problem you may have noticed when looking at the blanket – at times, your working block needs to be longer than the block below it. In other words, continuing the c2c stitch even when there is nothing to work the stitches into.
Here is how it is done:

Image 2: CH 6
Image 3: SS into the last DC you completed (creating a loop). I recommend inserting your hook from BACK to FRONT for neatness.
Image 4: CH 3
Image 5: work 3 DC into the loop you created
Image 6: repeat this process to make the three additional blocks
Pattern:
Note: I did not include “turn” in the pattern, it is expected that you will turn each row.
Starting the Panel
Left Side of the Panel
Create the Odd Shape as described below. Reference the Pattern Notes if needed.
- Make 1 c2c stitch. (1)
- DEC (i.e. CH 3 and SS into the CH 3 space of the c2c stitch) and work 1 c2c stitch. (1)
- INC and work a c2c stitch up the side. (2)
- DEC and work c2c stitches back down. (2)
- INC and work c2c stitches up the side. (3)
- DEC and work c2c stitches down the side. (3)
- INC and work c2c stitches up the side. (4)
- DEC and work c2c stitches back down. (4)
Change to a new color on the last yarn over of the last stitch of the odd shape.
- INC. Work c2c stitches up the side. Then work FINC three times for a total of 8 c2c stitches. (8)
- DEC. Work c2c stitches back down. (8)
- INC. Work c2c stitches up the side. (9)
- DEC. Work c2c stitches back down. (9)
- INC. Work c2c stitches up the side. (10)
- DEC. Work c2c stitches down the side. (10) Fasten off. Place to the side. This piece will be the bottom left side of the panel.
Right Side of the Panel
- Create a starting triangle by working 6 rows of c2c increasing at the start of every row. Hint: your finished triangle should be 6 c2c stitches wide, 6 c2c stitches tall and 6 across the diagonal. Change to a new color the last stitch. (6)
- INC and work c2c stitches up the side for a total of 7 c2c stitches. (7)
- INC and work c2c stitches down the side. (8)
- INC and work c2c stitches up the side. (9)
- INC and work c2c stitches down the side. (9) Note: You should have one c2c stitch to work remaining.

Grab the other piece you made and place it so that the Odd Shape is at the bottom, left.
SS into the last CH 3 space in order to begin working the final c2c stitch. CH 3 and SS into the bottom right most stitch of the left side piece in order to link those stitches and panel sides together.
DC 3 as you normally would to complete the c2c stitch and SS into the left side of the corresponding (same) stitch on the left side panel. (10)
CH 3 and SS into the CH 3 space of the last stitch you made to maneuver out of the trapped position.
- Continue making c2c stitches up the block for a total of 10 c2c stitches. (10)
- INC. Work c2c stitches down the side. On the 11th stitch (of the row) you will need to attach to the left side panel again. See Attaching Blocks in the Pattern Notes above if you need more clarification. (11)
Fasten off.
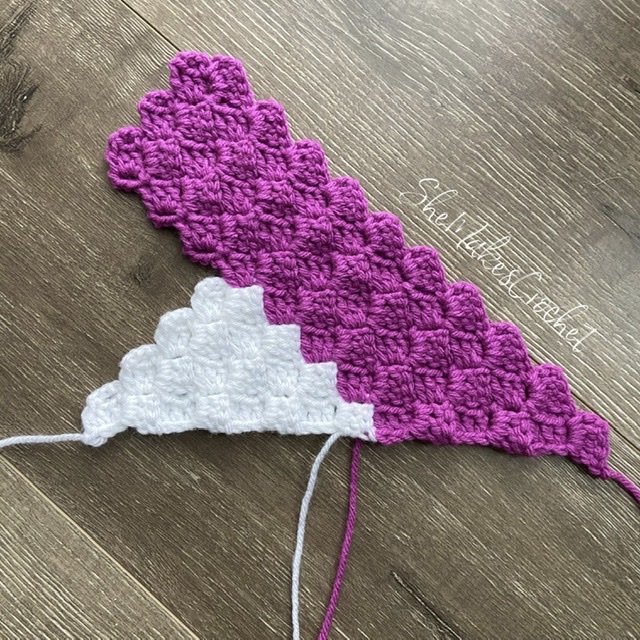
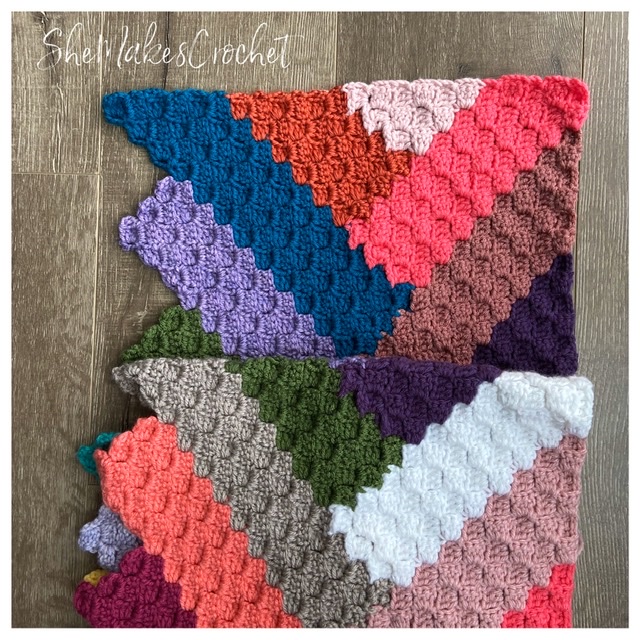
Now you should have the start of the Right Blanket Edge. The right side should be a straight edge because this is the right edge of the blanket. The bottom should also be a straight edge and will be the bottom edge of the blanket. The left side is jagged because you will need to make another panel to continue adding blocks to that side after you reach the top of this panel to get the blanket wider. The middle is a “V” shape and you will continue layering blocks side to side inside the “V” until your panel is a size you like. Then the top edge will be squared off.
Layering Blocks for the Right Blanket Edge Panel
Left Side Blocks
- With the right side of the blanket facing you, attach (a new color) yarn in the bottom right most available stitch of the last left side block you made. Work a c2c stitch (starting with a CH 3). Continue working c2c stitches up the side followed by three FINC (for a total of 12 stitches). (12)
- DEC and work stitches back down. Attach to the corresponding right side block on the 12th stitch and maneuver out of the trapped position. (12)
- Work c2c stitches back up. (12)
- DEC and work stitches back down. Attach to the corresponding right side block on the 12th stitch and maneuver out of the trapped position. (12)
- Work c2c stitches back up. (12)
- DEC and work stitches back down. Attach to the corresponding right side block on the 12th stitch and fasten off. (12)
Right Side Blocks
- With the wrong side of the blanket facing, attach (a new color) yarn in the bottom right most available stitch of the last right side block you made. Work a c2c stitch (starting with a CH 3). Continue working c2c stitches up the side (for a total of 8 stitches). (8)
- INC and work stitches back down. Attach to the corresponding left side block on the 9th stitch and maneuver out of the trapped position. (9)
- Work c2c stitches back up. (9)
- INC and work stitches back down. Attach to the corresponding left side block on the 10th stitch and maneuver out of the trapped position. (10)
- Work c2c stitches back up. (10)
- INC and work stitches back down. Attach to the corresponding left side block on the 11th stitch and fasten off. (11)
You will repeat this process – layering left then right side blocks until your blanket is as tall as you like. I chose to do 20 of these blocks.
Squaring the Top
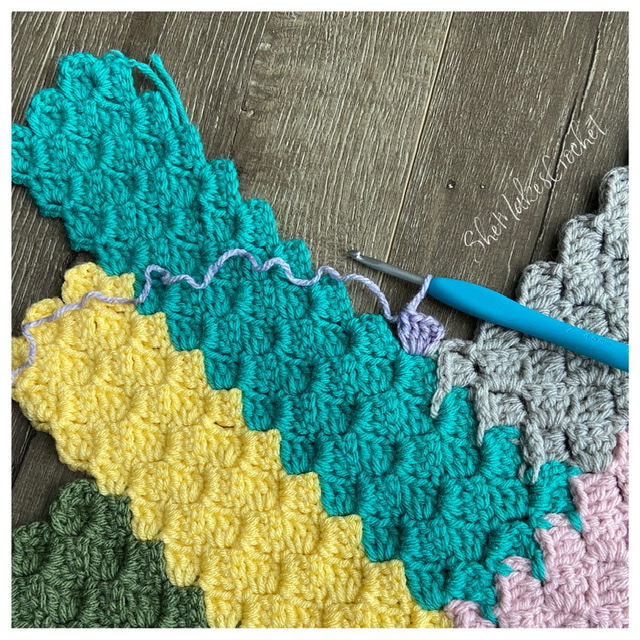
The last thing to do for this panel is to square off the top edge. To accomplish that, you will continue to layer blocks as before, but the stitch counts will change to create the straight edge. You start this process with a left side block. So in the picture below, that would be the blue block on the left.
First Left Side Block
- With the right side of the blanket facing you, attach (a new color) yarn in the bottom right most available stitch of the last left side block you made. Work a c2c stitch (starting with a CH 3). Continue working c2c stitches up the side followed by three FINC (for a total of 12 stitches). (12)
- DEC and work stitches back down. Attach to the corresponding right side block on the 12th stitch and maneuver out of the trapped position. (12)
- Work c2c stitches back up. SS into the last stitch of the row. (11)
- DEC and work stitches back down. Attach to the corresponding right side block on the 11th stitch and maneuver out of the trapped position. (11)
- Work c2c stitches back up. SS into the last stitch of the row. (10)
- DEC and work stitches back down. Attach to the corresponding right side block on the 10th stitch and fasten off. (10)
First Right Side Block
- With the wrong side of the blanket facing you, attach (a new color) yarn in the bottom right most available stitch of the last right side block you made. Work a c2c stitch (starting with a CH 3). Continue working c2c stitches up the side (for a total of 8 stitches). (8)
- INC and work stitches back down. Attach to the corresponding left side block on the 9th stitch and maneuver out of the trapped position. (9)
- Work c2c stitches back up. SS into the last stitch. (8)
- DEC and work stitches back down. Attach to the corresponding left side block on the 8th stitch and maneuver out of the trapped position. (8)
- Work c2c stitches back up. SS into the last stitch. (7)
- DEC and work stitches back down. Attach to the corresponding left side block on the 7th stitch and fasten off. (7)
Last Left Side Block
- With the right side of the blanket facing you, attach (a new color) yarn in the bottom right most available stitch of the last left side block you made. Work a c2c stitch (starting with a CH 3). Continue working c2c stitches up the side (for a total of 6 c2c stitches). SS into the last stitch. (6)
- DEC and work stitches back down. Attach to the corresponding right side block on the 6th stitch and maneuver out of the trapped position. (6)
- Work c2c stitches back up. SS into the last stitch of the row. (5)
- DEC and work stitches back down. Attach to the corresponding right side block on the 5th stitch and maneuver out of the trapped position. (5)
- Work c2c stitches back up. SS into the last stitch of the row. (4)
- DEC and work stitches back down. Attach to the corresponding right side block on the 4th stitch and fasten off. (4)
Last Right side Block
- With the wrong side of the blanket facing you, attach (a new color) yarn in the bottom right most available stitch of the last right side block you made. Work a c2c stitch (starting with a CH 3). Continue working c2c stitches up the side (for a total of 3 stitches). SS into the last stitch. (3)
- DEC and work stitches back down. Attach to the corresponding left side block on the 3rd stitch and maneuver out of the trapped position. (3)
- Work c2c stitches back up. SS into the last stitch. (2)
- DEC and work stitches back down. Attach to the corresponding left side block on the 2nd stitch and maneuver out of the trapped position. (2)
- Work a c2c stitch back up. SS into the last stitch. (1)
- DEC and attach to the corresponding left side block on the 1st stitch and fasten off. (1)
Weave in your ends! Be sure to post your progress pictures – if you do, use the hashtag #FelixBlanketCAL so we can find it.
I love when people share their finished pieces. If you share your work on facebook or instagram, please tag me so I can see it @shemakescrochet.
You are free to share your finished work, to include selling your finished products, but please credit me – SheMakesCrochet – as the pattern designer. Please do not distribute this pattern or any portion of it, instead direct people to my blog. THANK YOU!


Hi there, I have been doing C2C for a few years now. I have also been crocheting for 50+ years. I can usually figure out a pattern, but this one. I did get the 1st triangle done, then the 1st strip. But I am so confused and not understanding the next step. Honestly, the only reason I got as far as I did was due to pictures. I would really like to try this, so if you or anyone else reading this can help me, I woul d so appreciate it. Thanks
What exactly is the problem and I’ll try to help!
Hi are you in the FB page group, there is lots of help on there
You are right! And it’s a little easier to help in that format, as well. Thanks for that great suggestion.
Same. Pics were the only way I got as far as I did
I’m so glad the pictures were helpful. As I said in the pattern, it’s unconventional. I don’t think you could get this design using traditional c2c. I know it’s an adjustment at first because it’s different, but I’m glad you got there!!
Hi LuAnn! I’ve put together a post with more pictures, details and videos to help you get started if you need it.
https://shemakescrochet.com/2020/06/11/felix-blanket-tips-and-techniques/
Youbdid a great job with the directions but the video was the icing ..I am having fun thank you.
I’m so glad!!
Do you have a video?
I made one for the odd shape – it’s in the private Facebook group if you need to see it.
Diny, I am happy to report I have made several videos.
https://shemakescrochet.com/2020/06/11/felix-blanket-tips-and-techniques/
This looks great! I love c2c and I have a **lot** of “scraps” to use up. Thanks!
You are so welcome! Enjoy.
Love the look of your C2C Blanket! Any chance you can number the blocks in your part 1 Triangle shape graph, please, in the order you created them. It would definitely help me a ton! TYVM
I figured it out the order for the graph! Sorry for the bother! Thank You
I’m so glad you figured it out!! I did take up your suggestion and I numbered the graph – thank you for that. I also added some more pictures as some other people had questions about this too.
I did my odd block now I’m TOTALLY LOSTis there a video for the next step any help might work if I can’t get this I would be willing to buy one made that’s how much I love this Afghan thanks for any help or videos ladies doing this u are doing anAMAZING JOB lucky all I do better with videos so I may just have to adore the ones I see TIA AND HAPPY HOOKIN
On the very last stitch of the odd shape, change colors like you usually do on the last yarn over.
Increase – so make a CH 6 and 3DC c2c stitch and work 4 more stitches up the side of the pyramid. When you get to the very top, you should have made 5 stitches with the new color.
Then you will make 3 floating increases and you can see how to do those in the pattern notes. After you make those, you will be at the end of the row (you should have 8 stitches with the new color) and you will continue to work rows down and up for a total of 6 rows paying attention to stitch counts as you will increase and decrease at the start of rows accordingly.
If you use Facebook, you should join the group – I do have some videos posted in that private group. And there are lots of kind people offering lots of help there as well. I also don’t mind helping you here either! Whatever works.
Melody, I was able to create several videos and have some other tips in this post below, if you still need it!
https://shemakescrochet.com/2020/06/11/felix-blanket-tips-and-techniques/
Love, love love this scrap afghan. PLEASE let someone do a tutorial,who understands how to do this. I really want to make one. Thank you so much for sharing
I did put a lot of step-by-step pictures in the pattern notes, please don’t forget to reference that. If you join our private Facebook group, you will find I also put together a few videos and there is a lot of support there.
Finally, I can’t give you a timeline because I am swamped right now! I was so excited to share my hard-work and innovative design with the world that I put it out there early. I’m still putting the final edits on part 3 of the pattern. If you can give me some more time, I’ve been brainstorming some ideas on how to make this more “beginner friendly” for the people who need more support. I’m not saying you are a beginner with crochet – it’s just that this is very unconventional and it’s not as intuitive for some as it is for others, which is totally fine! I want everyone to be successful making this and I have a lot more ideas on how to accomplish that! I just need some time to get it all organized and presentable for the world.
Hi Barbara,
I have competed several tutorials. Thanks for being patient and I hope they help.
https://shemakescrochet.com/2020/06/11/felix-blanket-tips-and-techniques/
Wish there was a u tube on this. I do better with things done that way. Reading patterns are hard for me. I know how to do a c2c but this is one is hard to understand. Any help would be appreciated.
I have some videos in the private Facebook group. I am working on some more/something for here as well.
Cindy,
I have made several videos. I hope they help!
https://shemakescrochet.com/2020/06/11/felix-blanket-tips-and-techniques/
It took me a few attempts but I finally got this. The help and support in the facebook group was the key. Thank you for adding the videos they were a lifesaver. This is one of the most challenging patterns I have come across in years and I love it! Thank you so very much for sharing this patter with us.
I’m so glad to hear you love it!! It’s a very unusual design/construction for such a common stitch, but by the end of your blanket, it will be second nature.
I crochet left handed. Would this pattern be easy to translate to left handed crocheting? 🙂
I LOVE THIS PATTERN THANK YOU SO SO MUCH MY FAVORITE OF ALL ONES I HAVE EVER MADE GREAT JOB SHEMAKES CROCHET
You are too kind. Thank you. I’m happy you enjoy this pattern!!
Thank you for the pattern I have just downloaded it
You’re welcome! I hope you enjoy making it some time.
I came across your pattern on Pinterest and I absolutely love it! Just finished part 1 it is very addictive Thank You !!
I’m so happy to see this. I know I am biased, but I think it’s a lot of fun. Thanks for the kind note.
what is all the parts to print out
It is my intention to start offering PDF downloads of my patterns, especially this one. Unfortunately, I do not have one to provide right now. I’m sorry.
Is it possible to make a Felix Blanket with only 3 rows wide instead of 6?
Yes! I haven’t done it so can’t say for absolute certainty, but yes. The only thing – I recommend sticking with an even number of rows because the way you will have to work the joins will be impacted if you don’t. Alternatively you could work 3 rows and change colors for the next 3 (for a total of 6) and follow the pattern.