

EDIT: If you love this blanket, be sure to check out my Felix Remixed Blanket! It is the same type of crochet fun, but with a totally different result. You can find the pattern on my blog and it is also available to download on Ravelry.
Welcome back everyone! I hope you have been enjoying your Felix Blanket scrap project. It’s time to start adding width to your blankets and soon you’ll be snuggling underneath it while you work – which, in my opinion, is the best part of making a blanket. Edit: the entire blanket – all 3 parts – are available.
If you are just stumbling upon this post, you will need to refer back to my Introduction Post and to Part 1 before continuing.
As for everyone else, have you shared a WIP picture yet? If you haven’t, or even if you have because I LOVE seeing them, be sure to use the hashtag #FelixBlanketCAL or tag me @SheMakesCrochet on Facebook or Instagram. And if you haven’t already, join our Facebook group and ravelry group – SheMakesCrochet Designs because they are great places to see what everyone else is creating!
At the end of this section, you will have layered at least one more panel of blocks along the jagged side of your blanket. You can repeat this process as many times as you like to get the size you need. I completed this process twice for my blanket because I really felt the repeating pattern needed to be wider than tall in order to please my eye.
Part 2: The Middle
By now you should be comfortable with the pattern. This section is worked the same as Part 1 only there are some small differences because the right side is no longer a straight edge. You will start new blocks and link them up at the bottom of the “V” like we’ve been doing and you will also link them along the right side so that when you finish the middle section, you will have one large panel.
I debated including all the pattern notes and abbreviations again in this post, but it was getting too long! You can refer back to Part 1 if you need to refresh your memory on any of the special techniques you’ve already used when you created your first part. I also have a techniques and tips post including videos and a chart here.
Pattern:
Note: As with Part 1, it is assumed you will turn your work after every row.
Starting the Middle Panel
Left Side
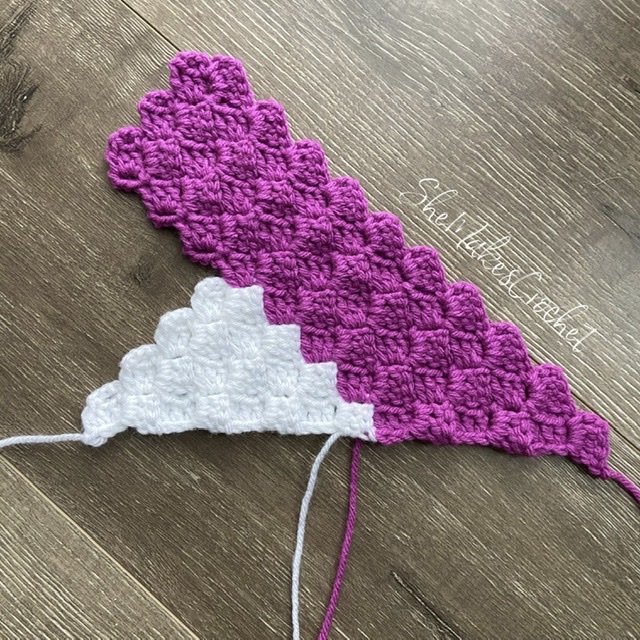
You’ll start with the Odd Shape as described below. If you need the pictures, refer back to here.
- Make 1 c2c stitch. (1)
- DEC (i.e. CH 3 and SS into the CH 3 space of the c2c stitch) and work 1 c2c stitch. (1)
- INC and work a c2c stitch up the side. (2)
- DEC and work c2c stitches back down. (2)
- INC and work c2c stitches up the side. (3)
- DEC and work c2c stitches down the side. (3)
- INC and work c2c stitches up the side. (4)
- DEC and work c2c stitches back down. (4)
Change to a new color on the last stitch.
- (With the new color) INC. Work c2c stitches up the side. Then work FINC three times for a total of 8 c2c stitches. (8)
- DEC. Work c2c stitches back down. (8)
- INC. Work c2c stitches up the side. (9)
- DEC. Work c2c stitches back down. (9)
- INC. Work c2c stitches up the side. (10)
- DEC. Work c2c stitches down the side. (10) Fasten off. Place to the side. This piece will be the bottom left side of the panel.
Right side
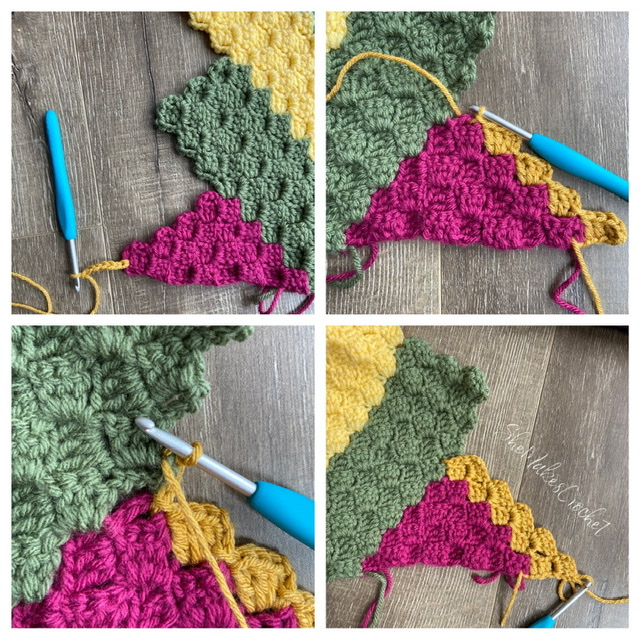
Image 2: 4 c2c stitches worked and 1 remaining.
Image 3: After making the CH 3 to work the last c2c, SS into the corresponding stitch on the block previously made to link up the stitches.
Image 4: finish the last c2c by making 3 DC and then SS to the corresponding stitch on the previously made block again. Maneuver out of the trapped position and c2c back down the side.
- Attach a new color in the bottom left most stitch of the odd shape from the right edge panel. INC and work c2c stitches up the side for a total of 5 c2c stitches, attaching to the corresponding stitch on the 5th stitch and maneuvering out of the trapped position. (5)
- Work c2c stitches down the side. (5)
- INC and work c2c stitches up the side. Attach and maneuver out of the trapped position on the last (6th) stitch. (6)
- Work c2c stitches down the side. (6)
- INC and work c2c stitches up the side. Attach and maneuver out of the trapped position on the last (7th) stitch. (7)
- Work c2c stitches down the side. Change colors on the last yarn over of the last DC. (7)
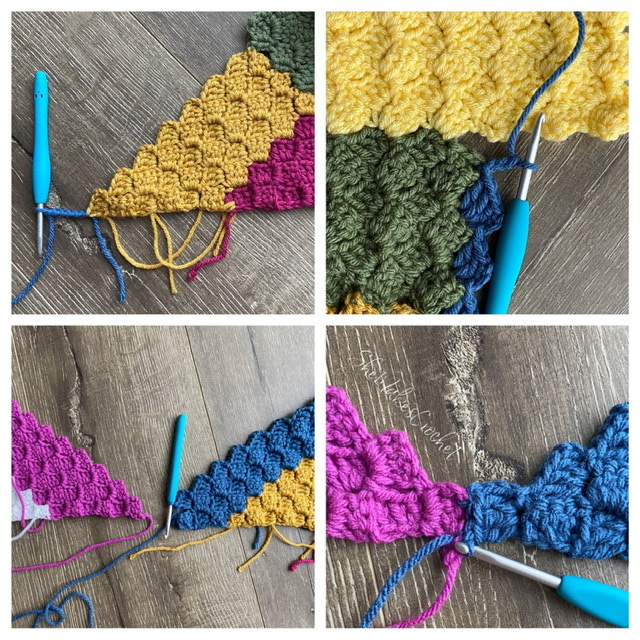
Image 2: work c2c stitches up the side and attach to the corresponding stitch of the previously made block on the last stitch. Note that, in this example, when you reach the end of the yellow block, you will continue up the three stitches of the green block.
Image 3: on the fourth row, attach to the corresponding stitch on the left side panel you just created. This is the same as you did in part 1.
Image 4: panels are attached. You then need to maneuver out of the trapped position and continue to work c2c stitches up the side and back down once more. Remember to attach at the last stitch of each row.
- With new color INC and work c2c stitches up the panel, attaching to the corresponding stitch on the 11th stitch and maneuvering out of the trapped position. (11) Hint: after 8 stitches you will begin working across another color block to complete the last three stitches.
- Work c2c stitches down the side. (11)
- INC and work c2c stitches up the side. Attach and maneuver out of the trapped position on the last (12th) stitch. (12)
- Work 11 c2c stitches down the side. Note: you will have one c2c stitch remaining to be worked.
See Pattern Notes for more details. Grab the other piece you made and place it so that the Odd Shape is at the bottom, left.
SS into the last CH 3 space in order to begin working the final c2c stitch. CH 3 and SS into the bottom right most stitch of the second panel in order to link those stitches and panels together.
DC 3 as you normally would to complete the c2c stitch and SS into the corresponding stitch on the other panel once more. (12)
CH 3 and SS into the CH 3 space of the last stitch you made to maneuver out of the trapped position.
- Continue making c2c stitches up the side. Attach and maneuver out of the trapped position on the last (12th) stitch. (12)
- Work c2c stitches down the side. Attach and maneuver out of the trapped position on the last (12th) stitch. (12)
Fasten off.

Now you should have the set up for your middle panels complete. You will layer blocks left to right like you did in Part 1, being sure to also attach your right side blocks to the jagged edge so you’ll have one large panel.
Layering Blocks for the Middle Panel

The process for layering blocks is essentially the same as before with the difference being that the right side needs to be attached to the jagged edge created in the previous panel.
Left Side Blocks

- With the right side of the blanket facing you, attach (a new color) yarn in the bottom right most available stitch of the last left side block you made. Work a c2c stitch (starting with a CH 3). Continue working c2c stitches up the side followed by three FINC (for a total of 12 stitches). (12)
- DEC and work stitches back down. Attach to the corresponding right side block on the 12th stitch and maneuver out of the trapped position. (12)
- Work c2c stitches back up. (12)
- DEC and work stitches back down. Attach to the corresponding right side block on the 12th stitch and maneuver out of the trapped position. (12)
- Work c2c stitches back up. (12)
- DEC and work stitches back down. Attach to the corresponding right side block on the 12th stitch and fasten off. (12)
Right Side Blocks

- With the wrong side of the blanket facing you, attach (a new color) yarn in the bottom right most available stitch of the last right side block you made. Work a c2c stitch (starting with a CH 3). Continue working c2c stitches up the side. Attach to the corresponding right side block on the 12th stitch and maneuver out of the trapped position. (12)
- Work c2c stitches back down. Attach to the corresponding left side block on the 12th stitch and maneuver out of the trapped position. (12)
- Work c2c stitches up the side. Attach to the corresponding right side block on the 12th stitch and maneuver out of the trapped position. (12)
- Work c2c stitches back down. Attach to the corresponding left side block on the 12th stitch and maneuver out of the trapped position. (12)
- Work c2c stitches up the side. Attach to the corresponding right side block on the 12th stitch and maneuver out of the trapped position. (12)
- Work c2c stitches back down. Attach to the corresponding left side block on the 12th stitch and fasten off. (12)
You will repeat this process – layering left then right side blocks until your blanket is as tall as you decided when making Part 1.
Squaring the Top
The last thing to do is to square off the top edge. This is the same as squaring off in Part 1! You start this process with a left side block.

First Left Side Block
- With the right side of the blanket facing you, attach (a new color) yarn in the bottom right most available stitch of the last left side block you made. Work a c2c stitch (starting with a CH 3). Continue working c2c stitches up the side followed by three FINC (for a total of 12 stitches). (12)
- DEC and work c2c stitches back down. Attach to the corresponding right side block on the 12th stitch and maneuver out of the trapped position. (12)
- Work c2c stitches back up. SS into the last stitch of the row. (11)
- DEC and work c2c stitches back down. Attach to the corresponding right side block on the 11th stitch and maneuver out of the trapped position. (11)
- Work c2c stitches back up. SS into the last stitch of the row. (10)
- DEC and work c2c stitches back down. Attach to the corresponding right side block on the 10th stitch and fasten off. (10)
First Right Side Block
- With the wrong side of the blanket facing you, attach (a new color) yarn in the bottom right most available stitch of the last right side block you made. Work a c2c stitch (starting with a CH 3). Continue working c2c stitches up the side (for a total of 9 stitches). SS into the last stitch of the row. (9)
- DEC and work c2c stitches back down. Attach to the corresponding right side block on the 9th stitch and maneuver out of the trapped position. (9)
- Work c2c stitches back up. SS into the last stitch of the row. (8)
- DEC and work c2c stitches back down. Attach to the corresponding right side block on the 8th stitch and maneuver out of the trapped position. (8)
- Work c2c stitches back up. SS into the last stitch of the row. (7)
- DEC and work c2c stitches back down. Attach to the corresponding right side block on the 7th stitch and maneuver out of the trapped position. (7)
Last Left Side Block
- With the right side of the blanket facing you, attach (a new color) yarn in the bottom right most available stitch of the last left side block you made. Work a c2c stitch (starting with a CH 3). Continue working c2c stitches up the side (for a total of 6 c2c stitches). SS into the last stitch. (6)
- DEC and work c2c stitches back down. Attach to the corresponding right side block on the 6th stitch and maneuver out of the trapped position. (6)
- Work c2c stitches back up. SS into the last stitch of the row. (5)
- DEC and work c2c stitches back down. Attach to the corresponding right side block on the 5th stitch and maneuver out of the trapped position. (5)
- Work c2c stitches back up. SS into the last stitch of the row. (4)
- DEC and work c2c stitches back down. Attach to the corresponding right side block on the 4th stitch and fasten off. (4)
Last Right side Block
- With the wrong side of the blanket facing you, attach (a new color) yarn in the bottom right most available stitch of the last right side block you made. Work a c2c stitch (starting with a CH 3). Continue working c2c stitches up the side (for a total of 3 stitches). SS into the last stitch. (3)
- DEC and work c2c stitches back down. Attach to the corresponding left side block on the 3rd stitch and maneuver out of the trapped position. (3)
- Work c2c stitches back up. SS into the last stitch. (2)
- DEC and work c2c stitch back down. Attach to the corresponding left side block on the 2nd stitch and maneuver out of the trapped position. (2)
- Work a c2c stitch back up. SS into the last stitch. (1)
- DEC and attach to the corresponding left side block on the 1st c2c stitch and fasten off. (1)
You may repeat this process of making a middle panel as many times as you like to reach your desired width. I competed this entire process 2 times for mine.
Weave in your ends! Be sure to post your progress pictures – if you do, use the hashtag #FelixBlanketCAL so we can find it.
I love when people share their finished pieces. If you share your work on facebook or instagram, please tag me so I can see it @shemakescrochet.
You are free to share your finished work, to include selling your finished products, but please credit me – SheMakesCrochet – as the pattern designer. Please do not distribute this pattern or any portion of it, instead direct people to my blog. THANK YOU!


3 thoughts on “Scrap-Along Felix Blanket: Part 2”