

I can’t thank you guys enough for the excitement and love you have been showing my Felix Blanket! This has definitely been such a fun project and a learning experience for me. My Felix Blanket is one of my favorite makes – it’s SO colorful which makes me happy every time it catches my eye. Not to mention, it has greatly inspired me to do more with this design and to do more with my blog, which brings me to this post!
Our Scrap-Along Felix Blanket group on Facebook has been such a sweet space to enjoy everyone’s beautiful blankets, it also turned into an amazing space to ask questions and receive more guidance – EDIT: more on this so be sure to check out the end of this post for a super fun tool Lisa Schwartz put together and so graciously allowed for me to share with all of you! – I always knew that people learn in different ways, but that group helped me to realize the myriad ways people’s minds work when it comes to our craft. I wanted to offer some more tips and strategies so that hopefully anyone who can crochet who sees this blanket, can make it easily.
Easily is the key word in that sentence because this blanket is not hard! It’s quite repetitive and mindless – BUT it’s probably unlike anything you’ve ever done before and therefore, will take a degree of attention until you unlock the pattern in your mind and “get it”. At that point, you probably won’t even need the pattern anymore.
My goal with this post is to get as many people as possible to find that “I’ve got it” moment as quickly as possible. So I’m going to include several videos and some more pictures with annotations to hit home all of the highlights.
EDIT: I’ve also got a full video tutorial of the entire blanket from start to finish. It’s broken up into parts and is called Felix Blanket Crochet Along.
Edit: If you are attempting to complete this blanket without the written pattern, it is recommended that you watch all of the videos. Parts 1-4 demonstrate specific techniques, but they also build off each other and can act as a blanket pattern tutorial when viewed consecutively. Part 5 explains how to grow your blanket, but also has specific stitch counts for blocks in each section. The final video is an overview of the entire blanket making process and would be beneficial if you like to have the overall concept in mind before tackling this project.
C2C
You need to be able to c2c to make this blanket, but remember what I said earlier – this blanket is probably unlike anything you’ve ever done before. So even if you’ve made hundreds of c2c projects, you can still get tripped up with this design because it’s very unconventional – you will need to read the Pattern Notes and Abbreviations carefully because you will need to work some stitches differently than what you are probably use to and you will be making shapes that may be completely foreign to you.
I’ve included a video on how to c2c below. Even if you’ve made hundreds of c2c projects, if you feel lost looking at the pattern – please watch this video because I will speak the language I use in the pattern and also demonstrate exactly how I make my stitches, which is how they need to be done to work the pattern. Ensuring we are on the same page with our terminology may be all it takes to provide you with your ah-ha moment!
Special Techniques
There are three special techniques you need to be familiar with in order to successfully work this pattern. They are:
- Making an “Odd Shape” – this isn’t necessarily a special technique, but it is so incredibly different than how you normally c2c that it’s worth examining more closely.
- Making a FINC – floating increase – a method I developed so you can continue to build stitches even though you no longer have a row beneath you to work into. I developed this method and wouldn’t expect you to have seen it before, so again, it requires your attention before beginning.
- Attaching Blocks – which is basically a join-as-you-go method for c2c with an extra step. Even if you’ve done a c2c join-as-you-go project before, as I said, this project is unconventional so this needs to be reviewed.
All of these methods are outlined in the pattern notes found in Part 1. If you skipped over those your first time with the pattern, you may want to jump back there and can do so here.
Making an Odd Shape:
I have some very clear step-by-step pictures of this process in Part 1, including a numbered chart so you can see the order you need to create your stitches. Not to mention, the chart may help to wrap your mind around making shorter than expected rows and keep your stitch count on track.
It is important for you to realize that you WILL ALWAYS turn your work. You WILL ALWAYS work up one side, TURN and work back down the SAME SIDE.
This is exactly what you always do in c2c. Your c2c instincts may be telling you to do something else when you work this piece, but please ignore them and follow the pattern. It feels “odd” to make this shape and that’s where the name comes from. If you are struggling here, be sure to carefully read the stitch abbreviations, review the step-by-step photos and my c2c video. Then, carefully read the directions and turn your work after every row – you can do it!
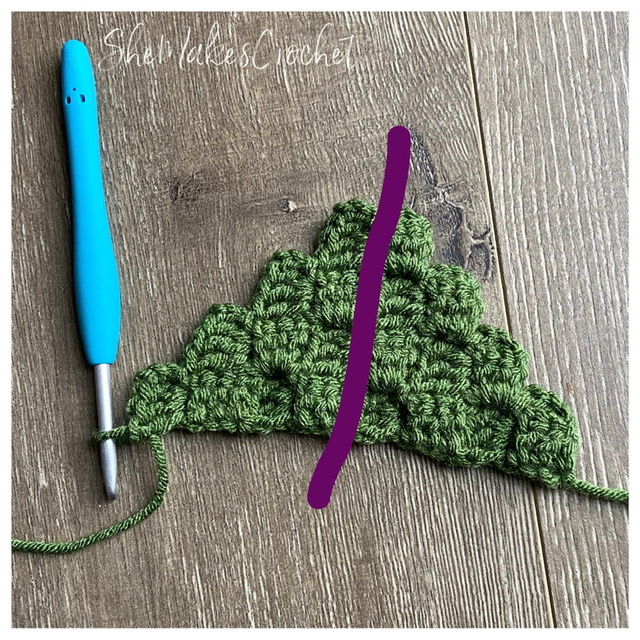
I want to bring to your attention that there is a cheat – just crochet a normal c2c triangle that is 4 stitches wide, 4 stitches tall and 4 across the diagonal. Fasten off and make a second, identical triangle. Fasten off leaving a long tail. Line your triangles up so that you have 8 stitches across the bottom and two stitches at the top point and stitch them together – the purple line in the image above is your stitch line.
FINC – Floating Increase

When you look at the image above, especially if you are experienced with c2c, you should notice that the blocks on the left side have a “floating” edge. I started working each of those stripes in the middle valley of the “V” and up to the side. At some point, you will reach the top of the last stitch and still have more to go. The FINC is what allows you to keep going. I think the step-by-step photos in the pattern notes are very clear so I’m not going to post anymore pictures. I do have a video though if you need to see it in action before it will click.
Attaching Blocks
Like I said above, it may help to think of this as “join-as-you-go”. It may also help to recognize that your c2c stitches look like little squares and when you look at a finished c2c blanket, there is a grid of squares. Each square is touching and connected to its neighboring squares. When you layer blocks of colors onto your Felix Blanket, you will need to attach stitches to neighboring stitches on another block to maintain the grid and to have a blanket that is in one solid piece. This will require you to make some slip stitches while you are in the middle of working a c2c stitch.
Aside from the images in the pattern notes, I also have these annotated images which I think are very useful.

Image 4: Not only shows what it looks like after pieces/stitches are joined together, but I hope it also helps illustrate the grid I mentioned above.
Image 1: In this picture I have made a SS into the last space to work my last stitch. I have completed a CH 3 to start making that last c2c stitch. Do you notice how there is a square shaped gap the size of a c2c stitch between those two panels? That gap is where your last stitch – the one you are currently making – will be and when you are finished with that stitch, it needs to be connected to the blue stitch to the left of it.
Image 2: I annotated that same picture with a purple dot to show you where to SS in order to join/link/connect those two blocks together at the top corner along the edge they will share. After the SS, you need to finish making the last c2c stitch you already started when you made the CH 3, meaning you have 3 DC stitches remaining to finish the stitch. I tried to show that with the pink lines. You make this stitch just like you would normally do – pretend like you never even made the SS and completely ignore that other piece connected to your work. Finally, you need to join/link/connect those two stitches one more time at the bottom corner along the edge they share and I denoted where to SS the second time with the blue dot.
Image 3: You should notice the last stitch is made, all stitches are linked up together. But now you have a problem because your hook and working yarn are at the bottom of your work and you still need to make two more rows of stitches. You need to be in the CH 3 loop on top of the stitch you just made so you can continue working up the row. I tried to illustrate the future c2c stitches you need to make with pink lines. So to get back on top of that c2c stitch, you CH 3 and SS into the loop! It’s that easy. Then, you turn your work and continue to make c2c stitches like normal (starting with another CH 3).
EDIT: I have been noticing that there are some people that struggle with joins as they begin to layer on blocks. Often, the reason for the struggle is that they are making their join (usually the first join of row 2) into the wrong stitch. If you find yourself consistently questioning your joins or are having trouble maintaining the proper stitch count as you layer blocks, this Extra video may be helpful!
Putting It All Together
Now that you are familiar with the c2c stitch and all the special techniques, it’s time to put it together beginning with layering blocks and adding panels.
I’m saying the blanket is worked in panels or sections, but it’s really made as one piece because of the join-as-you-go aspect. There are three sections. They all start off with making a beginning right and left side set up, joining the set up together, layering left and right side blocks and then squaring off the top.

Note: The first set of 12 in black represent the right side panel – Part 1. The second set of 12 in red represent the middle panel – Part 2. This section may be repeated as many times as you like (or omitted all together). The third set of 12 in white represent the left side panel – Part 3.
In Part 1, you will set up your blanket so you have a straight edge along the right and a jagged edge along the left – like in the image I used to illustrate the FINC stitches. You will join the initial set up pieces, layer blocks and square off the top.
In Part 2, you will again create a starting piece for the left set up, you will build onto the bottom of your blanket to set up for right side blocks, you will join both sides together, layer blocks and square off the top. This part may be repeated as many times as you like, or it may be omitted entirely and I describe this in more details in the video below.
In Part 3, you set up the left side with a straight edge, you build onto the bottom of your blanket to set up for the right side blocks, you join both sides together, layer blocks and square off the top.
I have two more videos. The first, I describe the pattern and overall Construction of my Felix Blanket. The second is an Extra on my method of weaving in yarn tails.
It is my sincere hope that between the pattern (and especially the pattern notes), these extra instructions and the videos, you will be able to joyfully and easily create your own Felix Blanket. I love this design and would love to see your work!
EDIT – As I mentioned at the top of this post. Our Felix Blanket Facebook group has been such an amazing experience with so many kind souls sharing their knowledge, as well as their beautiful work. Which brings me to this exciting tool that the awesome Lisa Schwartz put together and so kindly allowed for me to share with all of you! She put together two documents that you can use to plan/customize your Felix Blanket design.
The first one is scaled to the size I used when creating my blanket – so 20 repeating blocks tall with two middle panels. The second is a massive version that will enable you to square or rectangle off a section to be able to create your own unique size. Then, color in the panels to help get a sense of various color arrangements, repeating patterns and designs before you get started. How cool is that!? THANK YOU Lisa!
You are free to share your finished work, to include selling your finished products, but please credit me – SheMakesCrochet – as the pattern designer. Please do not distribute this pattern or any portion of it, instead direct people to my blog. THANK YOU!


Hi there….
I’m a member on the facebook group, and love the tutorials you have made. Yes, this makes this blanket much easier to follow along with the pattern.
My question is….where is the link to the written pattern?
I really would enjoy the challenge of making this Felix blanket.
Thank you
Kathy
For next time, click on Menu and then All Patterns or Home Decor, if you scroll you’ll see it! Here is the link to Part 1, there are 3.
http://shemakescrochet.com/2020/06/03/scrap-along-felix-blanket-part-1/
Is there a writen pattern p please
There is, but it’s over the course of three posts. The third and final post will go live on Wednesday. The first part can be found here:
http://shemakescrochet.com/2020/06/03/scrap-along-felix-blanket-part-1/
Can we get access to a larger version of your map of the blanket so the text can be readable when printed?
Thanks again for the great pattern.
Yes, thank you so much for bringing that to my attention. I re-uploaded it at “actual size” just now so I hope that helps. I can get on a computer sometime later and try something else too.
It’s great. The full size image helped.
Ok!! I’m glad to hear that, thanks so much Lisa.
Just wondering how it got the name “Felix”? What’s the story?
Aw, thanks for asking!
I wanted to give this blanket a nice name instead of my usual, uninteresting and very literal ones. This blanket makes me feel happy because it’s so colorful and fun to look at. I also love that it’s like a happy accident in that a bunch of random colors come together to make a very beautiful and cohesive piece. So I looked up names with those types of meanings – Felix means happy and lucky – I went with that.
Hi, I am a bit confused about the size of your lovely Felix Blanket.
Allowing for different hook sizes and thickness of wool how is the blanket 20 blocks and 51.5 inches tall.
Many thanks, Ruth
Hi Ruth! It takes 4 blocks to set up (2 on the right and 2 on the left) and 4 blocks to straighten out the top (2 on the right and 2 on the left). And then I repeated the middle layer blocks for a total of 20 blocks (10 on the left and 10 on the right). It is not 20 blocks tall. I’m sorry if that’s confusing! Hopefully this explanation makes more sense? If my math is correct, I think it’s 80 c2c stitches tall (the way I made it). Please let me know if you still need help.
I need help. I think I messed up on the second panel. Who can I send pic to
.
I’m so sorry I am just now seeing this. Were you able to figure it out? Do you have facebook? I have a group devoted entirely to this blanket with thousands of members. Your questions will get answered very quickly there (if not by me, then by someone else).
I started another one and now have 2 started and doubt I will finish either iPhone!
Where would l find the Felix afghan horizontal with no FINC…
Thank you ever so much.
I made the original now l want to try going sideways…
Hi Carolyn, I did not write instructions for that and I never made a blanket using that method. If I were to try, I would simply make the start of the first panel. Then continue starting each subsequent panel until it’s the width you need and then start working vertically.