

I’ll admit right now that naming my patterns is not my strong suit. The name for this piece came to be because I was inspired by my Geometric Zip Pouch. I love that this design echos my other bag, but this time, the triangles “square” up to each other – hence my very original name. Not to mention, I absolutely could not nail down a color palette because there were too many gorgeous options, so I used the same tapestry pattern to make two totally different bags – taking the squared in Geometric Squared to another level.
Geometric Squared Pouch
Please note that there are two versions of this bag and they are each created working off the same tapestry crochet design. I used slightly different color arrangements for each bag and have therefore provided both graphs. The Wide Bottom Pouch may be referred to as Version 1 (v. 1) and the Fold-Over Clutch as Version 2 (v. 2).
Supplies:
- DK yarn – I used Cotlin yarn in:
- Linen
- Whisker
- Ash
- Harbor
- Mustard Seed (v. 1) or Conch (v. 2)
- 3.5 mm crochet hook***
- Scissors
- Darning/Yarn needle
- Stitch marker
- (v. 1) 9 inch zipper
- (v. 1) Needle and thread for attaching zipper
- (v. 1) Straight pins
- (v. 2) Faux leather vinyl
- (v. 2) Ruler
- (v. 2) Pen
- (v. 2) 1/8 inch hole punch
- (v. 2) Needle and thread
- (v. 2) Toggle button
***Note about hook size: I used a 3.5 mm hook for my Wide Bottom Pouch. However, I used a 2.75 mm hook for my Fold-Over Clutch. You may need to adjust your hook size up or down for the Fold-Over Clutch in order to achieve a tension that corresponds with the same width as the bottom of the bag that is created with the faux leather vinyl.
Gauge: 4 inch tapestry crochet square is 27 stitches by 17 rows with 3.5 mm hook; 31 stitches by 18 rows with 2.75 mm. Note: gauge is somewhat relative for this project, especially if you make the Fold-Over Clutch as you must construct the faux leather vinyl bottom before working your crochet stitches. Depending on your specific yarn and personal tension, you may choose to cut your faux leather vinyl slightly larger or smaller than mine.
Finished Dimensions: Wide Bottom Pouch is 5 inches tall by 9 inches wide (at widest point) and 4.5 inches deep. Fold-Over Clutch is 10 inches tall (unfolded)/6.5 inches (folded) by 8 inches wide.
Abbreviations and stiches used:
- SC single crochet
- BLO back loop only
- CH chain
- SS slip stitch
Pattern Notes:
These bags are designed using tapestry crochet and will require you to work off a chart. If you are not familiar with tapestry crochet and/or working off a chart, instructions are provided below. Some things to keep in mind with tapestry crochet are to use a small hook for a nice, tight fabric and to work in the BLO because it helps to hide your unused strands of yarn.
Carrying Yarn
In order to complete the color work for these bags, you will work SC stitches into the BLO and carry all of the unused yarn, working over the strands, as you go along. Refer to the images to below.
Note: All images throughout are read from left to right and top to bottom.

Color Changes
The next thing you need to be able to do is to make a color change. Refer to the images below.

Special Consideration – Avoiding Tangled Yarn


When working, I like to keep my yarn lined up as the first image above. When it comes time to change colors, I grab my new color at the skein and pull it up. There will be some twisting near your work as shown in the second picture above. You can almost always work over those little twists. It may help to stop after several stitches and pull on the unused strands from time to time.
Working Off a Chart
Finally, you will need to work off a chart. In my case, as someone who crochets right handed, I will read the chart from RIGHT to LEFT (just as you work your stitches from right to left). Reference the chart below.
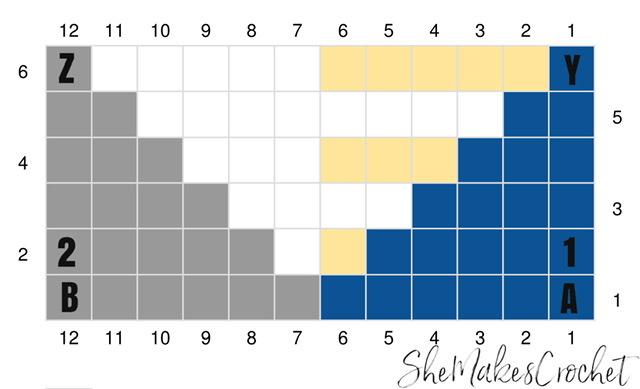
If I was using the chart above to make a bag, the image that you see would represent one side (let’s say the front) of the bag and that one side would be 12 stitches wide by 6 rounds high. In order to make the back of the bag, the chart will need to be repeated. In other words, each row will be worked twice. So my final dimensions for the entire bag (front and back) will be 24 stitches wide by 6 rounds high.
Each box on the chart represents one stitch. In this example, I would reference row 1 and work 12 stitches starting at the blue A and ending at the grey B. At this point, I would be halfway finished with my first round. I would then return to the beginning of row 1 and complete those same 12 stitches a second time (again starting at the blue A and ending at the grey B). I would then be at the end of the first round, ready to start the second.
The other part about working off a chart is making color changes. As you can see from the example above, row 1 consists of 6 blue stitches, followed by 6 grey stitches. I would work 5 blue stitches and on the final yarn over of the 6th blue stitch, I would change to grey. Then I would work 5 grey stitches and change back to blue on the final yarn over of the 6th grey stitch in order to repeat row 1 of my chart. I would again work 5 blue stitches, changing to grey on the 6th blue stitch and then work 5 grey stitches, changing to blue on the 6th grey stitch.
Round 1 is completed, you move up to row 2 on the chart and would start at the blue 1 working from right to left until you reach the grey 2. As you can see, you would complete, 4 blue stitches and change to yellow on the 5th blue stitch, work 1 yellow stitch, changing to white on the final yarn over. Work 1 white stitch, changing to grey on the final yarn over and work 4 grey stitches, changing to blue on the 5th grey stitch. You would repeat this process/row one additional time in order to complete both sides of your bag and the entire round of 24 stitches.
Round 2 is complete, you move up to row 3 and complete that same process for that row and each remaining row.
Special Consideration – Red Dot Annotation

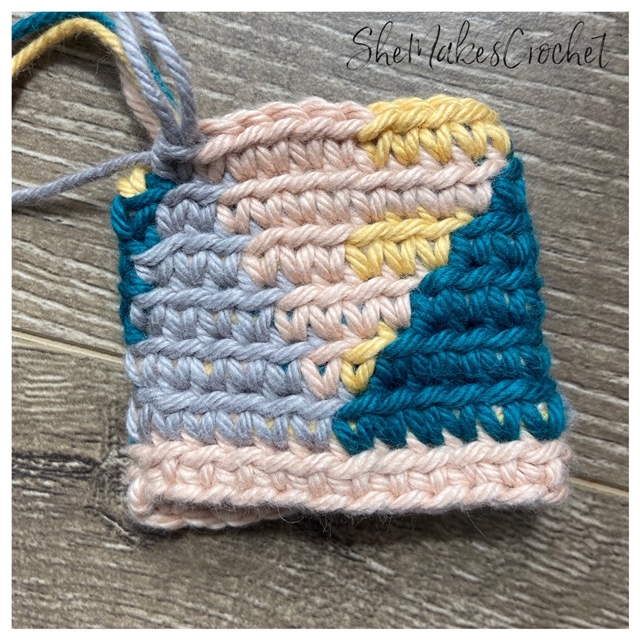
Crochet stitches have a slant to them and at times, cleaner lines can be achieved by working through both loops instead of the BLO. You will notice an red dot on the graph throughout the tapestry design and in those places, it is recommended to work through both loops rather than the BLO. This is optional. The two pictures above illustrate this difference. In the first picture, the left side of the linen triangle was worked in both loops and in the second picture, that same side was worked into the BLO. It’s a subtle difference, but the image on the left looks cleaner and is what I prefer.
Pattern – Wide Bottom Pouch:

The Wide Bottom Pouch is created by chaining a loop and working the tapestry design in the round. Then, the bottom of the bag gets seamed closed at the end. The pictures below illustrate working the loop and adding the unused strands after the foundation row as described above in the Pattern Notes.

Using Linen
The Foundation Row: CH 126. SS to join into the first CH, SC into the same stitch (the first CH) and SC into each remaining CH. (126 SC)
Note: you will need to change to the first color of the chart (Ash) on the last yarn over of the last stitch.
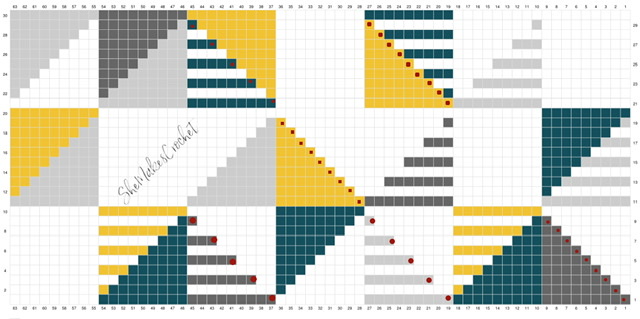
Round 1: Work the first stitch of the pattern into the BLO being sure to add the unused strands as described in the Pattern Notes above. It is recommended to mark the first stitch of the round. Follow the chart above and continue working SC stitches into the BLO for the remainder of the round. Be sure to carry all of the unused strands. (126 SC)
Note: I also work over my yarn tails as well.
Rounds 2-30: Continue following the chart to work the remainder of the tapestry design. Be sure to always work in the BLO and to carry all of your unused strands of yarn. Also remove and place the stitch marker into the first stitch as you start each new round. (126 SC)
Round 31: SC all around in preferred color – I used Mustard Seed. (126 SC)
Note: Continue to SC into the BLO for this round and crochet over all unused strands of yarns. Fasten off and leave a long tail to weave in. Trim the other strands close to your work – No need to weave those as they were crocheted over.
Finishing Touches
Whip Stitch the bottom of the bag closed. If you like a flat bag, you may leave it like this.

To create the wide bottom, you need to do a little more sewing. Turn the bag so the inside (wrong side) of your work is facing to the outside. Open the bag and place it on your work surface with the bottom seam facing up. You need to press it down and fan the corners open as shown in the second image above.
Then, fold the corners towards the middle of the bag – the further down you fold the corners, the deeper your bag will be. I did not measure this though you could! Instead, I folded until the 7th round of stitches. Once you have everything evenly folded, pin into place. Thread your needle with a long strand of yarn and sew the two sides of the triangle flap into place as depicted in images 3 and 4 above. I like to work my needle through both panels of the triangle and then only partially through the bottom of the bag (so my stitching will not be visible on the outside of my bag).
After stitching down both corners, remove pins and weave in any ends. Turn your bag right side out. You will notice a crease where the corners were folded in and that crease is illustrated in the first picture below. I chose to stitch that crease closed. These stitches are visible on the outside of the bag so be sure to use a color that will blend well – I used Linen.

You may choose to line your bag; however, with tapestry bags, it really isn’t necessary! The fabric is tight and has a nice structure to it. I chose to leave my bag without a liner. Attach a zipper or other closure of choice.

Pattern – Fold-Over Clutch:


The Fold-Over Clutch is created by making a bottom out of faux leather vinyl and then working the foundation row directly into the bottom. Reference the pictures below.

Cut a piece of faux leather vinyl that is 15 cm high by 21 cm wide.
Note: if you used a different weight yarn, you may want to cut your piece several centimeters wider or narrower.
Using a ruler, place a mark ½ cm from the edge and every 1 cm after that along the long side (for a total of 21 marks). Repeat this process on the other long side of the faux leather vinyl. Carefully punch a hole into each one of the marks.
Note: if you cut your faux leather vinyl to a different size, you will need to adjust your spacing between holes accordingly.
Fold in half with the right side to the inside and the holes running along the top. Stitch the two short sides closed. Turn your piece so the right side is facing out.
As mentioned earlier, you may need to adjust your hook size up or down in order to achieve a size that corresponds to the faux leather that you have at the base of your bag. I used a 2.75 mm hook and my stitches line up perfectly with the width of the base of my bag – I tend to crochet on the tight side of normal. I recommend assessing if you should change hook sizes for the remainder of the bag after working a round or two of the tapestry crochet pattern.
Using Linen
The Foundation Row: Insert hook into the first hole immediately after the seam, draw up a loop, CH 1 and SC into the same hole. SC into the same hole two more times (for a total of 3). Work 3 SC stitches into each hole all the way around the faux leather vinyl. (126 SC)
Note: you will need to change to the first color of the chart (Ash) on the last yarn over of the last stitch.

Round 1: Work the first stitch of the pattern into the BLO being sure to add the unused strands as described in the Pattern Notes above. It is recommended to mark the first stitch of the round. Follow the chart above and continue working SC stitches into the BLO for the remainder of the round. Be sure to carry all of the unused strands. (126 SC)
Note: I also work over my yarn tails as well.
Rounds 2-30: Continue following the chart to work the remainder of the tapestry design. Be sure to always work in the BLO and to carry all of your unused strands of yarn. Also remove and place the stitch marker into the first stitch as you start each new round. (126 SC)
Round 31: SC all around – I used Conch. (126 SC)
Note: Continue to SC into the BLO for this round and crochet over your yarn tails. Fasten off and leave a long tail to weave in. Trim the other strands close to your work – No need to weave those as they were crocheted over.
Finishing Touches
You may choose to line your bag; however, with tapestry bags, it really isn’t necessary! The fabric is tight and has a nice structure to it. I chose to leave my bag without a liner. Attach a toggle button or other closure of choice.

If attaching a toggle button decide where you would like the button to be and stitch into place. I chose to place mine in the center just above the faux leather vinyl base of my bag. I attached my button with yarn.
Fold the bag over and attach a strand of yarn into the final round (I used Conch to match) on the top side of the folded over piece. You need to make a small loop to wrap around the button and the exact size and position of your loop will vary depending on the button you used and where you placed it so be sure to test as you work. CH a length, I did 11. SS back into the final round several stitches away, I did 4. Then, work SC stitches over the CH loop and SS into the final round where you started, I worked 11 SC. Fasten off and weave in any ends you may have.

I love when people share their finished pieces. If you share your work on facebook or instagram, please tag me so I can see it @shemakescrochet.
You are free to share your finished work, to include selling your finished products, but please credit me – SheMakesCrochet – as the pattern designer. Please do not distribute this pattern or any portion of it, instead direct people to my blog. THANK YOU!


Hi! I love this pattern! They’re such pretty bags! I’d like to make version 2, but with the colours (yellow) of versions 1. How many skeins did you use per colour? Can’t seem to find it in the post. Thank you!
Hi! Great question. I used 1 skein of each color. You will use most of the skein for the main color for one bag. You should have enough leftovers of the other colors to make both bags. So I used 2 linen and 1 of everything else to make both.
Thank you for sharing it. It’s very clear instructions 🥰🥰
Thank you for leaving a kind comment. I hope you enjoy making and using these bags!