

EDIT: If you love this blanket, be sure to check out my Felix Remixed Blanket! It is the same type of crochet fun, but with a totally different result. You can find the pattern on my blog and it is also available to download on Ravelry.
We’re almost finished with our blankets and I hope you have been enjoying the pattern and your creation! This last section will go quickly because the left side blocks are shorter. If you haven’t started weaving those ends in, I would consider doing some of that while working this quick panel so you can start to fully enjoy your blanket sooner!
If you are new here, please refer back to my Introduction Post, Part 1 and Part 2 before continuing. Also I have a Tips and Techniques post with videos, a chart, additional explanations and annotated pictures.
Part 3: The Left Side
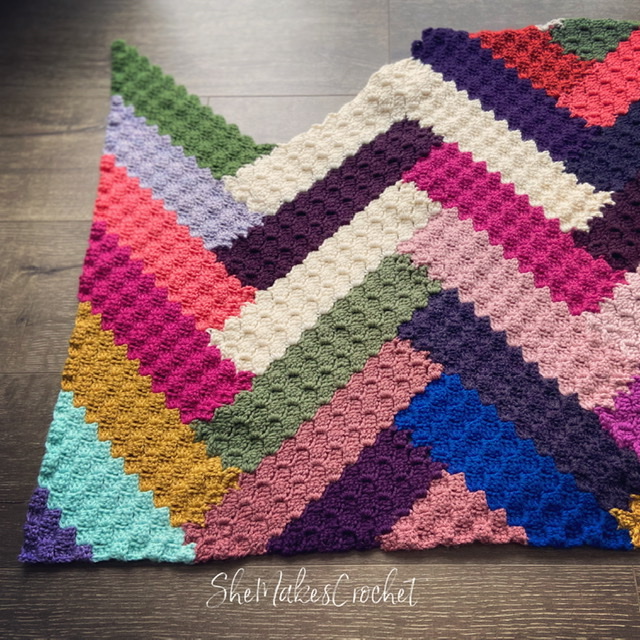
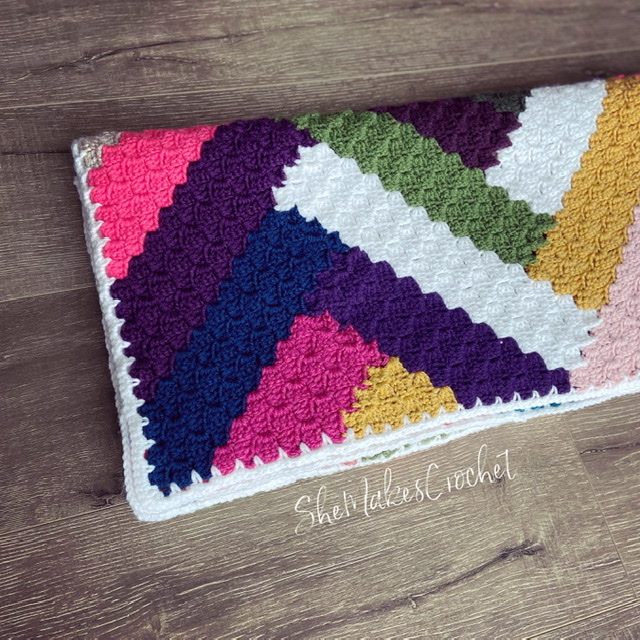
It’s time to layer on the last panel and square up the remainder of your Felix Blanket!
This should all be very familiar. We will start the panel, join, then layer blocks and square the top. The right side blocks will be created just like you did in Part 2 and the left side will have a straight edge all they way up, similar to Part 1.
Again, I left out the abbreviations and pattern notes from this section because you should be familiar. If you need the pictures, please refer back here.
Pattern:
Note: As always, it is expected you will turn your work after every row.
Starting the Panel
The Left Side
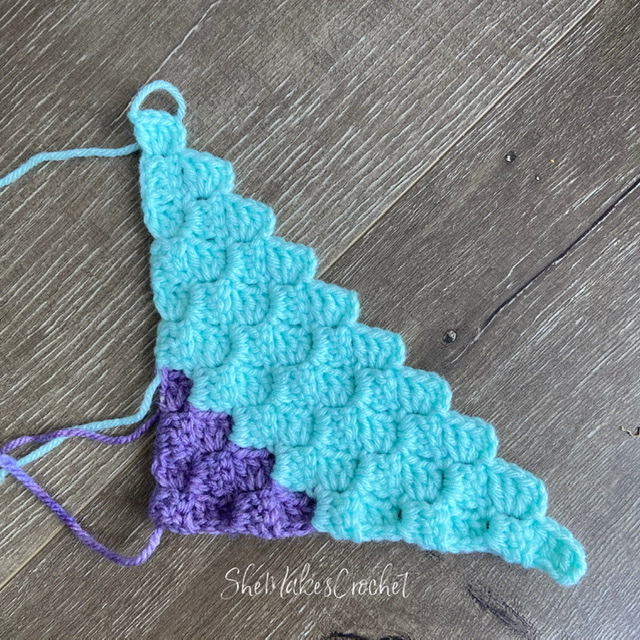
Rows 1-4:
Create a starting triangle by working 4 rows of c2c increasing at the start of every row. Change to a new color on the last stitch. Hint: your finished triangle should be 4 c2c stitches wide, 4 c2c stitches tall and 4 across the diagonal.
Rows 5-10:
With the new color, continue working 6 more rows of c2c increasing at the start of every row. Hint: your finished triangle (counting both colors) should be 10 c2c stitches wide, 10 c2c stitches tall and 10 across the diagonal.
Fasten off. Place to the side. This piece will be the bottom left side of the panel.
Right side
Note: This process is the same as in Part 2.
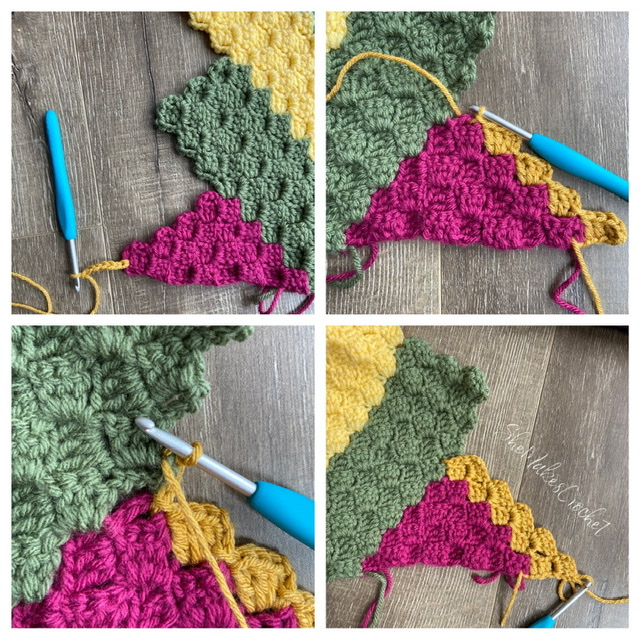
Image 2: 4 c2c stitches worked and 1 remaining.
Image 3: After making the CH 3 to work the last c2c, SS into the corresponding stitch on the block previously made to link up the stitches.
Image 4: finish the last c2c by completing 3 DC and SS to the corresponding stitch on the previously made block again. Maneuver out of the trapped position and c2c back down the side.
- Attach a new color in the bottom left most stitch of the odd shape on your blanket. INC and work c2c stitches up the side, attach to the corresponding stitch on the last (5th) stitch and maneuver out of the trapped position. (5)
- Work c2c stitches down the side. (5)
- INC and work c2c stitches up the side. Attach to the corresponding stitch at the top and maneuver out of the trapped position on the last (6th) stitch. (6)
- Work c2c stitches down the side. (6)
- INC and work c2c stitches up the side. Attach to the corresponding stitch at the top and maneuver out of the trapped position on the last (7th) stitch. (7)
- Work c2c stitches down the side. (7)
Change colors on the last yarn over of the last DC.
- With the new color INC and work c2c stitches up the panel, attach to the corresponding stitch on the 11th stitch and maneuver out of the trapped position.
- Work c2c stitches down the side. (11)
- INC and work c2c stitches up the side. Attach to the corresponding stitch at the top and maneuver out of the trapped position on the last (12th) stitch.
- Work 11 c2c stitches down the side. Note: you will have one c2c stitch remaining to be worked.

Grab the other piece (triangle) you made and place it so that the straight edges of the triangle are at the bottom and left.
SS into the last CH 3 space in order to begin working the final c2c stitch. CH 3 and SS into the bottom right most stitch of the triangle in order to link those stitches together.
DC 3 as you normally would to complete the c2c stitch and SS into the corresponding stitch (the same stitch) on the triangle again.
CH 3 and SS into the CH 3 space of the last stitch you made to maneuver out of the trapped position. (12)
- Continue making c2c stitches up the side. Attach to the corresponding stitch at the top and maneuver out of the trapped position on the last (12th) stitch. (12)
- Work c2c stitches down the side. Attach on the last (12th) stitch. (12)
Fasten off.

Now you should have the set up for your Left Edge of the blanket complete. You will layer blocks left to right like you did in Parts 1 and 2, being sure to have a straight edge all the way up for the left side blocks and to attach your right side blocks to the jagged edge so you’ll have one squared off blanket at the end.
Layering Blocks for the Left Blanket Edge
The process for layering blocks is essentially the same as before with the difference being that the left side needs to form a straight edge all the way up the side.
Left Side Blocks
- With the right side of the blanket facing you, attach (a new color) yarn in the bottom right most available stitch of the last left side block you made. Work a c2c stitch (starting with a CH 3). Continue working c2c stitches up the side for a total of 9 stitches. (9)
- INC and work c2c stitches back down. Attach to the corresponding right side block on the last (10th) stitch and maneuver out of the trapped position. (10)
- Work c2c stitches back up. (10)
- INC and work stitches back down. Attach to the corresponding right side block on the last (11th) stitch and maneuver out of the trapped position. (11)
- Work c2c stitches back up. (11)
- INC and work stitches back down. Attach to the corresponding right side block on the last (12th) stitch and fasten off. (12)
Right Side Blocks
- With the wrong side of the blanket facing you, attach (a new color) yarn in the bottom right most available stitch of the last right side block you made. Work a c2c stitch (starting with a CH 3). Continue working c2c stitches up the side. Attach to the corresponding right side block on the last (12th) stitch and maneuver out of the trapped position. (12)
- Work c2c stitches back down. Attach to the corresponding left side block on the last (12th) stitch and maneuver out of the trapped position. (12)
- Work c2c stitches up the side. Attach to the corresponding right side block on the last (12th) stitch and maneuver out of the trapped position. (12)
- Work c2c stitches back down. Attach to the corresponding left side block on the last (12th) stitch and maneuver out of the trapped position. (12)
- Work c2c stitches up the side. Attach to the corresponding right side block on the last (12th) stitch and maneuver out of the trapped position. (12)
- Work c2c stitches back down. Attach to the corresponding left side block on the last (12th) stitch and fasten off. (12)
You will repeat this process – layering left then right side blocks until your blanket is as tall as you decided when making Part 1.
Squaring the Top
The last thing to do is to square off the top edge. This is a similar process as you’ve done before with some small differences due to the fact that the left side is a straight edge.
First Left Side Block
- With the right side of the blanket facing you, attach (a new color) yarn in the bottom right most available stitch of the last left side block you made. Work a c2c stitch (starting with a CH 3). Continue working c2c stitches up the side for a total of 9 c2c stitches. (9)
- INC and work stitches back down. Attach to the corresponding right side block on the last (10th) stitch and maneuver out of the trapped position. (10)
- Work c2c stitches back up. (10)
- INC and work c2c stitches back down. Attach to the corresponding right side block on the last (11th) stitch and maneuver out of the trapped position. (11)
- Work c2c stitches back up. SS into the last stitch of the row. (10)
- DEC and work c2c stitches back down. Attach to the corresponding right side block on the last (10th) stitch and fasten off. (10)
First Right Side Block
- With the wrong side of the blanket facing you, attach (a new color) yarn in the bottom right most available stitch of the last right side block you made. Work a c2c stitch (starting with a CH 3). Continue working c2c stitches up the side for a total of 9 stitches. SS into the last stitch of the row. (9)
- DEC and work c2c stitches back down. Attach to the corresponding left side block on the last (9th) stitch and maneuver out of the trapped position. (9)
- Work c2c stitches back up. SS into the last stitch of the row. (8)
- DEC and work c2c stitches back down. Attach to the corresponding left side block on the last (8th) stitch and maneuver out of the trapped position. (8)
- Work c2c stitches back up. SS into the last stitch of the row. (7)
- DEC and work c2c stitches back down. Attach to the corresponding left side block on the last (7th) stitch and maneuver out of the trapped position. (7)
Last Left Side Block
- With the right side of the blanket facing you, attach (a new color) yarn in the bottom right most available stitch of the last left side block you made. Work a c2c stitch (starting with a CH 3). Continue working c2c stitches up the side and SS into the last stitch. (6)
- DEC and work c2c stitches back down. Attach to the corresponding right side block on the last (6th) stitch and maneuver out of the trapped position. (6)
- Work c2c stitches back up. SS into the last stitch of the row. (5)
- DEC and work c2c stitches back down. Attach to the corresponding right side block on the last (5th) stitch and maneuver out of the trapped position. (5)
- Work c2c stitches back up. SS into the last stitch of the row. (4)
- DEC and work c2c stitches back down. Attach to the corresponding right side block on the last (4th) stitch and fasten off. (4)
Last Right side Block
- With the wrong side of the blanket facing you, attach (a new color) yarn in the bottom right most available stitch of the last right side block you made. Work a c2c stitch (starting with a CH 3). Continue working c2c stitches up the side (for a total of 3 stitches). SS into the last stitch. (3)
- DEC and work c2c stitches back down. Attach to the corresponding left side block on the last (3rd) stitch and maneuver out of the trapped position. (3)
- Work 2 c2c stitches back up. SS into the last stitch. (2)
- DEC and work c2c stitches back down. Attach to the corresponding left side block on the last (2nd) stitch and maneuver out of the trapped position. (2)
- Work a c2c stitch back up. SS into the last stitch. (1)
- DEC and attach to the corresponding left side block on the 1st c2c stitch and fasten off. (1)
Border

I went back and forth for an embarrassingly long time trying to decide on whether to put a border on this or not and I have to say, while this blanket looks amazing without one, I am so glad I used one because it really pops!


I decided to keep my border simple and if you’d like to do the same, here is what I did:
Note: Depending on your tension, you may need to adjust and do a CH 2 in place of the CH 3.
Note: I wanted to be sure my blanket was nice and flat. As such, I didn’t want too much “bulk” at the corners. I made a CH 2 immediately before and after the 3 SC corner. Otherwise, I made a CH 3 throughout the remainder. This is optional, again depending on how tight or loose you crochet, you may or may not need to make that adjustment.
- Attach a new strand of yarn somewhere along the edge between c2c stitches, CH 1 (doesn’t count as a stitch) and single crochet (SC) in the same space. Then CH 3 and SC in the next “gap” between c2c stitches. Repeat this process of CH 3 and SC between c2c stitches until you reach the corner. Work 3 SC into the corner and then continue to CH 3 and SC between c2c stitches until you get all the way around your blanket. SS to join to the first SC.
- CH 1 and SC in the same stitch as the join. Work 2 SC into the CH 3 space and then SC into the next SC. Continue to work 2 SC into the CH 3 space and SC into the next SC until you reach the middle SC of the 3 SC corner. Work 3 SC into the middle SC and continue to work a SC into the next SC and 2 SC into the CH 3 space until you get all the way around your blanket. SS to join to the first SC.
Weave in your ends! Remember to use the tag #FelixBlanketCAL when sharing pictures on social media so we can all enjoy your hard work!
I love when people share their finished pieces. If you share your work on facebook or instagram, please tag me @shemakescrochet so I can see it.
You are free to share your finished work, to include selling your finished products, but please credit me – SheMakesCrochet – as the pattern designer. Please do not distribute this pattern or any portion of it, instead direct people to my blog. THANK YOU!


I would just like to thank you very much for this lovely pattern and tutorials. You are a very talented lady, figuring out how to join each piece individually without the need for bobbins. It is a wonderful pattern which I have started 3 times already, but not settled on a colour scheme (which is usual for me), but have mastered the technique with the help of your very informative pattern and Youtube tutorials. I can’t wait to get started again. You have been so generous to give this pattern freely and you have helped so many people get to grips with the new joining technique. I know this is going to be a very popular go-to blanket for a lot of people. Thank-You x
Thank you for that very kind comment! I’m happy that so many people are enjoying this pattern and appreciate you taking the time to share your thoughts and experience so far. I love that you are being so intentional with a color scheme – I’m sure whatever you decide will be beautiful.
Do you have a pattern of this on Ravelry that can be purchased? I would love to have it in my library! I am retiring in October and plan on this being my 1st retirement project. Thank you so much for all the hard work you put into this and all the extra miles you went to provide all the videos and helpful hints!
Congratulations on your upcoming retirement! I have the “pattern” on ravelry if you want to save it that way, but I do not have a PDF version of the pattern at this time (so ravelry will link you back to here). It will remain on my blog though, so no rush to feel like you have to save it until after October. Does that help?
THANK U SO MUCH FOR YOUR TIME AND EFFORT IN WRITING AND MAKING VIDOES FOR THIS AMAXING FELIX BLANKET FOR ALL OF US TO ENJOY IVE MADE PLENTU OF BLANKETS BUT THIS ONE HAS MY HEART AND MY FAVORITE OF ALL BLANKETS I HAVE DONE AND HOW AMAXING THE HELP FROM U AND ALL THE OTHERS WILLING TO HELP ALONG THE WAY APRILLE COLLAR AND U AND OTHERS HELPED ME SO MUCH WHEN I GOT STUCK (ALOT OF TIMES LOL) IM ON #2 OF THIS AMAZING BLANKET HAVE 4 MORE TO GO (XMAS SURPRISE FOR MY GRAND CHILD AND I ABSOLUTELY NEED ONE FOR ME THANK U AGAIN FOR THE PATTERN VIDEOS AND ALL UR PATIENCE AND HELP LOVE SHEMAKES CROCHET ILL BE HERD FOR A LONG TIME
Thank you so much, Melody! It makes my heart happy that you enjoy this blanket so much. I have greatly enjoyed seeing your beautiful work. Thank you for sharing!
Can’t wait to begin this C2C. I just made my first C2C blankets and love how fast it goes. I will post you with the one that I will make from your parttenr. Thank you for taking the time.