
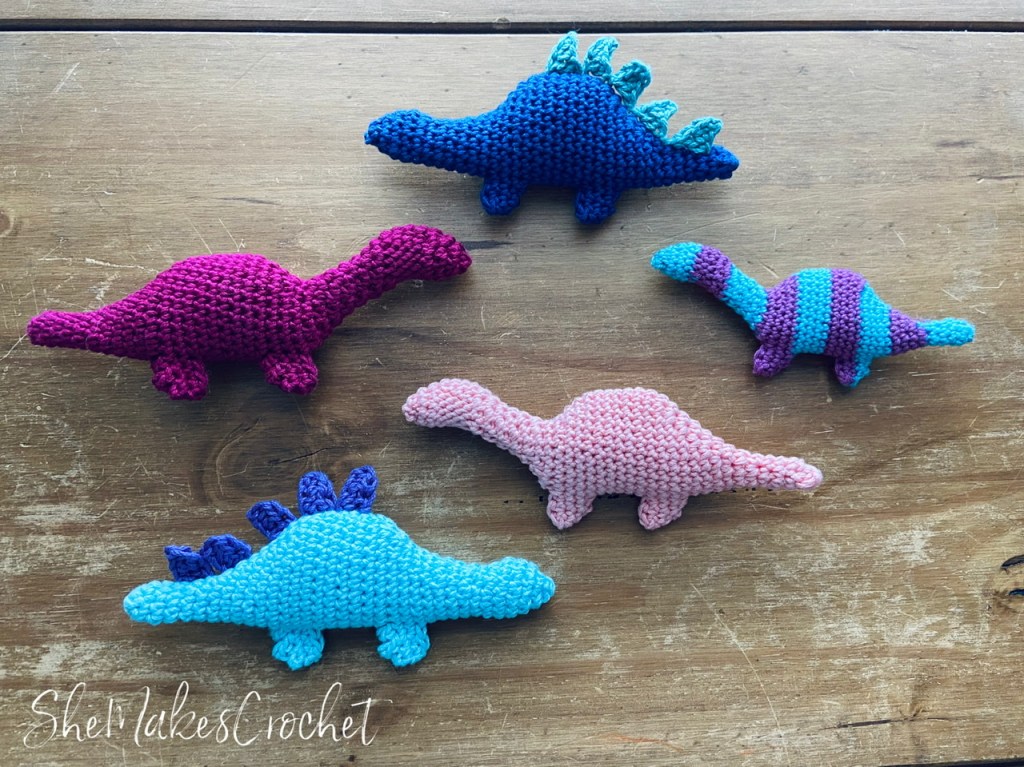
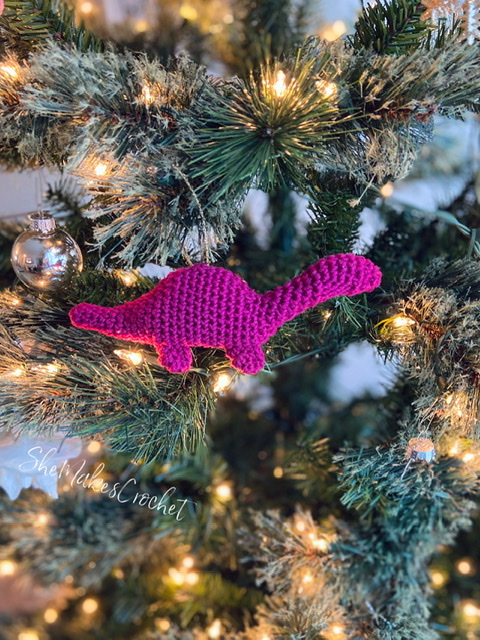
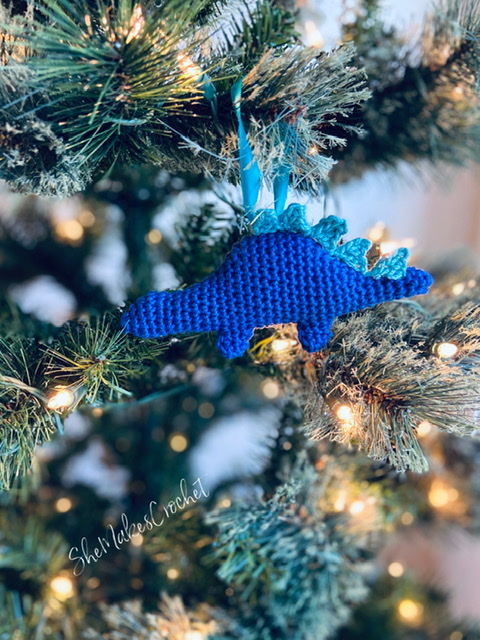
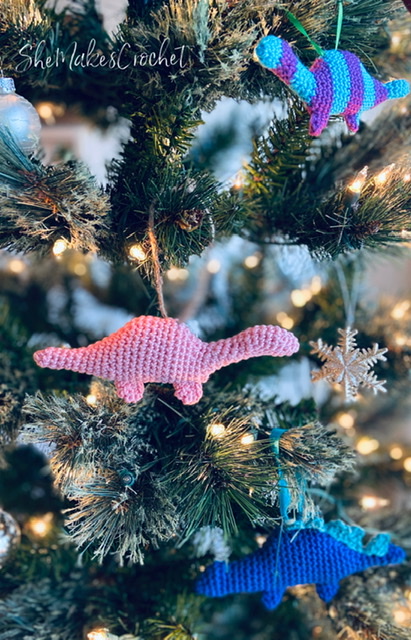
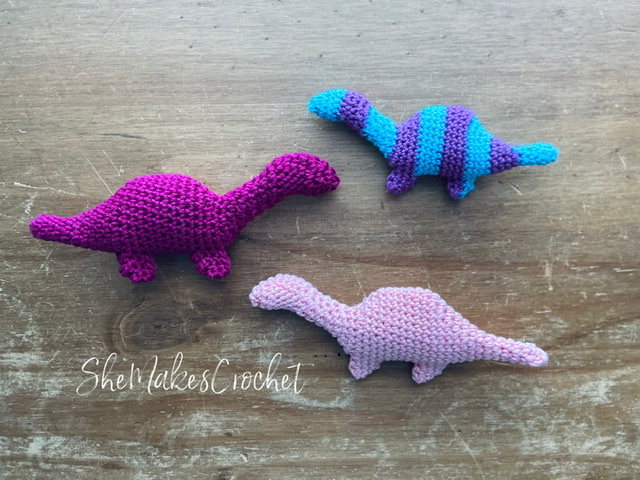
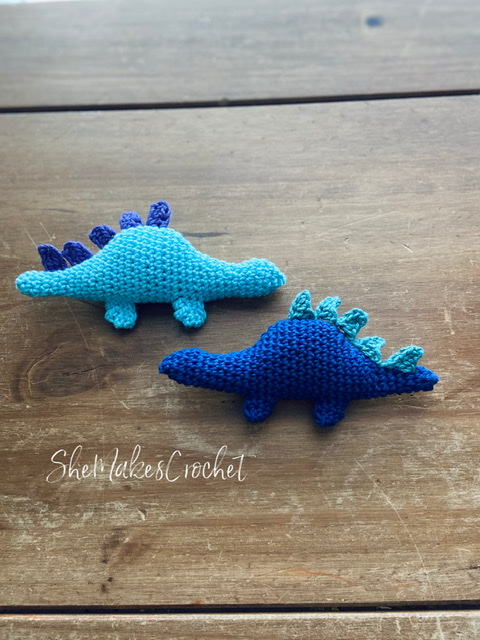
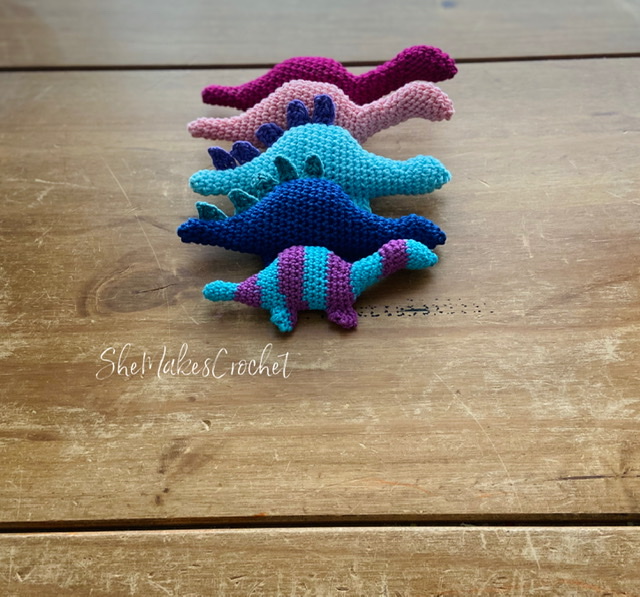
These dinosaurs were inspired by the abundance of felt dinosaurs available on Pinterest. I was so excited to make one, as we have some dinosaur fans in my house. I distinctly remember thinking, if I were to crochet something like this, it would take forever and so I decided to start yet another non-crochet project. Later that day, I realized there is a way to create a fun dinosaur with no sewing and in one sitting. I quickly got to work and these little guys came together seamlessly. I loved how my prototype turned out and was thrilled that I could easily alter the shape to get a second dinosaur. I think a group of these in coordinating colors would be absolutely adorable! If ornaments are not your thing, these would be cute attached to a gift bag, or a backpack! I also think you could use these to make an adorable bunting to decorate a playroom or a nursery. There are so many possibilities. I hope you enjoy these dinosaurs as much as I have been!
Supplies:
- Small amount of yarn in one or several colors – I used *mercerized* cotton yarn from my stash – Omega Sinfonia, 24/7 Cotton and Patons Grace
- Crochet hook to match your tension and yarn weight – I used a 4.0 mm with the Omega Sinfonia and 24/7 Cotton (4 weight) and a 3.75 mm with the Patons Grace (3 weight)
- Scissors
- Needle for sewing down yarn tails
- Small amount of poly-fil or stuffing of choice
- Contrasting yarn, twine, ribbon, etc. if using as an ornament to create a loop for hanging
*Mercerized cotton is not required. If you are not familiar with it and you are able to get your hands on some, I highly recommend it for many different types of projects, this one included. Basically, the mercerized cotton has an incredible sheen and allows for some very vibrant and rich colors which I think these playful dinosaurs need.
Finished Dimensions: Finished size varies depending on your yarn and hook selections. My dinosaurs worked with the larger hook and heavier weight yarn are approximately 6.5 inches across from the tip of the head to the tip of the tail. The smaller dinosaurs worked with the smaller hook and lighter weight yarn are about 5.5 inches.
Abbreviations and stiches used:
- CH chain
- SC single crochet
- HDC half double crochet
- DC double crochet
- SS slip stitch
- FLO front loop only
- DEC decrease
- INC increase ***I recommend an invisible decrease, see Pattern Notes below***
Pattern Notes:
Dinosaurs are worked from tail to head. I have created several projects that I call “rag dolls” and these dinosaurs fit into that category. If you are unfamiliar with my rag dolls (you should check them out!) – essentially they are worked like amigurumi in continuous rounds. However, the finished piece has more of a flat look to it, similar to the look you achieve when you work two flat panels and whip stitch them together. I recommend lightly stuffing these to help maintain the flat look.
Invisible Decrease – insert your hook into the FLO of the next stitch, DO NOT draw up a loop and instead, insert your hook into the FLO of the next stitch after that. It’s a little awkward at first, but you’ll get use to it. Then, yarn over and pull through two loops (i.e. the two front loops) and then yarn over and pull through to complete the stitch.
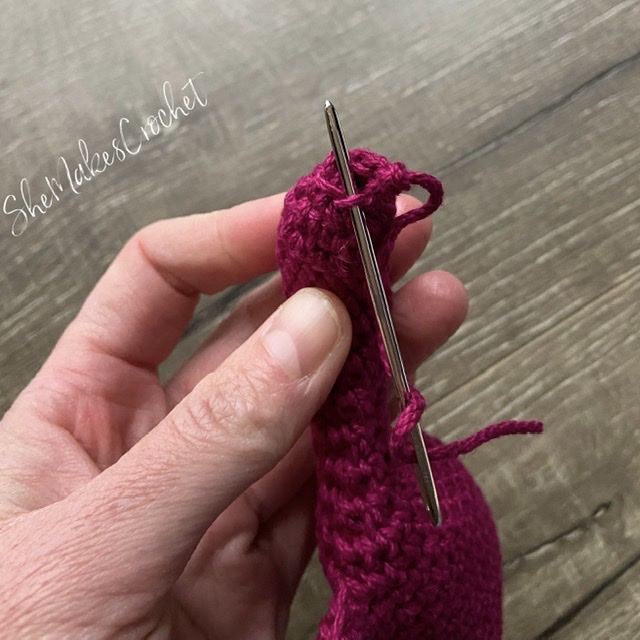
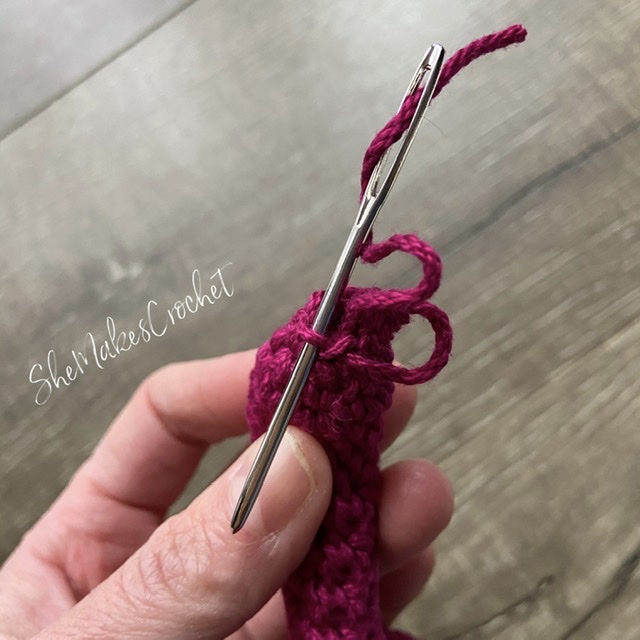
Close Off – I do this by threading a needle with the yarn tail and weaving through the front loops of the last round of stitches. I alternate working my needle from bottom to top and top to bottom. When you get all the way around, pull the yarn tail to close the hole.
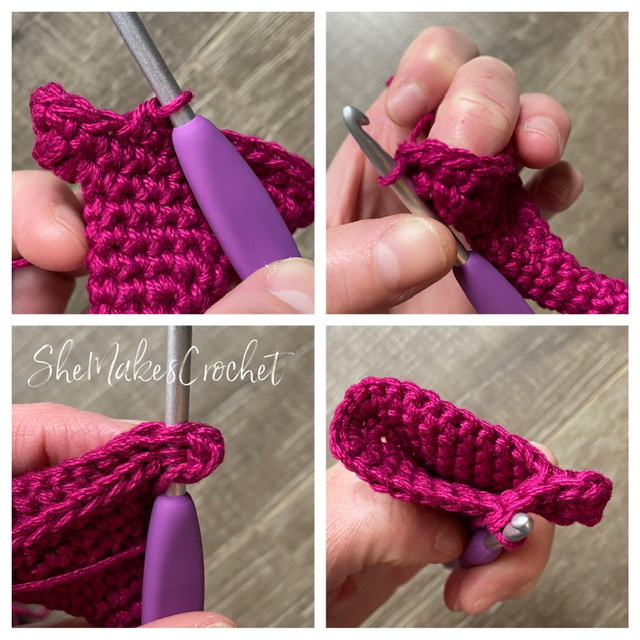
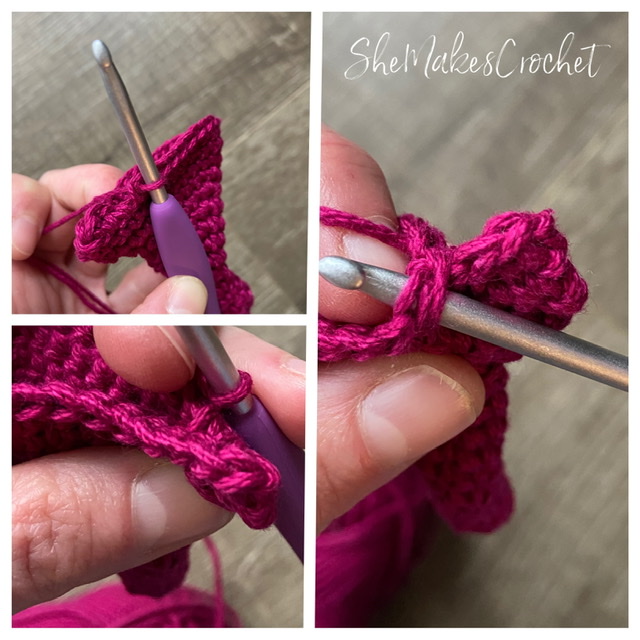
I’ve included a video tutorial for making the legs (only). This process is the same for both dinosaurs.
Pattern Version 1:
- Round 1: Magic ring, CH 1, 6 SC. Pull ring taught. (6 SC)
- Rounds 2-5: SC all around. (6 SC)
- Round 6: INC, 5 SC. (7 SC)
- Round 7: INC, 6 SC. (8 SC)
- Round 8: INC, SC, INC, 5 SC. (10 SC)
- Round 9: SC, INC, SC, INC, 6 SC. (12 SC)
- Round 10: 2 SC, INC, SC, INC, 7 SC. (14 SC)
- Round 11: 3 SC, INC, SC, INC, 8 SC. (16 SC)
- Round 12: 4 SC, INC, SC, INC, 7 SC. Then CH 4 and DC into the 3rd and 4th CH from the hook (to create the leg). 2 SC. (18 SC and 2 DC)

- Round 13: 5 SC, INC, INC, INC, 8 SC. Then work the leg by SC into the base of the next 2 CHs, INC one time in the turning CH immediately prior to the DC stitches of Round 12 and SC into each of the 2 DC. 2 SC. (27 SC)

- Round 14: 6 SC, INC, 2 SC, INC, 9 SC. Then finish the leg by SC into the next 2 stitches – mark these 2 stitches mentally or with a scrap of yarn – SC into the next 2 stitches. Squish the leg flat, insert hook into the next stitch and into the first marked stitch (the one further from the body). Work a second SC in the same manner by inserting the hook into the next stitch and into the second marked stitch (closest to the body). 2 SC. (29 stitches made//27 counting upon completion)
- Round 15: 21 SC, skip the leg (you will be skipping 2 somewhat hidden SC stitches at the base of the foot and the 2 SC stitches you worked through both layers after squishing the leg flat). 2 SC. (23 SC)
- Rounds 16-21: SC all around. (23 SC)
- Round 22: CH 4 and DC into the 3rd and 4th CH from the hook (to create the leg). 9 SC, DEC, SC, DEC, 9 SC. (21 SC and 2 DC)
- Round 23: SC into the base of the next 2 CHs, INC one time in the turning CH immediately prior to the DC stitches of Round 22 and SC into each of the 2 DC. 8 SC, DEC, SC, DEC, 8 SC. (25 SC)
- Round 24: SC in next 2 stitches – mark these stitches mentally or with a scrap of yarn – SC into the next 2 stitches. Squish the leg flat, insert hook into the next stitch and into the first marked stitch (the one further from the body). Work a second SC in the same manner by inserting the hook into the next stitch and into the second marked stitch (closest to the body). 5 SC, DEC, DEC, SC, DEC, DEC, 5 SC. (21 stitches made//19 counting upon completion)
- Round 25: Skip the leg (you will be skipping 2 somewhat hidden SC stitches at the base of the foot and the 2 SC stitches you worked through both layers after squishing the leg flat). 15 SC. (15 SC)
- I recommend lightly stuffing the body and the base of the tail here. I don’t worry about stuffing the tail completely.
- Round 26: DEC, DEC, SC, SC, INC, 3 SC into 1 stitch, INC, SC, SC, DEC, DEC. (15 SC)
- Round 27: DEC, DEC, SC, SC, INC, SC, INC, SC, SC, DEC, DEC. (13 SC)
- Work 1 SC – this is just to shift the start of the round to counteract the natural drift that happens when working in the round.
- Round 28: DEC, DEC, INC, INC, SC, INC, INC, DEC, DEC. (13 SC)
- Rounds 29-31: Repeat Round 28.
- Work 1 SC – this is just to shift the start of the round to counteract the natural drift that happens when working in the round.
- Round 32: ***I recommend working all SS loosely and into the FLO*** 4 SS, 5 SC, 4 SS. (13 stitches)
- Rounds 33-35: Repeat Round 32.
- I recommend lightly stuffing the remainder of the body and neck now.
- Round 36: 4 SC, DEC, SC, DEC, 4 SC. (11 SC)
- Round 37: 2 SC, DEC, SC, DEC, 4 SC. (9 SC)
- Add a little more stuffing before closing off if desired.
- Round 38: DEC, DEC, SC, DEC, DEC. (5 SC)
- Fasten off. Use the yarn tail to weave through the remaining stitches and pull to close off opening. Weave in tail. Embellish and attach a loop for hanging as desired.
Pattern Version 2:
- Round 1: Magic ring, CH 1, 6 SC. Pull ring taught. (6 SC)
- Rounds 2-5: SC all around. (6 SC)
- Round 6: INC, 5 SC. (7 SC)
- Round 7: INC, 6 SC. (8 SC)
- Round 8: INC, SC, INC, 5 SC. (10 SC)
- Round 9: SC, INC, SC, INC, 6 SC. (12 SC)
- Round 10: 2 SC, INC, SC, INC, 7 SC. (14 SC)
- Round 11: 3 SC, INC, SC, INC, 8 SC. (16 SC)
- Round 12: 4 SC, INC, SC, INC, 7 SC. Then CH 4 and DC into the 3rd and 4th CH from the hook (to create the leg). 2 SC. (18 SC and 2 DC)
- Round 13: 5 SC, INC, INC, INC, 8 SC. Then work the leg by SC into the base of the next 2 CHs, INC one time in the turning CH immediately prior to the DC stitches of Round 12 and SC into each of the 2 DC. 2 SC. (27 SC)
- Round 14: 6 SC, INC, 2 SC, INC, 9 SC. Then finish the leg by SC into the next 2 stitches – mark these 2 stitches mentally or with a scrap of yarn – SC into the next 2 stitches. Squish the leg flat, insert hook into the next stitch and into the first marked stitch (the one further from the body). Work a second SC in the same manner by inserting the hook into the next stitch and into the second marked stitch (closest to the body). 2 SC. (29 stitches worked//27 counted upon completion)
- Round 15: 21 SC, skip the leg (you will be skipping 2 somewhat hidden SC stitches at the base of the foot and the 2 SC stitches you worked through both layers after squishing the leg flat). 2 SC. (23 SC)
- Rounds 16-21: SC all around. (23 SC)
- Round 22: CH 4 and DC into the 3rd and 4th CH from the hook (to create the leg). 9 SC, DEC, 2 SC, DEC, 8 SC. (21 SC and 2 DC)
- Round 23: SC into the base of the next 2 CHs, INC one time in the turning CH immediately prior to the DC stitches of Round 22 and SC into each of the 2 DC. 7 SC, DEC, DEC, DEC, 8 SC. (24 SC)
- Round 24: SC in next 2 stitches – mark these stitches mentally or with a scrap of yarn – SC into the next 2 stitches. Squish the leg flat, insert hook into the next stitch and into the first marked stitch (the one further from the body). Work a second SC in the same manner by inserting the hook into the next stitch and into the second marked stitch (closest to the body). 6 SC, DEC, SC, DEC, 7 SC. (22 stitches worked//20 counted upon completion)
- Round 25: Skip the leg (you will be skipping 2 somewhat hidden SC stitches at the base of the foot and the 2 SC stitches you worked through both layers after squishing the leg flat). 5 SC, DEC, SC, DEC, 6 SC. (14 SC)
- I recommend lightly stuffing the base of the tail and the body here. I do not worry about stuffing the entire tail.
- Round 26: SC all around. (14 SC)
- Round 27: 4 SC, DEC, SC, DEC, 5 SC. (12 SC)
- Rounds 28: SC all around. (12 SC)
- Round 29: 3 SC, DEC, SC, DEC, 4 SC. (10 SC)
- Rounds 30: SC all around. (10 SC)
- Rounds 31: 4 SC, INC, INC, INC, 3 SC. (13 SC)
- Rounds 32: SC all around. (13 SC)
- I recommend lightly stuffing the remainder of the body and the neck now.
- Round 33: 4 SC, DEC, SC, DEC, 4 SC. (11 SC)
- Round 34: 2 SC, DEC, SC, DEC, 4 SC. (9 SC)
- Add a little more stuffing before closing off if desired.
- Round 35: DEC, DEC, SC, DEC, DEC. (5 SC)
- Fasten off. Use the yarn tail to weave through the remaining stitches and pull to close off opening. Weave in tail.
Spikes: I made 5. Note: I did not do this, but if you want more structure for your spikes, I recommend making 2 and whip stitching together before attaching.
Round 1: CH 4, SC in 2nd CH from hook, HDC, in next, DC in last. Fasten off. Use the yarn tails to attach along the top of the dinosaur as desired.
Attach the spikes, embellish as desired and attach a loop for hanging if necessary. Weave in all remaining ends.
I love when people share their finished pieces. If you share your work on facebook or instagram, please tag me so I can see it @shemakescrochet.
You are free to share your finished work, to include selling your finished products, but please credit me – SheMakesCrochet – as the pattern designer. Please do not distribute this pattern or any portion of it, instead direct people to my blog. THANK YOU!

