

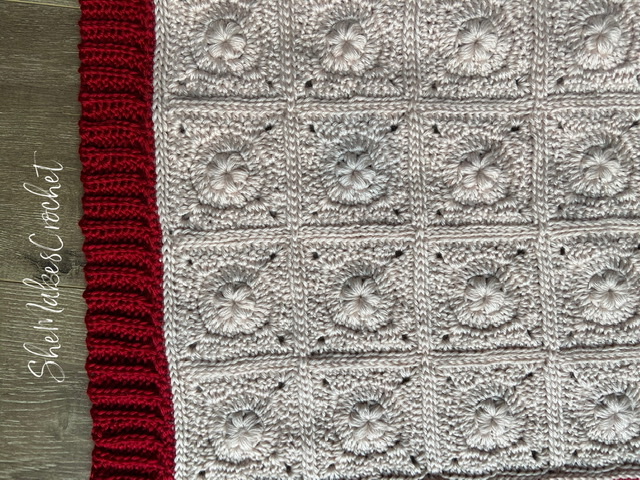
Here it is! It feels incredibly odd posting this before Halloween, but I hope everyone who wants to make this has plenty of time to complete it before the holidays.
Farmhouse Holiday Blanket
Supplies:
- Worsted weight yarn – I used Mighty Stitch (208 yards/100 grams) in:
- Oyster (main color) x 7 skeins
- Black x 1 skein **
- White x 1 skein
- Ash x 3 skeins
- Love Letter (border color) x 3 skeins
- 5.5 mm crochet hook
- Scissors
- Darning/Yarn needle
** Note: If you crochet loosely, you may consider getting a second skein of black (and possibly white). I had very little black left. **
Gauge:
Each granny square measures approximately 3.75 inches.
Finished Dimensions:
The overall finished blanket measures approximately 55 by 47 inches.
Note: You may adjust the finished size of your blanket a few different ways. You could choose to repeat the final row of each square 1 or even 2 more times to get every square a little bigger. You could also choose to add an extra round (or 2) of granny squares along all sides of the blanket.
Abbreviations and Stiches Used:
- CH chain
- SC single crochet
- HDC half double crochet
- DC double crochet
- SS slip stitch
- Puff stitch (see pattern notes)
- Cuff stitch (see pattern notes)
Pattern Notes and Special Stitches:
To work a puff stitch – Yarn over, insert hook and draw up a loop. Repeat this process 4 more times (for a total of 5) and then yarn over and pull through all loops on hook. Or in other words: Yarn over, insert hook and draw up a loop (3 loops on hook); yarn over, insert hook and draw up a loop (5 loops on hook); yarn over, insert hook and draw up a loop (7 loops on hook); yarn over, insert hook and draw up a loop (9 loops on hook); yarn over, insert hook and draw up a loop (11 loops on hook); yarn over and pull through all loops on hook. Hint: Really exaggerate and yank up on your yarn when drawing up loops to keep things loose to make it easier to pull through at the end.
The cuff stitch isn’t really a stitch. It is more of a concise way to describe a repeat of stitches used when making the ribbing for the border. The repeat of stitches that define the cuff stitch are described in the border section.
The starting CH at the beginning of rounds does not count as a stitch throughout unless indicated otherwise.
When making color changes, switch to the new color on the final yarn over of the stitch immediately prior to the color change.
Pattern Overview:
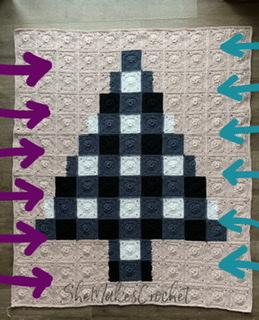
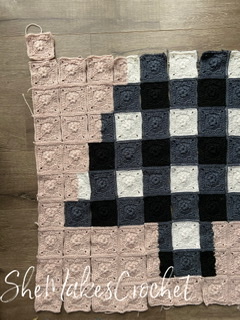
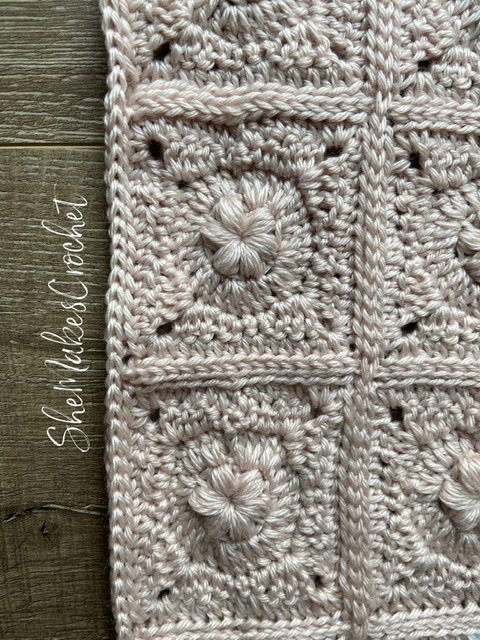
As you can see, your finished blanket will be 11 granny squares wide, by 13 granny squares tall (disregard the faint lines dividing each square into 4 smaller squares!) for a total of 143 squares. The break down of square colors is as follows:
- Oyster: 88
- Ash: 22
- Black: 12
- White: 9
- Split Square – Oyster and Ash: 6
- Split Square – Oyster and Black: 2
- Split Square – Oyster and White: 4

Pattern – Solid Puff-flake Square:
Note: Step by step picture instructions follow, if needed.
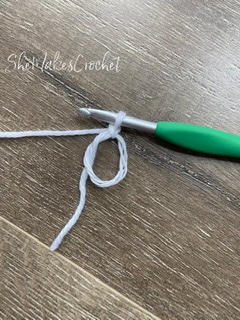
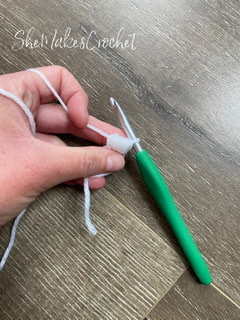
- Round 1: magic ring and CH 1, * work a puff stitch followed by CH 1, repeat from * 5 more times (for a total of 6). SS to first puff stitch and pull ring closed. CH 2 and turn. (6 puff stitches and 6 CH) Hint: This (before the turn) is the wrong side of your work. As such, I recommend pulling your yarn tail to the front before the final SS so that your tail will be on the back of your work when you complete your square.
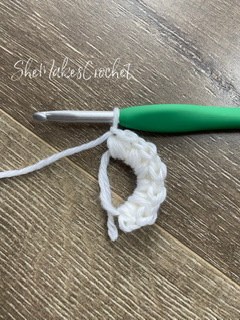
- Round 2: * work 2 DC in same stitch, 2 DC in next stitch and 3 DC in next stitch, repeat from * 3 more times. SS to first DC. CH 1 and turn. (28 DC)
- Round 3: * SC, HDC, DC, then work 2 DC, CH 2, 2 DC all in one stitch, DC, HDC, SC, repeat from * 3 more times. SS to first SC. CH 1 and turn. (40 stitches [i.e. 8 SC, 8 HDC, 24 DC] and 4 CH 2 spaces)
- Round 4: * HDC in next 5 stitches, then work 2 HDC, CH 2, 2 HDC all in the CH 2 space, HDC in next 5 stitches, repeat from * 3 more times. SS to first HDC. Fasten off. (56 HDC and 4 CH 2 spaces)
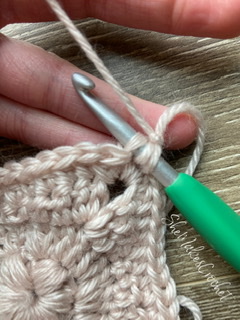
Step by Step Picture Instructions
Round 1:


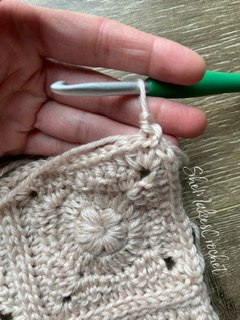
CH 2 and Turn.
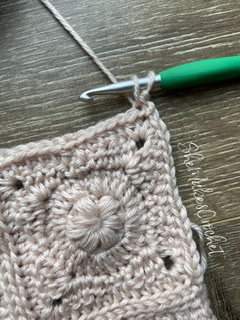
Round 2:

CH 1 and turn.
Round 3:


CH 1 and turn.
Round 4:

If you are really disciplined this would be an excellent spot to weave in those two ends.
Pattern – Split Puff-flake Square:
Note: Step by step picture instructions follow, if needed.
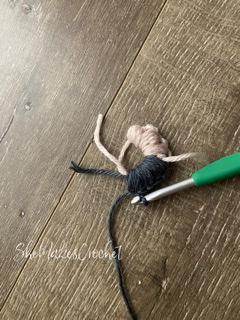
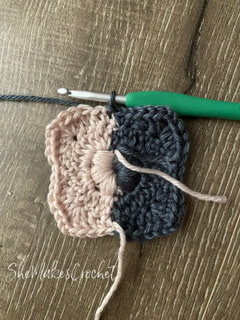
- Round 1: using first color – A – (it doesn’t matter which one you choose) magic ring and CH 1, * work a puff stitch followed by CH 1, repeat from * 2 more times, omitting the final CH 1 (for a total of 3 puffs). Pick up the second color – B – and complete CH 1 with second color. Hint: You need to work over the tails of color A and color B, but do not work over the working strand of color A. Then * work a puff stitch followed by a CH 1, repeat from * 2 more times (for a total of 3 puffs). SS to first puff stitch. Pull ring closed. Note: When pulling the magic ring closed, be sure to only pull color A! CH 2 and turn. (6 puff stitches and 6 CH//3 puff stitches and 3 CH of each color) Hint: Move yarn tails to the front before joining.
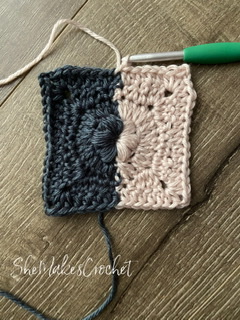
- Round 2: continue with color B and * work 2 DC in first stitch, 2 DC in next stitch and 3 DC in next stitch, repeat from * 1 more time changing back to color A on the final yarn over of the last DC. With color A * work 2 DC in next stitch, 2 DC in next stitch and 3 DC in next stitch, repeat from * 1 more time. SS to first DC. CH 1 and turn. (28 DC//14 DC of each color)
- Round 3: continue with color A * SC, HDC, DC, then work 2 DC, CH 2, 2 DC all in one stitch, DC, HDC, SC, repeat from * 1 more time changing to color B on the final yarn over of the final stitch. With color B * SC, HDC, DC then work 2 DC, CH 2, 2 DC all in one stitch, DC, HDC, SC, repeat from * 1 more time. SS to first SC. CH 1 and turn. (40 stitches [i.e. 8 SC, 8 HDC, 24 DC] and 4 CH 2 spaces//20 stitches [i.e. 4 SC, 4 HDC, 12 DC] and 2 CH 2 spaces of each color)
- Round 4: continue with color B * HDC in next 5 stitches and work 2 HDC, CH 2, 2 HDC all in the CH 2 space, HDC in next 5 stitches, repeat from * 1 more time changing to color A on the final yarn over of the final stitch. With color A * HDC in next 5 stitches and work 2 HDC, CH 2, 2 HDC all in the CH 2 space, HDC in next 5 stitches, repeat from * 1 more time. SS to first HDC. Fasten off. (56 HDC and 4 CH 2 spaces// 28 HDC and 2 CH 2 spaces of each color)
Step by Step Picture Instructions
Round 1:


CH 2 and turn.
Round 2:


CH 1 and turn.
Round 3:

CH 1 and turn.
Round 4:

Pattern – Joining Granny Squares:
Like I mentioned at the top of this post, this method is probably my absolute favorite method for joining squares. It’s a little fiddly at first, but I think it is well worth it! You get the beautiful frame that you achieve when you crochet squares together AND a totally flat join.
Before jumping into the “how to” I need to go over a couple of things. First, you will join all your squares into rows (of 11 granny squares). Each granny square corner is comprised of 2 HDC, CH 2 and 2 HDC, which means you will start (and end) working your joins for each pair of squares at the CH stitch immediately prior to (and after) the 2 HDC of the corner.
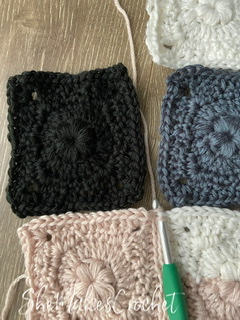
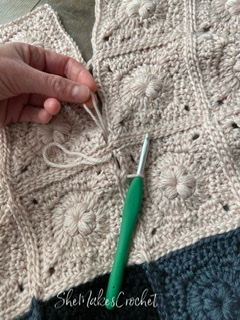
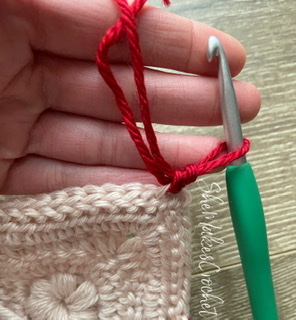
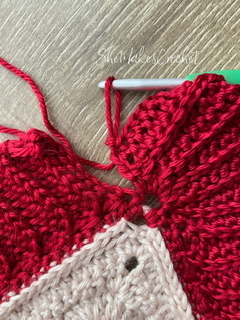
Finally, I feel like I’m getting into the weeds a little bit, but because the squares are not all the same color, you will get some subtle overhang of color in places. You can see what I mean with the white in the picture below. If you notice this and are wondering, yes that’s how mine looks too!

Join your granny squares into rows of 11 squares each:
To make your blanket exactly like mine, you will need to change colors at various points while joining squares. Most of the time you will be using oyster to join squares. I, however, used ash to join all the ash, black and white squares with the following exception – if one of the squares in the pair is oyster, use oyster. I will clarify further with the pictures below.


Note: Step by step picture instructions follow, if needed.
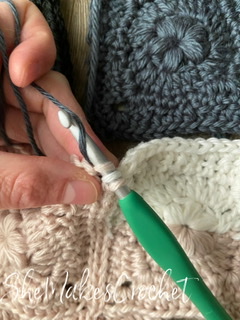
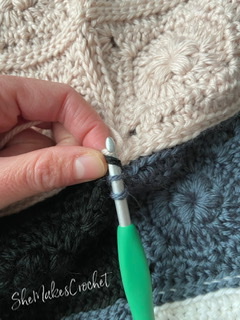
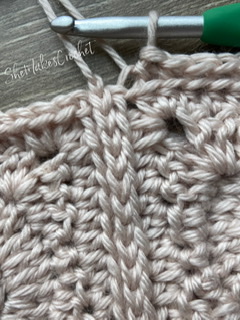
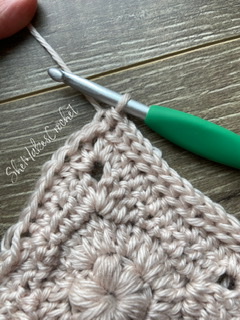
Position your pair of squares so they are side by side. Secure your join color with a slip knot to your hook. Identify the CH immediately prior to the 2 HDC stitches of the corner for both squares. Working from right to left, insert your hook from FRONT TO BACK into the back loop of the identified stitch for the square on the right. Then, again working FRONT TO BACK, insert your hook into the back loop of the identified stitch for the square on the left. With working yarn behind the squares, yarn over and pull through all loops on your hook creating a slip stitch.
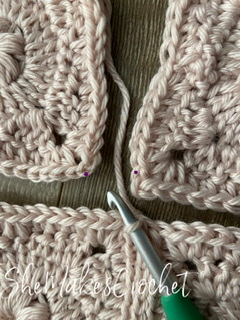
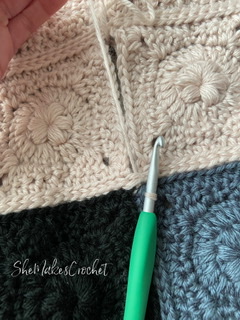
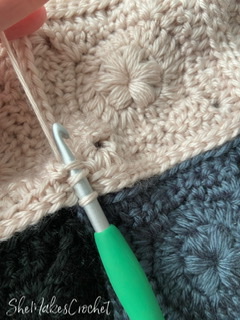
Continue in this fashion – insert hook from front to back into the back loop of the next stitch of the square on the right. Then, insert hook from front to back into the back loop of the next stitch of the square on the left. Again, working yarn is behind your work. Yarn over and pull through all loops, completing a slip stitch. When you reach the first CH immediately following the 2 HDC stitches at the adjacent corner, begin working into the next pair of squares.
Step by Step Picture Instructions


Join your rows into columns:

Note: Step by step picture instructions follow, if needed.
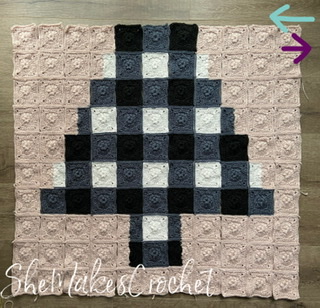
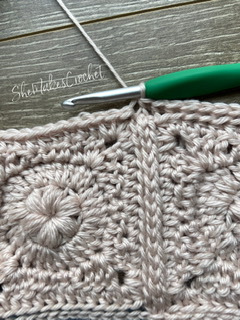
To join the columns you will work in exactly the same manner. I have included some illustrations to show how to handle the corner where 4 squares come together, but even that is very simple (and hopefully straightforward) because all of the squares have a CH and 2 HDC at each corner remaining to be used. So you will start and end joining each pair of squares at the CH immediately before or after the 2 HDC of the corner just like before. When you arrive at the row of slip stitches running horizontally, simply jump over it and continue joining your next pair of squares above being sure to continue to keep your working yarn behind your work.
Step by Step Picture Instructions


Pattern – Ribbed Border:
Part of my vision for this blanket is that it would have a nice, thick border that resembles the cuff of a cozy sweater. This is a place where you could scale your blanket smaller by leaving the “cuff” off and ending with the edging like pictured below.

The first thing to do is to finish off the outermost sides in order to continue the pretty edging that borders all of the squares.
Edging:
Note: Step by step picture instructions follow, if needed.
Round 1: To start, you will work along the bottom edge with the right side of the blanket facing you. Identify the first unworked CH immediately prior to the 2 HDC of the corner of the first block. Using oyster, with a slip knot on your hook and the right side of your blanket facing up, insert hook into back loop only of the identified stitch and draw up a loop. Then, insert your hook into the back loop only of the next stitch, draw up a loop and pull through all loops on the hook – first stitch made.
To make the next stitch, insert your hook into the back loop only of the same stitch and draw up a loop, then insert your hook into the back loop only of the next stitch, draw up a loop and pull through all loops on the hook – second/subsequent stitch made.
When you reach the end of the row, the last stitch will end at the second CH of the CH 2 space at the corner of your blanket. To make the corner, CH 2 and then continue working stitches along the next side. When you get back around to the start, SS to join into the starting stitch.
Final stitch counts: Short edges at the top and bottom will have 176 stitches (or 11 sets of 16). Long edges at either side will have 208 stitches (or 13 sets of 16). And you will have 4 Ch 2 spaces, 1 at each of the corners.
Step by Step Picture Instructions
To create this edging you will need to work in the back loop only and use a special version of the slip stitch – it’s almost like making 2 SS together, but with a subtle difference. I will illustrate how below! I like this method instead of straight SS, because it keeps a nice loose tension and creates a pronounced third loop in the back that will be easier to work into later.
With the right side of the blanket facing, identify the first CH immediately prior to the 2 HDC corner along the bottom edge of the blanket.


Because all of the blocks have the same stitch count, we can use the joins between blocks as a landmark to make counting stitches easier. See images below.

When you reach the end of the row, the last block does not have a join so you will end at the second CH of the CH 2 space at the corner of your blanket. To make the corner, CH 2 and then continue working stitches along the next side. See images below.

Continue working stitches all the way around the blanket, making a CH 2 in each corner as described in the images above. Join into the first stitch and fasten off.
Final stitch counts: Short edges at the top and bottom will have 176 stitches (or 11 sets of 16). Long edges at either side will have 208 stitches (or 13 sets of 16). And you will have 4 Ch 2 spaces, 1 at each of the corners.

Ribbing:
Round 1: Using Love Letter, with the wrong side of the blanket facing and working into the third loops – see images below – insert hook into the first stitch immediately following a CH 2 corner and draw up loop, CH1 and SC into same space. Then work a SC into each stitch across. When you arrive at the CH 2 corner space, work 2 HDC, CH 2, 2 HDC into the CH 2 corner. When you arrive back at the beginning of the round, SS into the first stitch and fasten off.


Final Stitch Counts: At the end of the round. The short edges at the top and bottom should have 176 stitches and the long edges at either side should have 208 stitches. There are 4 groups of 2 HDC, CH 2, 2 HDC stitches in each of the four corners.
Note: Step by step picture instructions follow, if needed.
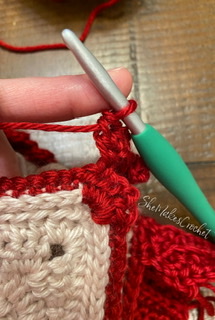
Round 2: Continuing with Love Letter, with the right side facing – insert hook into the first HDC immediately following the CH 2 at the corner and draw up a loop. CH 1 (doesn’t count). Then, CH 9 and HDC into the second CH from hook and each remaining CH (8 total). Then, DC into the side of the starting CH 1 that I said didn’t count as a stitch. Note: These DC stitches will be made throughout and are meant to close up the gap between the set up row and the ribbing. It doesn’t count as a stitch and will always be skipped when you turn and work back up.
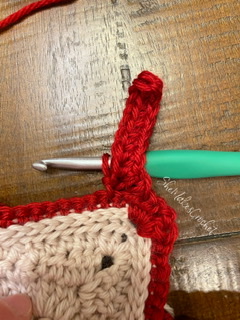
Skip 2 stitches along the blanket and SS into the third stitch. * CH 1 and turn. Skip the DC and work 8 HDC into the third loops back up the cuff. CH 1, turn and work 8 HDC into the third loop back down. Then, work a DC into the side of the turning CH at the base of the cuff. Skip 2 stitches along the blanket and SS into the third stitch. Repeat from * until you reach the end of the side you are on. Note: This process, i.e. the repeat, will be referred to as a “cuff stitch”.
When working short sides along the top and bottom, you will reach the end of the side when you SS into the CH 2 space at the corner. When working the long sides on either end, you will only have one stitch to skip on the last repeat before working a SS into the CH 2 space at the corner.
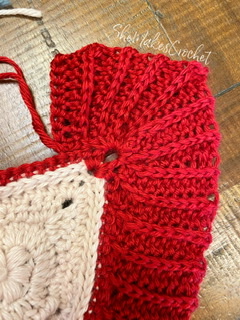
To make the corner, work two cuff stitches as described above, except omit the skipped stitches and instead SS into the CH 2 space again. Then, CH 1 and turn. Skip the DC and work 8 HDC into the third loops back up the cuff. CH 3, turn and work 8 HDC into the third loop back down. Then, work a DC into the side of the turning CH and SS into the CH 2 space again. Work a cuff stitch, again omitting the skipped stitches and SS into the CH 2 space one final time. Then, work another cuff stitch, except omit the skipped stitches and SS into the first HDC stitch immediately following the CH 2 space. Note: In total, you will SS 5 times in the CH 2 space in order to work a corner.
Continue on with cuff stitches along the remainder of the blanket. When you reach the final corner, you will need to SS into the same stitch that you worked your starting CH (which is the first HDC stitch immediately following the CH 2 space) in order to complete the round. Fasten off and then using the tail, whip stitch the two pieces together. Don’t forget Round 3 below.
Step by Step Picture Instructions
Continuing with Love Letter, with the right side facing – insert hook into the first HDC immediately following the CH 2 at the corner and draw up a loop. CH 1 (doesn’t count). Then, CH 9 and HDC into the second CH from hook and each remaining CH (8 total). Then, DC into the side of the starting CH 1 that I said didn’t count as a stitch. Skip 2 stitches along the blanket and SS into the third. Note: DC stitches will be made into the side of the CH throughout and are meant to close up the gap between the set up row and the ribbing. It doesn’t count as a stitch and will always be skipped when you turn and work back up.

* CH 1 and turn. Skip the DC and work 8 HDC into the third loops back up the cuff. CH 1, turn and work 8 HDC into the third loop back down. Then, work a DC into the side of the turning CH at the base of the cuff. Repeat from *until you reach the end of the side you are on. Note: This process, i.e. the repeat, will be referred to as a “cuff stitch”.
When working short sides along the top and bottom, you will reach the end of the side when you SS into the CH 2 space at the corner. When working the long sides on either end, you will only have one stitch to skip on the last repeat before working a SS into the CH 2 space at the corner.

To make the corner. Work two cuff stitches as described above, except omit the skipped stitches and instead SS into the CH 2 space again. Then, CH 1 and turn. Skip the DC and work 8 HDC into the third loops back up the cuff. CH 3, turn and work 8 HDC into the third loop back down. Then, work a DC into the side of the turning CH and SS into the CH 2 space again. Work a cuff stitch, again omitting the skipped stitches and SS into the CH 2 space one final time. Then, work another cuff stitch, except omit the skipped stitches and SS into the first HDC stitch immediately following the CH 2 space. Note: In total, you will SS 5 times in the CH 2 space in order to work a corner.
Continue with cuff stitches along the remainder of the blanket. When you reach the final corner, you will need to SS into the same stitch that you worked your starting CH (which is the first HDC stitch immediately following the CH 2 space) – see images above. Fasten off and then using the tail, whip stitch the two pieces together.
The final round is meant to be a clean up round to finish the edges and help to further define the corners.
Round 3: Starting in any CH 3 corner draw up a loop, CH 1 and SC in the same space. Work a second SC, CH 2 and work two more SC into the same CH 3. Then, work SC stitches evenly along the entire edge of the blanket. I spaced mine such that I made a SC into the ridge of stitches and 2 SC stitches between ridges. It doesn’t have to be exact, just relatively even. In each CH 3 space make 2 SC, CH 2, 2 SC. When you reach the start, SS to join into the first SC. Fasten off and weave in all ends.

I love when people share their finished pieces. If you share your work on facebook or instagram, please tag me so I can see it @shemakescrochet.
You are free to share your finished work, to include selling your finished products, but please credit me – SheMakesCrochet – as the pattern designer. Please do not distribute this pattern or any portion of it, instead direct people to my blog. THANK YOU!


Oh, thank you, thank you, thank you. Was getting tired of doing so many of the Felix – will NEVER give it up but need something dif and will return to Felix blankets later. Have been giving them away and people just love them. Thank you again.Marje
I’m so glad you like this and that you have been enjoying making Felix blankets. Thank you!
I absolutely love, love, love this this blanket!!!!!!!!!!!!!
Thank you so much! I have to agree, it’s really pretty in a very subtle way. I love that about it.