

First things first, this cutie is pictured in a Santa hat, but if you leave it off, he becomes a cute “thank you”, “birthday”, “just because”, etc gift card holder.
I recommend, if making him for the holidays, to attach a ribbon so he can serve as an ornament or adorn a gift after he makes his delivery. He’s too cute not to reuse!
This is a pattern I designed and originally published on Ravelry last year before I started this blog. I wanted to be sure to include it here because, he’s adorable and quick to work up.
Be sure to check out my Polar Bear! They make a cute pair.
Supplies:
- Small amounts of yarn in various colors to achieve desired look.
I used worsted weight yarn from my stash – primarily Loops & Threads Impeccable yarn (285 yards/4.5 oz)
- Putty (white parts of penguin)
- Dark Charcoal (black parts of penguin)
- Forest (gift)
- Cranberry (ribbon) *Vanna’s Choice yarn
- Gold (beak and feet)
- Soft Rose (cheeks)
- Red Sparkle *Caron Simply Soft Party yarn
- White
- 3.75 mm crochet hook
- 1.75 mm crochet hook
- Scissors
- Needle for sewing down yarn tails
- 12mm Animal Eyes
Note about supplies: If you prefer, you may use embroidery floss instead of splitting a strand of worsted weight yarn as directed in the pattern for the cheeks. Moreover, you could choose to use something like felt or paint to make the cheeks. In place of animal eyes, you could use shank buttons or felt. You could even embroider the eyes or crochet them with thin yarn or embroidery floss.
Finished Dimensions: Finished piece is approximately 7.5 inches tall without the hat; 9 inches with the hat
Abbreviations and stiches used:
- CH chain
- SC single crochet
- HDC half double crochet
- DC double crochet
- SS slip stitch
- DEC decrease
Pattern Notes:
The beginning CH 1 or CH 2 at the start of rows/rounds does not count as a stitch throughout unless otherwise specified.
When sewing pieces together, use matching yarn for the top piece and stitch completely through the top piece, but only catch the top loops for the bottom piece (i.e. do not take the needle completely through the back piece). A bent tip needle is helpful for this, but is not necessary. Stitching pieces together in this manner prevents the contrasting yarn from showing on the backside.
The pattern directs the use of surface crochet for the ribbon detail on the gift box. Surface crochet is basically a slip stitch with the hook on the front of your work and the working yarn on the back. If you are unsure about how to surface crochet, you could embroider the ribbon lines onto the gift or make a chain and stitch that into place.
Pattern Head:
Using dark charcoal and 3.75 mm hook (use this larger hook throughout unless otherwise specified)
- Round 1: Magic ring, CH 2, 12 DC and SS to join to first DC. Pull ring taught. (12 DC)
- Round 2: CH 2, 2 DC in each stitch around, SS to join to first DC. (24 DC)
- Round 3: CH1, *HDC, 2 HDC in next* repeat all around, SS to join to first HDC. (36 HDC)
- Round 4: CH 1, *HDC, 2 HDC in next, HDC* repeat all around, SS to join to first HDC. (48 HDC). Break yarn.
Using putty
- Round 1: Magic ring, CH 2, 13 DC and SS to join to first DC. Pull ring taught. (13 DC)
- Round 2: CH 2, 3 DC in first stitch, DC and HDC in next stitch, HDC and SC in next stitch, SC in next three stitches, CH 1, DC, CH 1, SC in next three stitches, SC and HDC in next stitch, HDC and DC in next stitch, 3 DC in last stitch, CH 2 and SS to base of first stitch (i.e. the DC you joined into at the end of Round 1). (21 stitches and 2 CH 1 spaces)
- Round 3: CH 2, 2 HDC in first stitch, *HDC in next, 2 HDC in next* repeat x1 more time, HDC in next six stitches (hint: last HDC is in CH 1), CH 1, DC, CH 1, HDC in next six stitches (hint: first HDC is in CH 1), *2 HDC in next, HDC in next* repeat x1, 2 HDC, CH 2 and SS in same ending SS of Round 2. (29 stitches and 2 CH 1 spaces). Break yarn leaving a long tail for stitching pieces together.
Using the long tail, stitch the white colored part of the head onto the black circle as pictured below:

Pattern Body:
Using dark charcoal
- Round 1: Magic ring, CH 2, 12 DC and SS to join to first DC. Pull ring taught. (12 DC)
- Round 2: CH 2, 2 DC in each stitch around, SS to join to first DC. (24 DC)
- Round 3: CH 2, *DC, 2 DC in next* repeat all around, SS to join to first DC. (36 DC)
- Round 4: CH 1, *HDC, 2 HDC in next, HDC* repeat all around, SS to join to first HDC. (48 HDC). Break yarn.
Using putty
- Round 1: Magic ring, CH 2, 12 DC and SS to join to first DC. Pull ring taught. (12 DC)
- Round 2: CH 2, 2 DC in each stitch around, SS to join to first DC. (24 DC)
- Round 3: CH 2, *DC, 2 DC in next* repeat all around, SS to join to first DC. (36 DC). Break yarn leaving a long tail for stitching pieces together.
Using the long tail, stitch the white circle onto the black circle as pictured below:

Pattern Beak:
Using gold
- Row 1: CH 4, SC in second CH from hook and remaining two CHs. Turn.
- Row 2: DO NOT CH. Skip first stitch and SC in second (middle) stitch, SS in last stitch. Turn.
- Row 3: DO NOT CH. Skip first slip stitch and SC in next stitch (i.e. the SC from Row 2). CH 1 and break yarn leaving a long tail for stitching.
Pattern Cheeks:
Using soft rose – cut approx. 18 inches of yarn and carefully split the yarn into two even strands
Use 1.75 mm hook
- Round 1: Magic ring, CH 1, 6 SC and join with SS into first SC. Break yarn and leave a long tail for sewing down. Make two.
Pattern Arms:
Using dark charcoal
- Round 1: Magic ring, CH 2, 7 DC. Turn. (7 DC)
- Round 2: CH 2 and 2 DC in first stitch, 2 SC in next 5 stitches, 2 DC in last stitch. Turn. (14 stitches)
- Round 3: CH 2 and 2 DC in first stitch, 1 DC in next, *2 SC in next, 1 SC in next* repeat x5 times, 1 DC in next, 2 DC in last. (21 stitches)
- CH 1 and rotate work 90 degrees to complete 12 evenly spaced SC along straight edge. Pull ring taught. Break yarn and leave a long tail for stitching pieces together. Make 2.
Pattern Feet:
Using gold
- Round 1: Magic ring, CH 1, 8 HDC and SS to join to first HDC. Pull ring taught.
- Round 2: CH 2 and 2 DC in first stitch, CH 2 and SS to same stitch. SC in next stitch. SS, CH 2 and 2 DC in next stitch, CH 2 and SS to same stitch. Break yarn and leave a long tail for stitching pieces together. Make 2.
Pattern Gift:
Note: Check that your gift card will fit after completing the first rectangle. I wanted my gift card to poke out of the side a little – you could adjust the starting CH to make your gift box longer or shorter. You can adjust the number of rows to make it taller or shorter depending on your tension and preference.
BOX
Using forest
- Row 1: CH 13 and HDC in second CH from hook. HDC in each remaining CH. Turn. (12 HDC)
- Rows 2-6: CH 1 and HDC in each stitch across. Turn.
- Row 7: CH 1 and HDC in each stitch across. CH 1 and rotate piece 90 degrees. Work 3 SC in next stitch (1st corner made). Work 8 SC stitches evenly along edge and 3 SC in last stitch (2nd corner made). Work 12 SC along the backside of the starting CH. Work 3 SC in next stitch (3rd corner made). Work 8 SC evenly along edge and 3 SC in last stitch (4th corner made). Work 12 SC along the top of Row 7. SS to join to first stitch. Break yarn and leave a long tail for stitching pieces together. Make 2.
RIBBON DETAIL
- Choose one rectangle to be the front side of the gift box, set the other aside
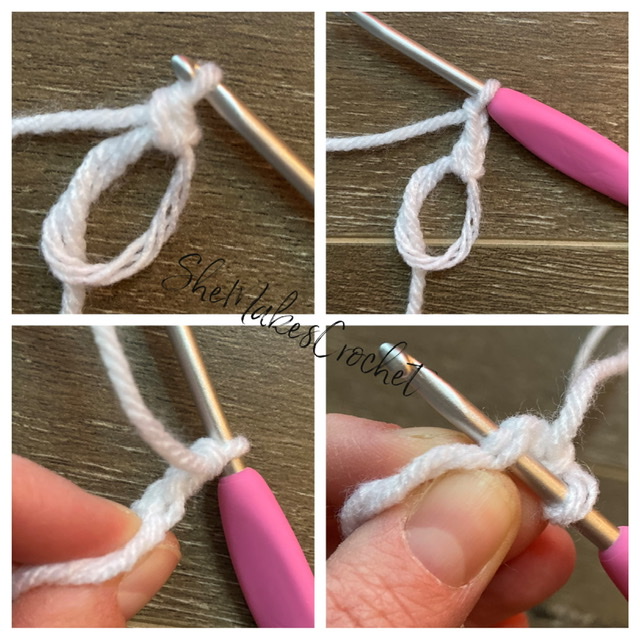
- Using cranberry CH 4 draw up a long loop, remove from hook and set aside.
- Insert hook into top center stitch of rectangle as pictured below (top left image below). Insert loop previously made with cranberry yarn on hook and pull through stitch and CH 1 (top right and bottom left images below).
- Rotate your work 180 degrees so your hook is at the bottom and surface crochet (i.e. SS inserting hook through piece and yarning over behind piece) to the other side of the rectangle. When you reach the end of the gift, rotate your work 180 degrees again and work a line back to the top (where you started). Hint: I tried to insert my hook into the same spaces for neatness, but that isn’t necessary. (bottom right image below)

- At the top, CH 7 and slip stitch into the same space you joined yarn (first half of bow made). (top left image below)
- CH 7 and slip stitch into the same space as best as you can to complete the second loop of the bow. CH 4 and tie off yarn. (bottom left image below).
- Optional: Use the yarn tails at either end of the bow to tack down. Weave in ends on the back side.

Place both panels of the gift box together with the wrong sides facing the inside (right sides facing the outside) and the front panel on top. Using the long yarn tail, stitch THREE SIDES ONLY of the gift together. The open side is needed for insertion/removal of gift card.
Pattern Hat:
BASE
Using red sparkle
- Row 1: CH 10, SC in second CH from hook and SC in each remaining CH across. Turn. (9 SC)
- Row 2: CH 1, SC in each stitch across. Turn. (9 SC)
- Row 3: CH 1, DEC, SC in next 5 stitches, DEC. Turn. (7 SC)
- Row 4: CH 1 SC in each stitch across. Turn. (7 SC)
- Row 5: CH 1, DEC, SC in next 3 stitches, DEC. Turn. (5 SC)
- Row 6: CH 1, SC in each stitch across. Turn. (5 SC)
- Row 7: CH 1, DEC, SC in next stitch, DEC. Turn. (3 SC)
- Rows 8-12: CH 1, SC in each stitch across. Turn. (3 SC)
- Row 13: CH 1, DEC, SC in next stitch. Turn. (2 SC)
- Row 14: CH 1, DEC. Turn. (1 SC)
- Row 15: CH 1, SC. Turn. (1 SC)
- Row 16: CH 1, SC. (1 SC). Break yarn. Leave a long tail for sewing down.
POM-POM
Using white
- Row 1: Magic ring, CH 1, *SC, CH 2 and SS into SC (picot made)* repeat x5 total and join to first SC (5 SC picots). Break yarn. Leave a long tail for sewing down. See images below:
TRIM
- Row 1: CH 10, SC in second CH from hook and SC in each remaining CH across. Turn
- Row 2: CH 2, 2 HDC and SS same stitch, skip next stitch, *3 HDC and SS into same stitch, skip next* repeat x2 more times, 2 HDC and SS into last stitch. Break yarn. Leave a long tail for sewing down.

Use above image as a guide. Fold top of hat over to one side and use yarn tail to stitch into place. Attach pom-pom to tip of hat. Attach trim to bottom of hat
Putting It All Together:
- Attach the arms to the bottom of the head as shown in the top left image below.
- Attach the body to the head being sure to place the arms on top of the body. You want the arms to be floppy so they can hold the gift (bottom left and right images below).

- Stitch the gift onto your penguin’s belly, again being mindful to lift the arms up so they will be on top as shown in the image below. Hint: Only stitch the outermost loops of the backside of the gift onto the body.

- Position the animal eyes on the head – see image above if you need help with placement. Hint: I like to push the washer down last just in case I want to move them after finishing the rest of the face.
- Attach the beak, cheeks and feet using the above image as a guide.
Optional, but recommended:
- Make a second head circle using dark charcoal and leave a long tail. Place it on the back of your penguin in order to cover the washer from the animal eyes. Use the long tail to stitch the two pieces together. Bonus: you can also use this to hide some of the yarn tails you used to stitch the features onto the face!
- Attach a ribbon at the top to repurpose your adorable penguin as an ornament after he makes his special delivery.
I love when people share their finished pieces. If you share your work on facebook or instagram, please tag me so I can see it @shemakescrochet.
You are free to share your finished work, to include selling your finished products, but please credit me – SheMakesCrochet – as the pattern designer. Please do not distribute this pattern or any portion of it, instead direct people to my blog. THANK YOU!


I am having a hard time with the arm on the last part about the rotate 90 degree. My arm does not look like the picture. Please help
You should be working the rounds without joining. So after working round 3, before rotating, you should have a semicircle-roundish shape with a gap (from where you did not join after each round). You rotate 90* and work along that gap/edge into the sides of the the stitches all the way across. Does that help?
Thank you for your fast response. I kept thinking about it. I did not join the rounds, what I did wrong. I tighten the middle to fast. So I took it apart and started over. Looks so much better. Thank you again.
Oh good! I’m so glad you figured it out. Thanks for letting me know.
It’s done. I was going to send a picture but it won’t let me
This is the best! So adorable!
Thank you!