
I can’t believe it’s finally time to share this project. It’s been such a long time in the making, both to conceptualize how it will all come together and to get everything written up. I also can’t believe I’m about to embark on a second crochet along (scrap-along). I am so excited and I hope you are too! I definitely learned a lot from last time and I think this project will be even better.
What is a scrap-along?
It’s basically a blanket we will make together! I will release a portion of the pattern one week at a time for 6 weeks. We will be starting on Thursday, May 19th with the next portion of the pattern being published every Thursday after that. At the end, you will have a blanket or a nice sized panel to use for something like a throw pillow, if you prefer a smaller project. The BEST part and the “scrap” part of scrap-along is that this project is an awesome way to use up those leftover skeins you have collecting dust in a bin somewhere in the closet. Though, it’s not required that you use scraps, this project is meant to be carefree so grab or buy your favorite yarn and jump in!
- As I stated earlier, I did learn a few things from the first time around and so things will be a tiny bit different this time. (Check out the first scrap-along project, The Felix Blanket, if you missed it and are curious.)
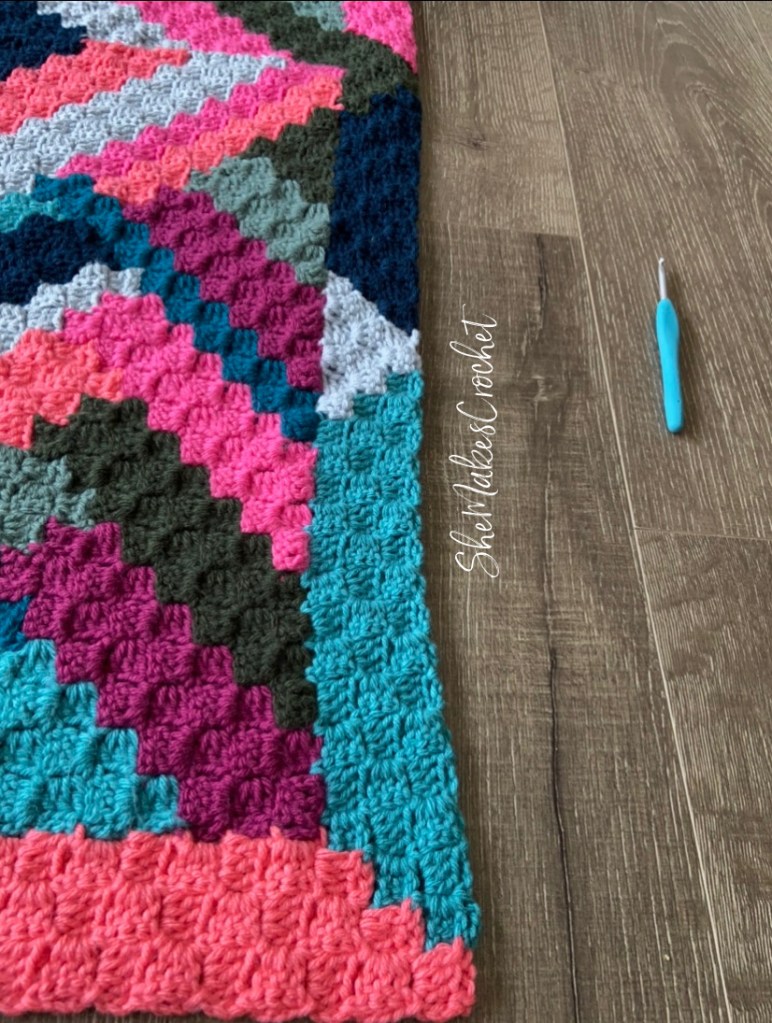
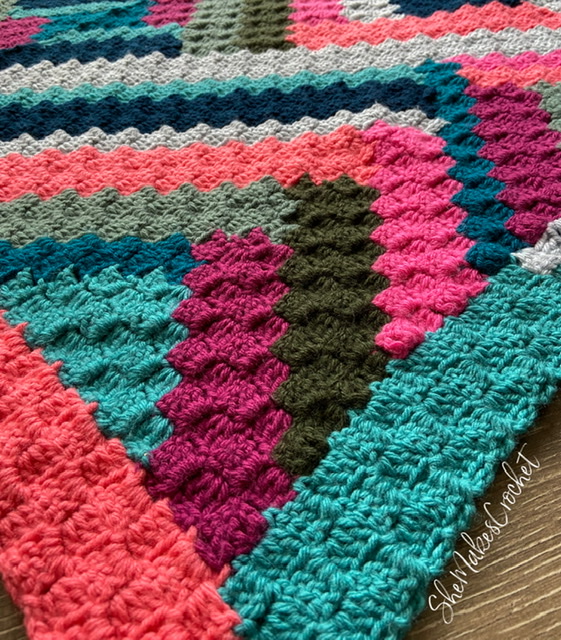
- One thing that is the same is that this project is made using corner to corner (C2C). Each block of color is worked in its entirety before moving on to the next color block. This means there are no bobbins. (Yay!) It’s super satisfying to fill in this blanket, watching all the blocks interlock. I think it keeps things fun. If you are familiar with the Felix Blanket, I think this will be a total breeze. If this is your first attempt at something like this, be sure to read the stitch guide as there is a bit of a spin on C2C – this is NOT your normal blanket.
- This blanket provides you with so many options. The blanket is worked in panels that get attached together at the end. I know, I know, the Felix Blanket was all one piece and that was probably my favorite thing about that design. I tried and this blanket absolutely can be made join-as-you-go style from start to finish, if you are feeling adventurous. But it was getting too complicated to explain the process, so I had to abandon that ambition. The awesome thing about the panels is that they are perfectly square so you can rotate them or flip them in whatever configuration you want *before* attaching which allows for more control over the design. And, one panel would make a perfect oversized throw pillow so this design is much more versatile when it comes to scaling the size up and down.
- I also designed a beautiful C2C border with the perfect mitered corners! I thought this blanket deserved something extra special and this border isn’t just your standard C2C border, it’s got the scrappy look carried through. I gave you lots of options there too. You have the option to border each panel before joining them. Or join a strip of 2-4 panels together, then place the border around each strip before joining the strips. You can work the border around the finished blanket. You could even work multiple rounds of the border. Or you could do any or all of these combinations! You will have so much more freedom to customize the size and the finished design.
- A big difference from last time is that if you’d rather have the written pattern all in one neat package or if you are too impatient to wait for the scrap-along to end to complete your project, I have a PDF download ready to go and it will be in my Ravelry Shop at the start of the crochet along! A few things about the download, you will get several files. One file is massive and includes all of the step-by-step detailed pattern directions with pictures – not very printer friendly. You could think of it as all of the blog posts rolled into one PDF document. A second file contains all of the pattern directions, but without pictures and is more concisely worded – it’s perfect for printing if you like to have a hard copy to make notes on, etc. A third file contains a couple of bonus charts – both color and black/white versions. I also separated the border out and made it into its own document because I think you’ll want to use it for other projects. Why so many options? This blanket, like the Felix Blanket, is unusual, but once you get the technique/idea of it down, it’s super easy. I anticipate you may find you need lots of pictures and details starting out, but as you get going further with the pattern, those things may no longer be necessary. You may find that you only need a simple, consolidated document to get you through the project and I wanted to give you guys everything.
I know waiting until May 19th to get started is tough, so I’ve got some more details to help hold you over.
- If you aren’t already a part of the Facebook Group and you want to be, join!
2. Gather your supplies. I used –
- Worsted weight yarn (#4) – I used Impeccable (4.5 oz/285 yd)
- Sapphire
- Smoke
- Lippy
- Coral
- Deep Forest
- Green Lagoon
- Rich Orchid
- Teal
- Aqua
- 4.5 mm crochet hook
- Scissors
- Darning/Yarn needle
- Stitch marker
3. Consider making a gauge swatch –
Gauge and Finished Dimensions:
Gauge is not relevant; however, my gauge using the above stated yarn and hook measures approximately 6 C2C stitches across by 6 C2C stitches high for a 4×4 inch swatch.
Each panel without the border is 28 C2C stitches square and with my tension, measures approximately 19 x 19 inches. With this information you can start to plan how many panels you would like to make.
4. Some important notes to familiarize yourself with before starting –
Abbreviations and stiches used:
- CH chain
- DC double crochet
- SS slip stitch
- **C2C corner to corner
** Note: I use this abbreviation to denote a “C2C stitch” and I explain this further in the pattern notes below.
Important Pattern Notes:
This blanket is unusual, but I think that is what makes it so much fun! It is VERY IMPORTANT to always count your “stitches”. For ease, I consider “1 stitch” to be 1 C2C block (consisting of a CH 3 and 3 DC). The stitch count changes from row to row so please be mindful of this throughout. At the end of each row, I will include a stitch count indicated by (#). The # is the number of stitches in that color for that row. If you are not familiar with C2C, rows are counted on the diagonal. See images below:
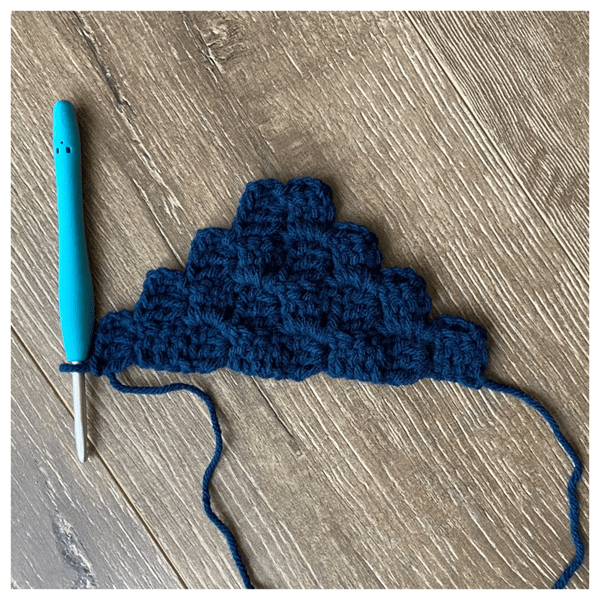

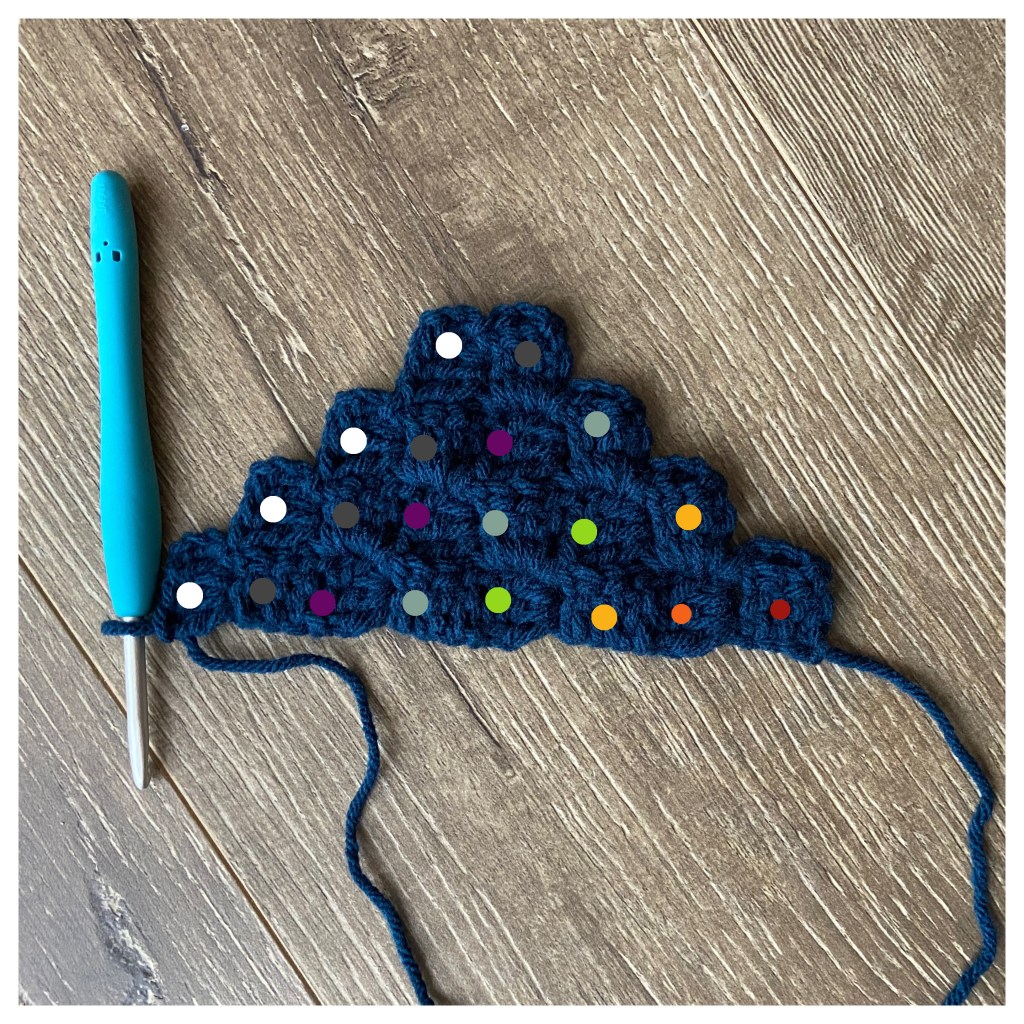
Image Notes: Image 1 is a picture of the “Odd Shape”. The arrows in image 2 depict the alternating rows that are counted on the diagonal. So from this picture, you can see that it takes 8 rows to create this shape. The colorful dots in image 3 correspond with the “C2C stitches” for each row. For example, row 1, depicted in red, has a stitch count of 1 while row 8, depicted in white, has a stitch count of 4.
It is also important to keep track of your right and wrong side during construction; however, once the blanket is finished, both sides will look the same. I will use the terms right and wrong side throughout. You may consider using a stitch marker to help you keep track. IF YOU ARE LEFT HANDED, please note that you will be working a mirror image to my piece. In other words, my “right side” will be your wrong side. You could, however, stop at any point, turn your work over, and it should look identical to mine – that is, your wrong side will perfectly match my right side.
You may choose to work your C2C blocks by working HDC stitches if you prefer. I tend to use a slightly smallish hook to minimize the appearance of gaps, but this may be adjusted to your preference as well.
Stitch Guide:
PLEASE READ even if you have made a thousand C2C blankets. THIS IS NOT YOUR TYPICAL C2C.
If you are totally unfamiliar with the C2C technique, I recommend working a small swatch to practice the stitch first. I have a YouTube video you may reference HERE. Note: I made this video for my original Felix Blanket, but it works for this one too.
To start a block or to add an additional block such that your stitch count for the row will increase, I will use the term INC (increase) and this means to CH 6 and work a DC into the 4th, 5th, and 6th CH from the hook. You will be left with a “stitch” consisting of a CH 3 loop and 3 DC.
Subsequent stitches will be worked into the CH 3 loop of stitches you have previously made. You will SS into the CH 3 loop to start your stitch and then create the stitch by working a CH3 and 3 DC.
To decrease or maintain an even row count, I will use the term DEC (decrease) and this means you will CH 3 and SS back into the CH 3 space of the stitch you just made. THIS IS EXTREMELY IMPORTANT. This blanket is worked using incomplete rows, layered in multiple directions and you will absolutely need the CH 3 loop later so we create it EVERY time you decrease.
Join as you go – if you think of each stitch as a square, we are going to want stitches to be attached at the corners that but up against the adjacent stitches (squares). I will walk through this process as it occurs throughout the pattern because the joins may vary slightly depending on the direction of the block you are working. I recommend always remembering you want to attach the corner(s) of the stitch you are making to the shared corner(s) of the adjacent block, meaning while working a stitch (i.e. CH 3 and 3 DC), you will incorporate slip stitch(es) somewhere in that sequence.
I think that’s it! Have fun digging through your stash (or shopping!). I’ll see you in the Facebook group if you aren’t already there. I’m excited to see what everyone makes.
You are free to share your finished work, to include selling your finished products, but please credit me – SheMakesCrochet – as the pattern designer. Please do not distribute this pattern or any portion of it, instead direct people to my blog. THANK YOU!


I can’t wait to start
Me too! I hope you have fun!!
Cant enter my email address after your post. It freezes
Hmm. I assume you used the subscribe box? I don’t know much about these things, but I’ll look into it.
The fun begins…Looking forward to it. Thanks in advance
I hope you’ve been able to start 🙂