
The time has come! I hope you are as excited to get started as I am. A couple of things to remember before beginning:
- If you would rather have a PDF download or the entire pattern available right now, jump over to Ravelry and grab it! The PDF includes all the detailed instructions you will find on my blog including the pictures. As a bonus, I also separated the border out into its own document, I put together a condensed version of the pattern that is more concisely written up without pictures – perfect for printing! I also included a chart for those whose minds work in that way. Those bonus documents will only be available as part of the download.
- Please share your blankets so I can see them. Be sure to use #FelixBlanketRemixed or tag me so I can admire your work.
If you are just stumbling upon this post, please jump back to the introduction post for supplies, relevant pattern notes and the link to the Facebook group!
Pattern:

The colors listed throughout the pattern are what I used and I found it helpful to list them in order to aid with visualizing how things come together, but of course you are free to use whatever colors you want.
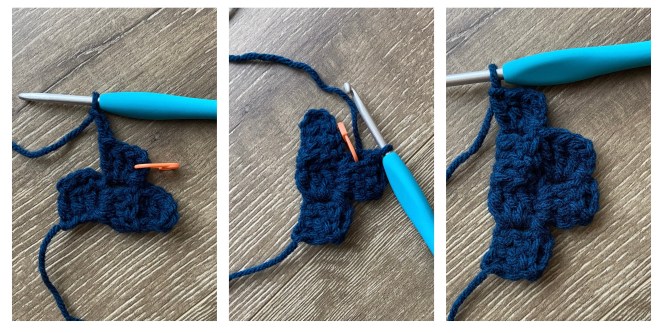
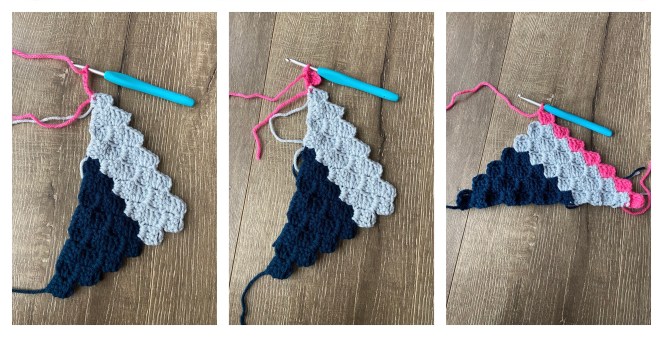
PART 1: To start, we will create the odd shape. {Sapphire}
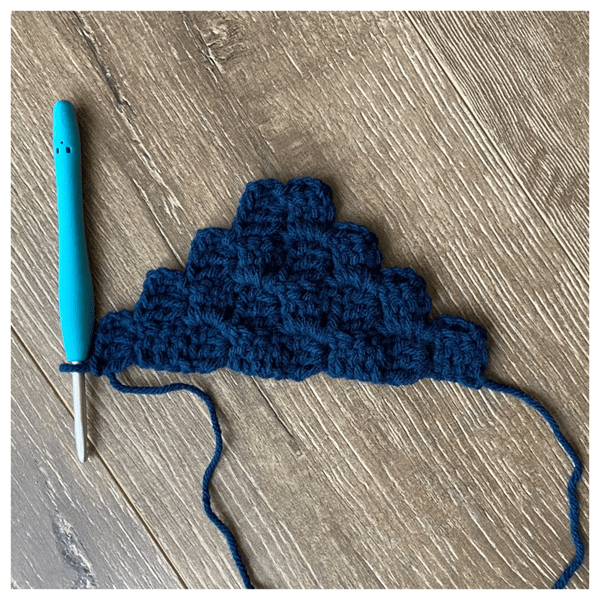
Row 1: Make your starting stitch (1)
CH 6 and DC into the 4th, 5th and 6th CH from the hook. Place a stitch marker into the CH 3 loop.

Row 2: DEC and work 1 C2C (1)
We want the second row to be 1 stitch as well and so we must decrease. CH 3 and SS into the CH 3 loop of the previous stitch – the loop with the stitch marker. (A decrease has been made.). Now work the 1 stitch of the row by CH 3 and DC 3 times into the CH 3 loop (the one with the stitch marker). Remove the stitch marker and place it into the CH 3 loop you just made when working this stitch.
Row 3: INC and work 1 C2C (2)
We want to increase the stitch count for this row from 1 to 2 and so we must work an increase. CH 6 and work a DC into the 4th, 5th and 6th CH from the hook. (An increase has been made). SS into the CH 3 loop of the marked stitch and work the remaining stitch of the row by CH 3 and DC 3 times into the CH 3 loop (the one with the stitch marker). Remove the stitch marker and place it into the CH 3 loop you just made when working this last stitch.
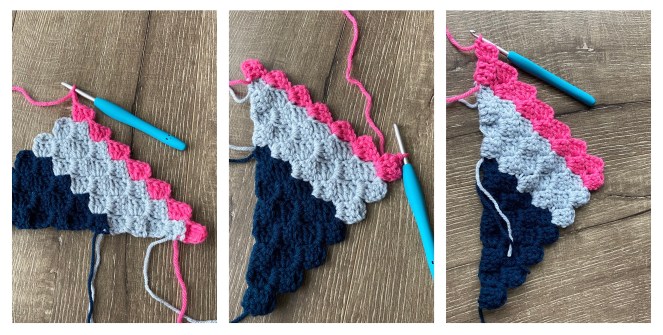
Row 4: DEC and work 2 C2C (2)
We want the fourth row to be 2 stitches as well and so we must decrease. CH 3 and SS into the CH 3 loop of the previous stitch – the loop with the stitch marker. (A decrease has been made.). Now work the 2 stitches of the row by CH 3 and DC 3 times into the CH 3 loop (the one with the stitch marker). Remove the stitch marker. SS into the next stitch, CH 3 and work 3 DC. Place the stitch marker into the CH 3 loop you just made working this last stitch.
Row 5: INC and work 2 C2C (3)
We want to increase the stitch count for this row from 2 to 3 and so we must work an increase. CH 6 and work a DC into the 4th, 5th and 6th CH from the hook. (An increase has been made). SS into the CH 3 loop of the marked stitch and work the remaining 2 stitches of the row. So you will CH 3 and DC 3 times into the CH 3 loop (the one with the stitch marker). Remove the stitch marker. SS into the next CH3 loop, CH 3 and work 3 DC. Place the stitch marker into the CH 3 loop you just made when working this last stitch.
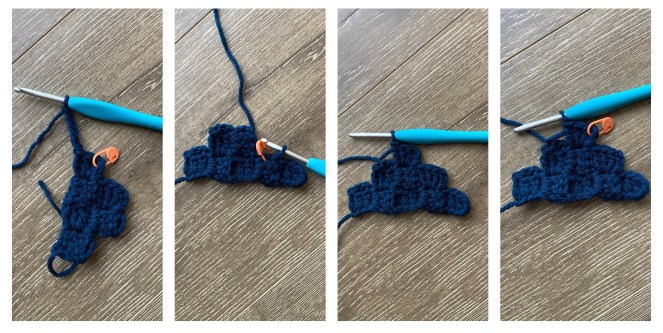
Row 6: DEC and work 3 C2C (3)
We want the sixth row to be 3 stitches as well and so we must decrease. CH 3 and SS into the CH 3 loop of the previous stitch – the loop with the stitch marker. (A decrease has been made.). Now work the 3 stitches of the row. So you will CH 3 and DC 3 times into the CH 3 loop (the one with the stitch marker). Remove the stitch marker. SS into the next stitch, CH 3 and work 3 DC. SS into the next stitch, CH 3 and work 3 DC. Place the stitch marker into the CH 3 loop you just made working this last stitch.

Row 7: INC and work 3 C2C (4)
We want to increase the stitch count for this row from 3 to 4 and so we must work an increase. CH 6 and work a DC into the 4th, 5th and 6th CH from the hook. (An increase has been made). SS into the CH 3 loop of the marked stitch and work the remaining 3 stitches of the row. So you will CH 3 and DC 3 times into the CH 3 loop (the one with the stitch marker). Remove the stitch marker. SS into the next CH3 loop, CH 3 and work 3 DC. SS into the next CH 3 loop, CH 3 and work 3 DC. Place the stitch marker into the CH 3 loop you just made when working this last stitch.

Row 8: DEC and work 4 C2C (4)
We want the eighth row to be 4 stitches as well and so we must decrease. CH 3 and SS into the CH 3 loop of the previous stitch – the loop with the stitch marker. (A decrease has been made.). Now work the 4 stitches of the row. So you will CH 3 and DC 3 times into the CH 3 loop (the one with the stitch marker). Remove the stitch marker. *SS into the next stitch, CH 3 and work 3 DC. Repeat from * 2 more times.

The odd shape has been made. Congratulations, I think this is the most challenging aspect of the pattern. Hopefully you started to recognize a pattern with the stitch count. A similar pattern of utilizing increases, as well as starting or ending rows with decreases is at the heart of this pattern. Be sure to count your stitches after every row. Fasten off.
Repeat this process as many times as you need. If you would like your blanket to be 9 panels, for example, you will need to make 9 Odd Shapes.
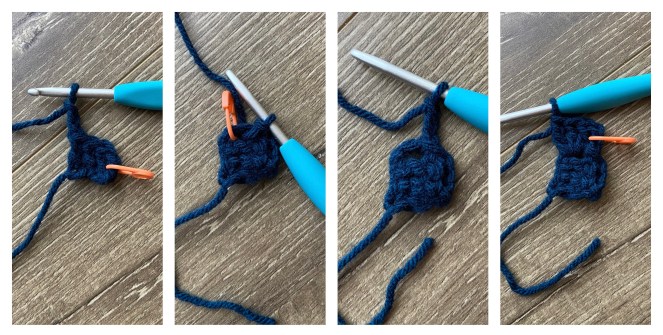
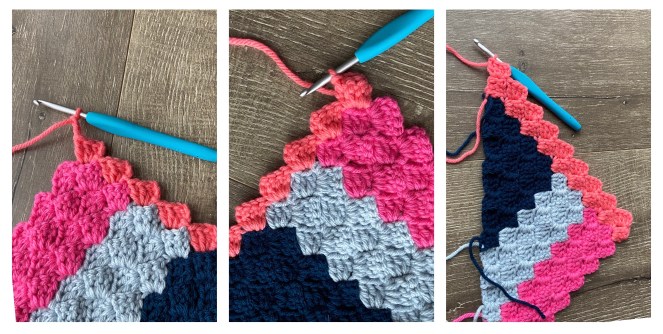
PART 2: Next we will layer on the first two blocks as pictured below. {Smoke, Lippy}

I am going to refer to the blocks built along this side of the Odd Shape as SIDE A. These next 2 blocks are a continuation of the exact thing you have been doing.
Attach a new color at one side of the Odd Shape.
Row 9: INC and work 4 C2C (5)
CH 6 and work a DC into the 4th, 5th and 6th CH from the hook. SS into the first CH 3 loop and work the remaining 4 stitches of the row. So you will CH 3 and DC 3 times into the first CH 3 loop. *SS into the next CH3 loop, CH 3 and work 3 DC. Repeat from * 2 more times.

Row 10: DEC and work 5 C2C (5)
CH 3 and SS into the CH 3 loop of the previous stitch – the C2C stitch you just made. Now work the 5 stitches of the row. So you will CH 3 and DC 3 times into the first CH 3 loop. *SS into the next stitch, CH 3 and work 3 DC. Repeat from * 3 more times.
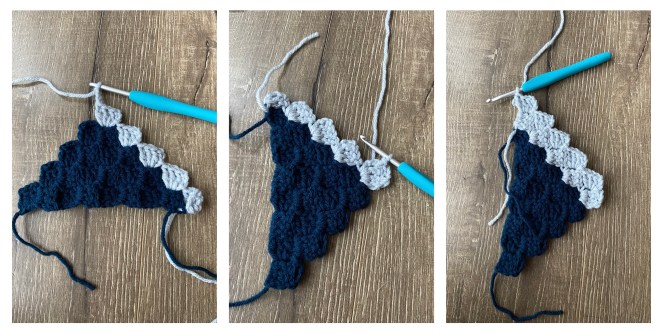
Row 11: INC and work 5 C2C (6)
CH 6 and work a DC into the 4th, 5th and 6th CH from the hook. SS into the first CH 3 loop and work the remaining 5 stitches of the row.

Row 12: DEC and work 6 C2C (6)
CH 3 and SS into the CH 3 loop of the previous stitch – the C2C stitch you just made. Now work the 6 stitches of the row.
Fasten off and attach new color.
Row 13: INC and work 6 C2C (7)
CH 6 and work a DC into the 4th, 5th and 6th CH from the hook. SS into the first CH 3 loop and work the remaining 6 stitches of the row.
Row 14: DEC and work 7 C2C (7)
CH 3 and SS into the CH 3 loop of the previous stitch – the C2C stitch you just made. Now work the 7 stitches of the row.
Row 15: INC and work 7 C2C (8)
CH 6 and work a DC into the 4th, 5th and 6th CH from the hook. SS into the first CH 3 loop and work the remaining 7 stitches of the row.

Row 16: DEC and work 8 C2C (8)
CH 3 and SS into the CH 3 loop of the previous stitch – the C2C stitch you just made. Now work the 8 stitches of the row.
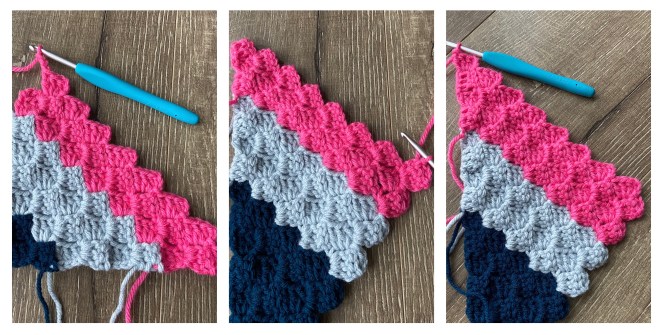
Repeat this process for each of your panels.
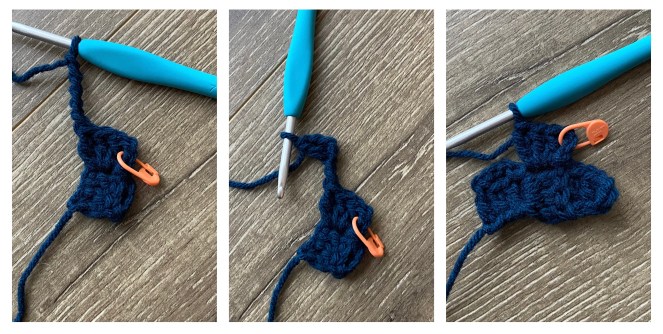
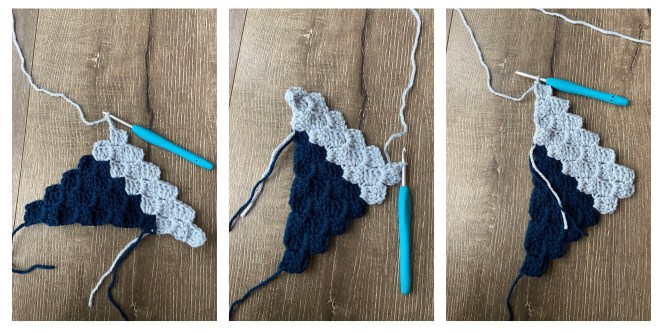
PART 3: Now it is time to layer a block along the opposite side of our pyramid as pictured below. {Coral}
I am going to refer to blocks built along this other side of the Odd Shape as SIDE B. These blocks are a continuation of the exact thing you have been doing! The only difference is that you will work along the opposite side of the odd shape and continue along the top edges of the two blocks you just made. Notice the orientation of the blocks in my picture – this will from now on be considered the “RIGHT SIDE” of my panel. You may consider using a stitch marker on this side of your work to help you distinguish the right and wrong side going forward.
Attach new color along the opposite side of the Odd Shape.
Row 17: INC and work 8 C2C (9)
CH 6 and work a DC into the 4th, 5th and 6th CH from the hook. SS into the first CH 3 loop and work the remaining 8 stitches of the row.
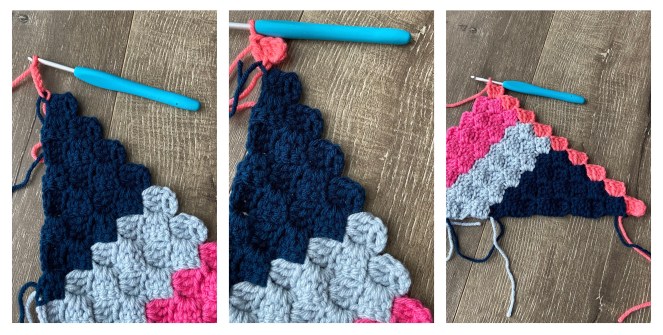
Row 18: DEC and work 9 C2C (9)
CH 3 and SS into the CH 3 loop of the previous stitch – the C2C stitch you just made. Now work the 9 stitches of the row.
Row 19: INC and work 9 C2C (10)
CH 6 and work a DC into the 4th, 5th and 6th CH from the hook. SS into the first CH 3 loop and work the remaining 9 stitches of the row.

Row 20: DEC and work 10 C2C (10)
CH 3 and SS into the CH 3 loop of the previous stitch – the C2C stitch you just made. Now work the 10 stitches of the row. Fasten off.

Repeat this process for each of your panels.
That’s it for Part 1! Please be sure to share your progress so I can see your beautiful creations. Part 2 will be released on Thursday, May 26th. If you can’t wait until then to continue, then jump over to Ravelry to grab the full pattern now!
You are free to share your finished work, to include selling your finished products, but please credit me – SheMakesCrochet – as the pattern designer. Please do not distribute this pattern or any portion of it, instead direct people to my blog. THANK YOU!


These are so fun!
Thank you, great and easy to follow instructions.