
Lets get started with part 2! Remember, if you would rather have the entire PDF download with the bonus documents or perhaps you are too impatient to wait several more weeks, or maybe you just love this project so much, head over to Ravelry and grab it here! Please share your blankets so I can see them. Be sure to use #FelixBlanketRemixed or tag me so I can admire your work.
If you are just starting, please jump back to the Introduction post for supplies and relevant pattern notes. You can find Part 1 here.

Pattern:
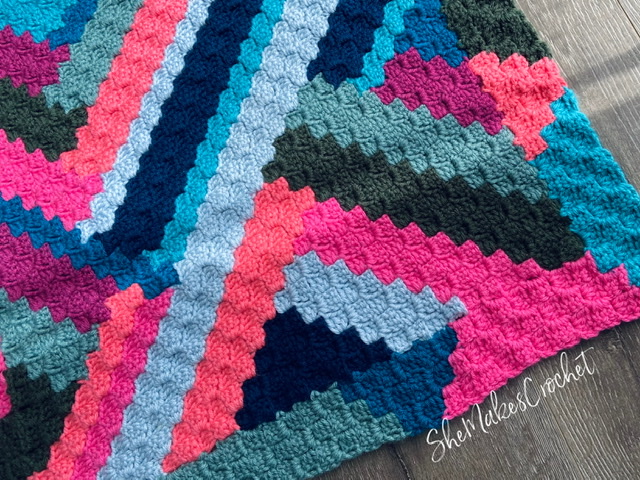
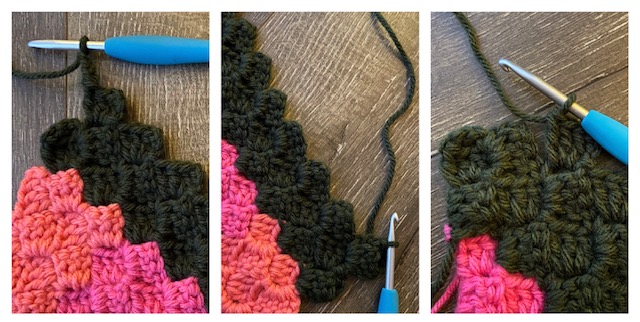
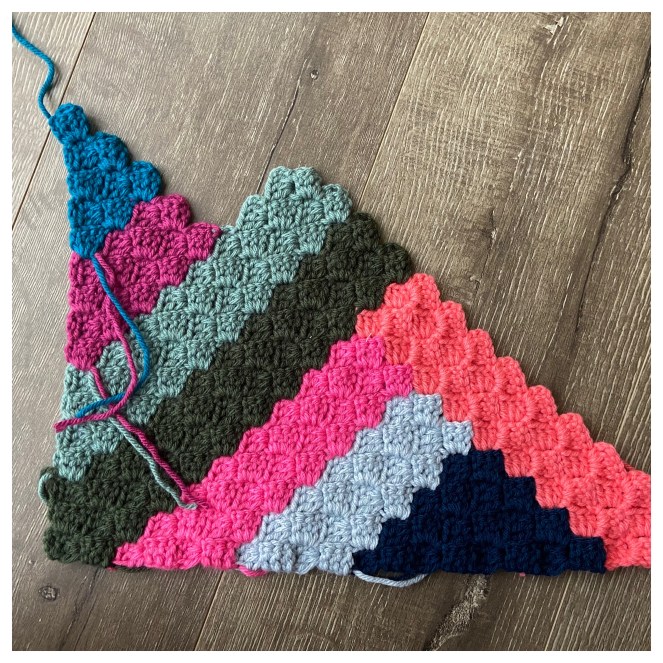
PART 4: Next build 2 more blocks along Side A as depicted below. {Deep Forest, Green Lagoon}
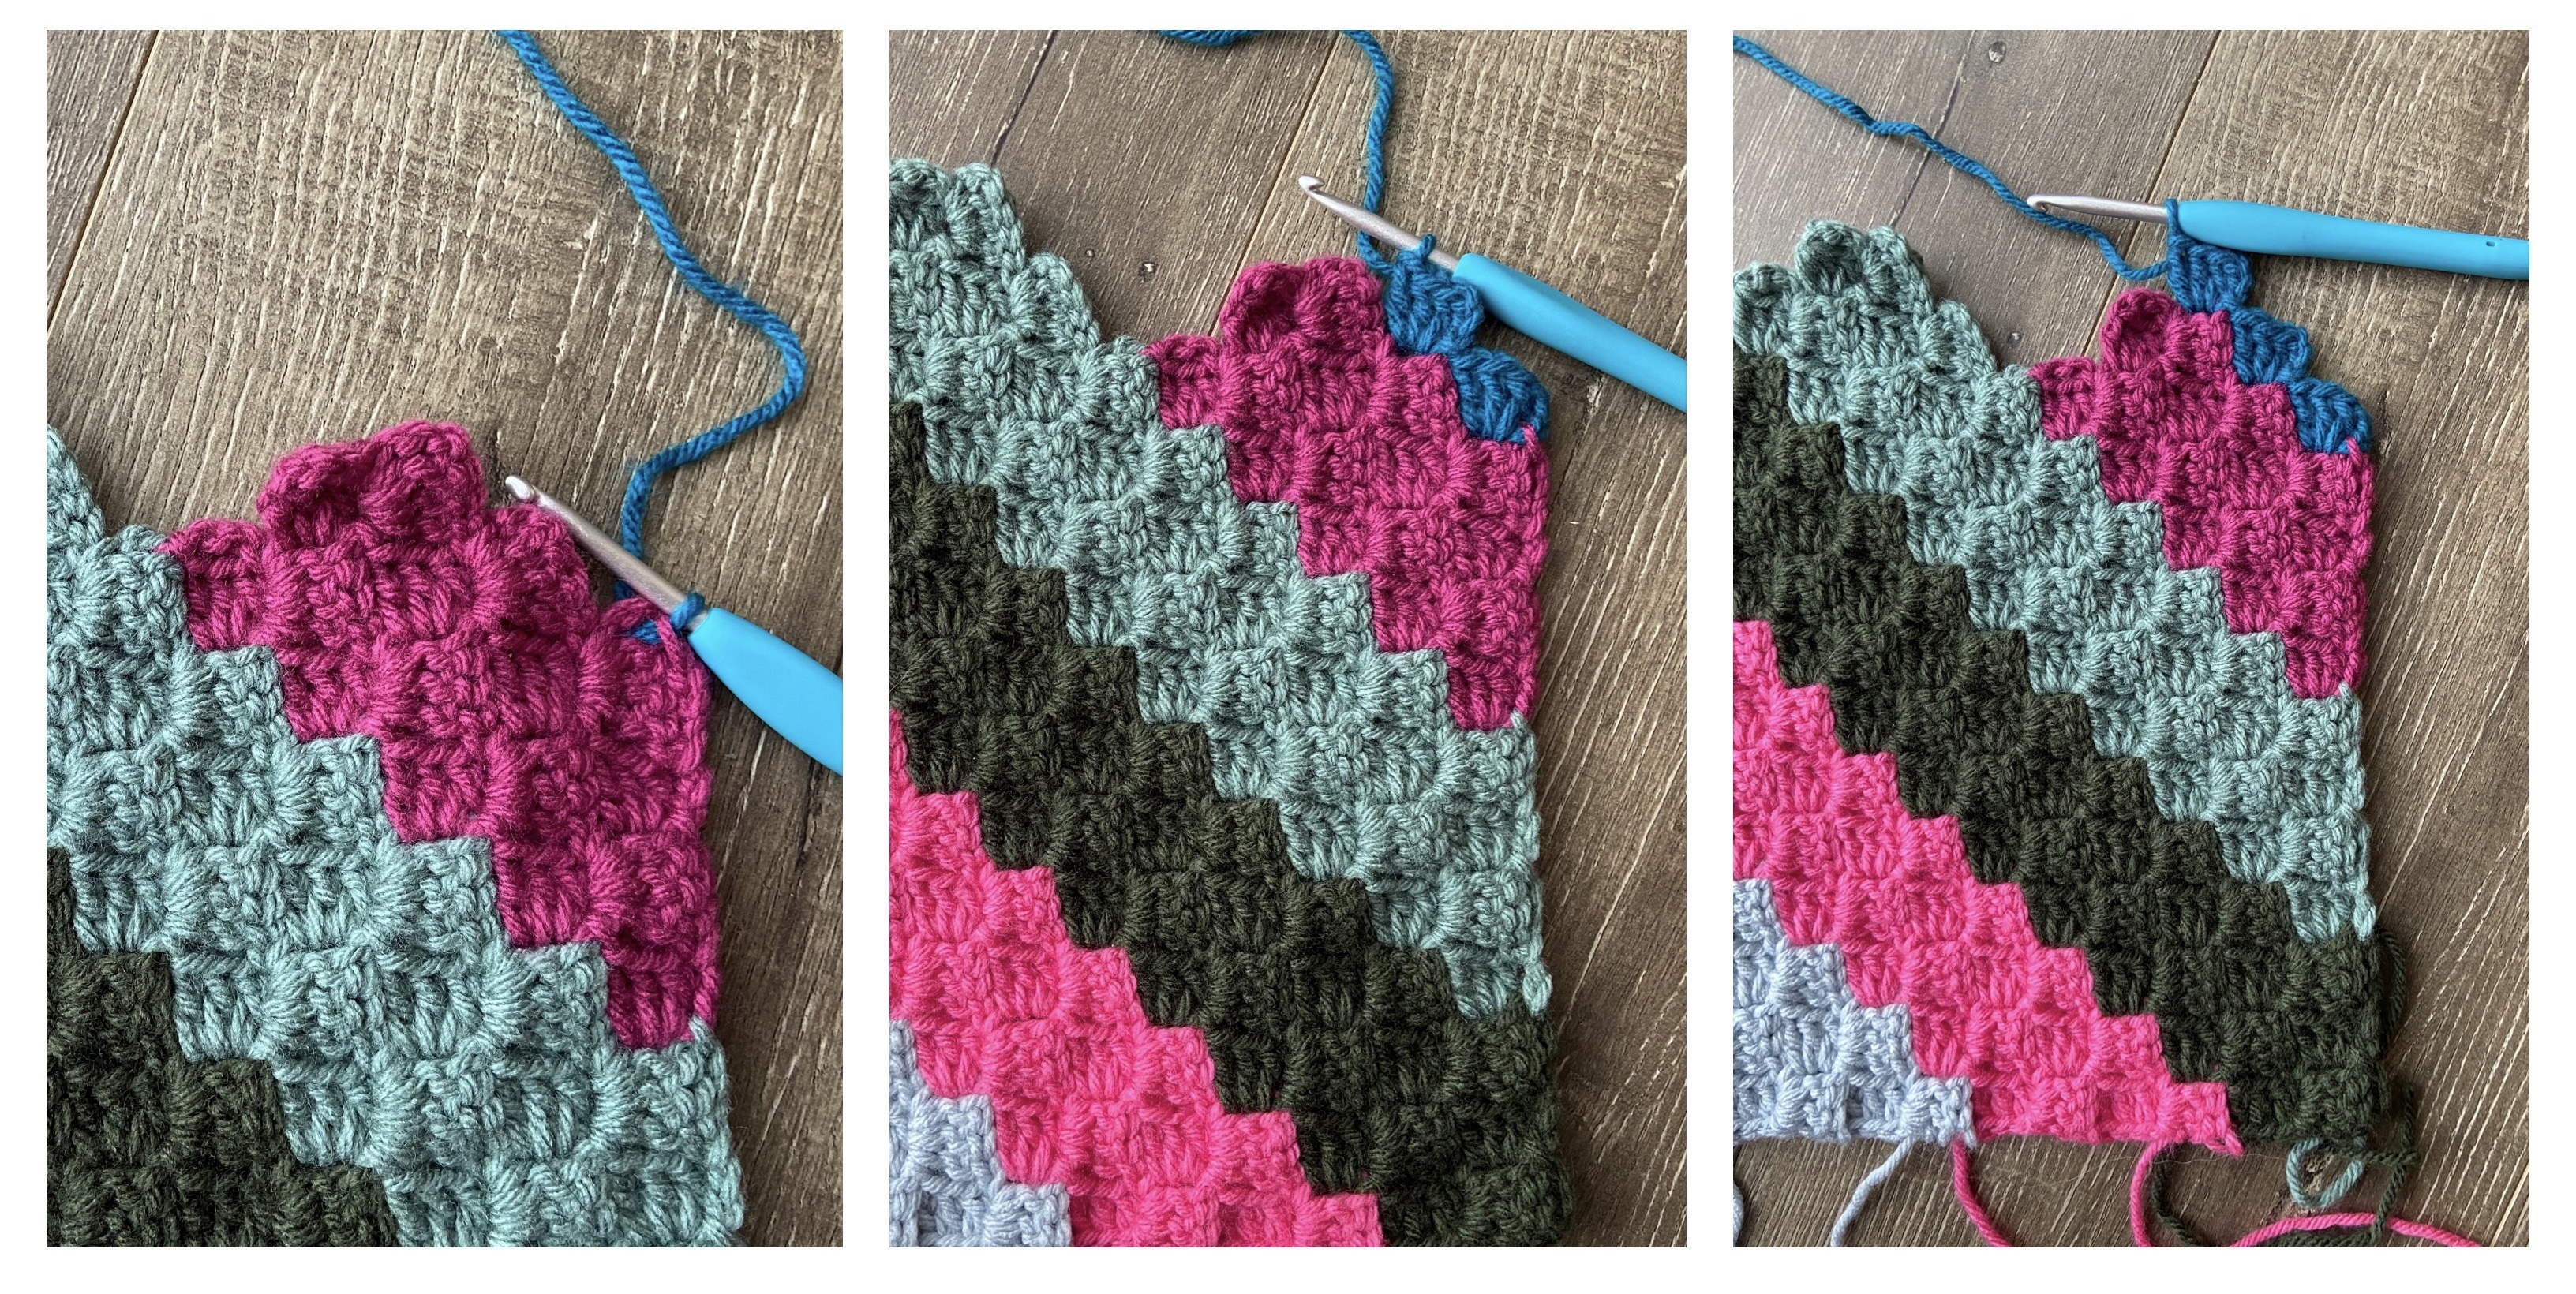
There will be a small change in the construction of these blocks because we are nearing the edge of the panel.
With WRONG SIDE facing up, attach new color as shown below.
Row 21: INC and work 10 C2C (11)
CH 6 and work a DC into the 4th, 5th and 6th CH from the hook. SS into the first CH 3 loop and work the remaining 10 stitches of the row.

Row 22: DEC and work 11 C2C (11)
CH 3 and SS into the CH 3 loop of the previous stitch – the C2C stitch you just made. Now work 11 stitches of the row.
*****This is where things change slightly. We are going to decrease on both ends because we want to make the side edge of the panel. *****
Row 23: DEC and work 11 C2C (11)
CH 3 and SS into the CH 3 loop of the previous stitch – the C2C stitch you just made. Now work 11 stitches of the row.
Row 24: DEC and work 10 C2C. You will need to SS to join to adjacent C2C stitch at the end of the row. (10)
CH 3 and SS into the CH 3 loop of the previous stitch – the C2C stitch you just made. Now work the 10 stitches of the row. Then SS to join to the adjacent C2C stitch at the end of the row.
Row 25: DEC. Fasten off and attach new color in the same spot. Then work 10 stitches of the row. (10)
DEC, in other words, CH 3 and SS into the CH 3 loop of the previous stitch – the C2C stitch you just made.
Fasten off and attach new color in the same spot. Then continue and work the 10 stitches of the row by CH 3 and working 3 DC into each CH 3 loop. (10)

Row 26: DEC and work 9 C2C. You will need to SS to join to adjacent C2C stitch at the end of the row. (9)
CH 3 and SS into the CH 3 loop of the previous stitch – the C2C stitch you just made. Now work the 9 stitches of the row. Then SS to join to the adjacent C2C stitch at the end of the row.
Row 27: DEC and work 9 C2C. (9)
CH 3 and SS into the CH 3 loop of the previous stitch – the C2C stitch you just made. Now work the 9 stitches of the row.

Row 28: DEC and work 8 C2C. You will need to SS to join to adjacent C2C stitch at the end of the row. (8)
CH 3 and SS into the CH 3 loop of the previous stitch – the C2C stitch you just made. Now work the 8 stitches of the row. Then SS to join to the adjacent C2C stitch at the end of the row.

Row 29: DEC. Fasten off. Remainder of Row 29 continued in next section.
DEC, or in other words, CH 3 and SS into the CH 3 loop of the previous stitch – the C2C stitch you just made. Fasten off. Remainder of Row 29 continued in next section.
Repeat this process for each of your panels.
PART 5: First two short blocks of Side A as pictured below. {Rich Orchid, Teal}
You will continue with the exact same method only the block will not fill the entire row.
With RIGHT SIDE facing up, attach new color as shown below.
Row 29 continued: 5 C2C stitches and SS to adjacent stitch. (5)
Continue the row, by working CH 3 and 3 DC into the next 5 CH 3 loops for a total of 5 stitches. You will need to SS to join to the adjacent C2C at the end of the row (5)

Row 30: DEC and work 4 C2C. You will need to SS to join to the adjacent C2C at the end of the row (4)
CH 3 and SS into the CH 3 loop of the previous stitch – the C2C stitch you just made. Now work the 4 stitches of the row. Then SS to join to the adjacent C2C stitch at the end of the row.

Row 31: DEC and work 4 C2C. (4) CH 3 and SS into the CH 3 loop of the previous stitch – the C2C stitch you just made. Now work the 4 stitches of the row

Row 32: DEC and work 3 C2C. You will need to SS to join to the adjacent C2C at the end of the row (3)
CH 3 and SS into the CH 3 loop of the previous stitch – the C2C stitch you just made. Now work the 3 stitches of the row. Then SS to join to the adjacent C2C stitch at the end of the row.

Row 33: DEC. Fasten off and attach new color in the same spot. Then work 3 C2C stitches. (3)
DEC, or in other words, CH 3 and SS into the CH 3 loop of the previous stitch – the C2C stitch you just made. Fasten off and attach new color in the same spot. Then continue and work the 3 stitches of the row by working CH 3 and 3 DC into the 3 CH 3 loops. (3)

Row 34: DEC and work 2 C2C. SS to join to adjacent stitch. (2)
CH 3 and SS into the CH 3 loop of the previous stitch – the C2C stitch you just made. Now work the 2 stitches of the row. You will need to SS to join to the adjacent C2C at the end of the row (2)

Row 35: DEC and work 2 C2C. (2)
CH 3 and SS into the CH 3 loop of the previous stitch – the C2C stitch you just made. Now work the 2 stitches of the row.

Row 36: DEC and work 1 C2C. SS to join to adjacent stitch. (1)
CH 3 and SS into the CH 3 loop of the previous stitch – the C2C stitch you just made. Now work the 1 stitch of the row. Then SS to join to the adjacent C2C at the end of the row (1)
Row 37: DEC and work 1 C2C. (1) CH 3 and SS into the CH 3 loop of the previous stitch – the C2C stitch you just made. Now work the 1 stitch of the row.

*A chain 3 loop needs to be created before fastening off so that we can work on top of this last stitch. Work one last decrease by making a CH 3 and SS into the previous stitch – the C2C stitch you just made.*
Fasten off.
Repeat this process for each of your panels.
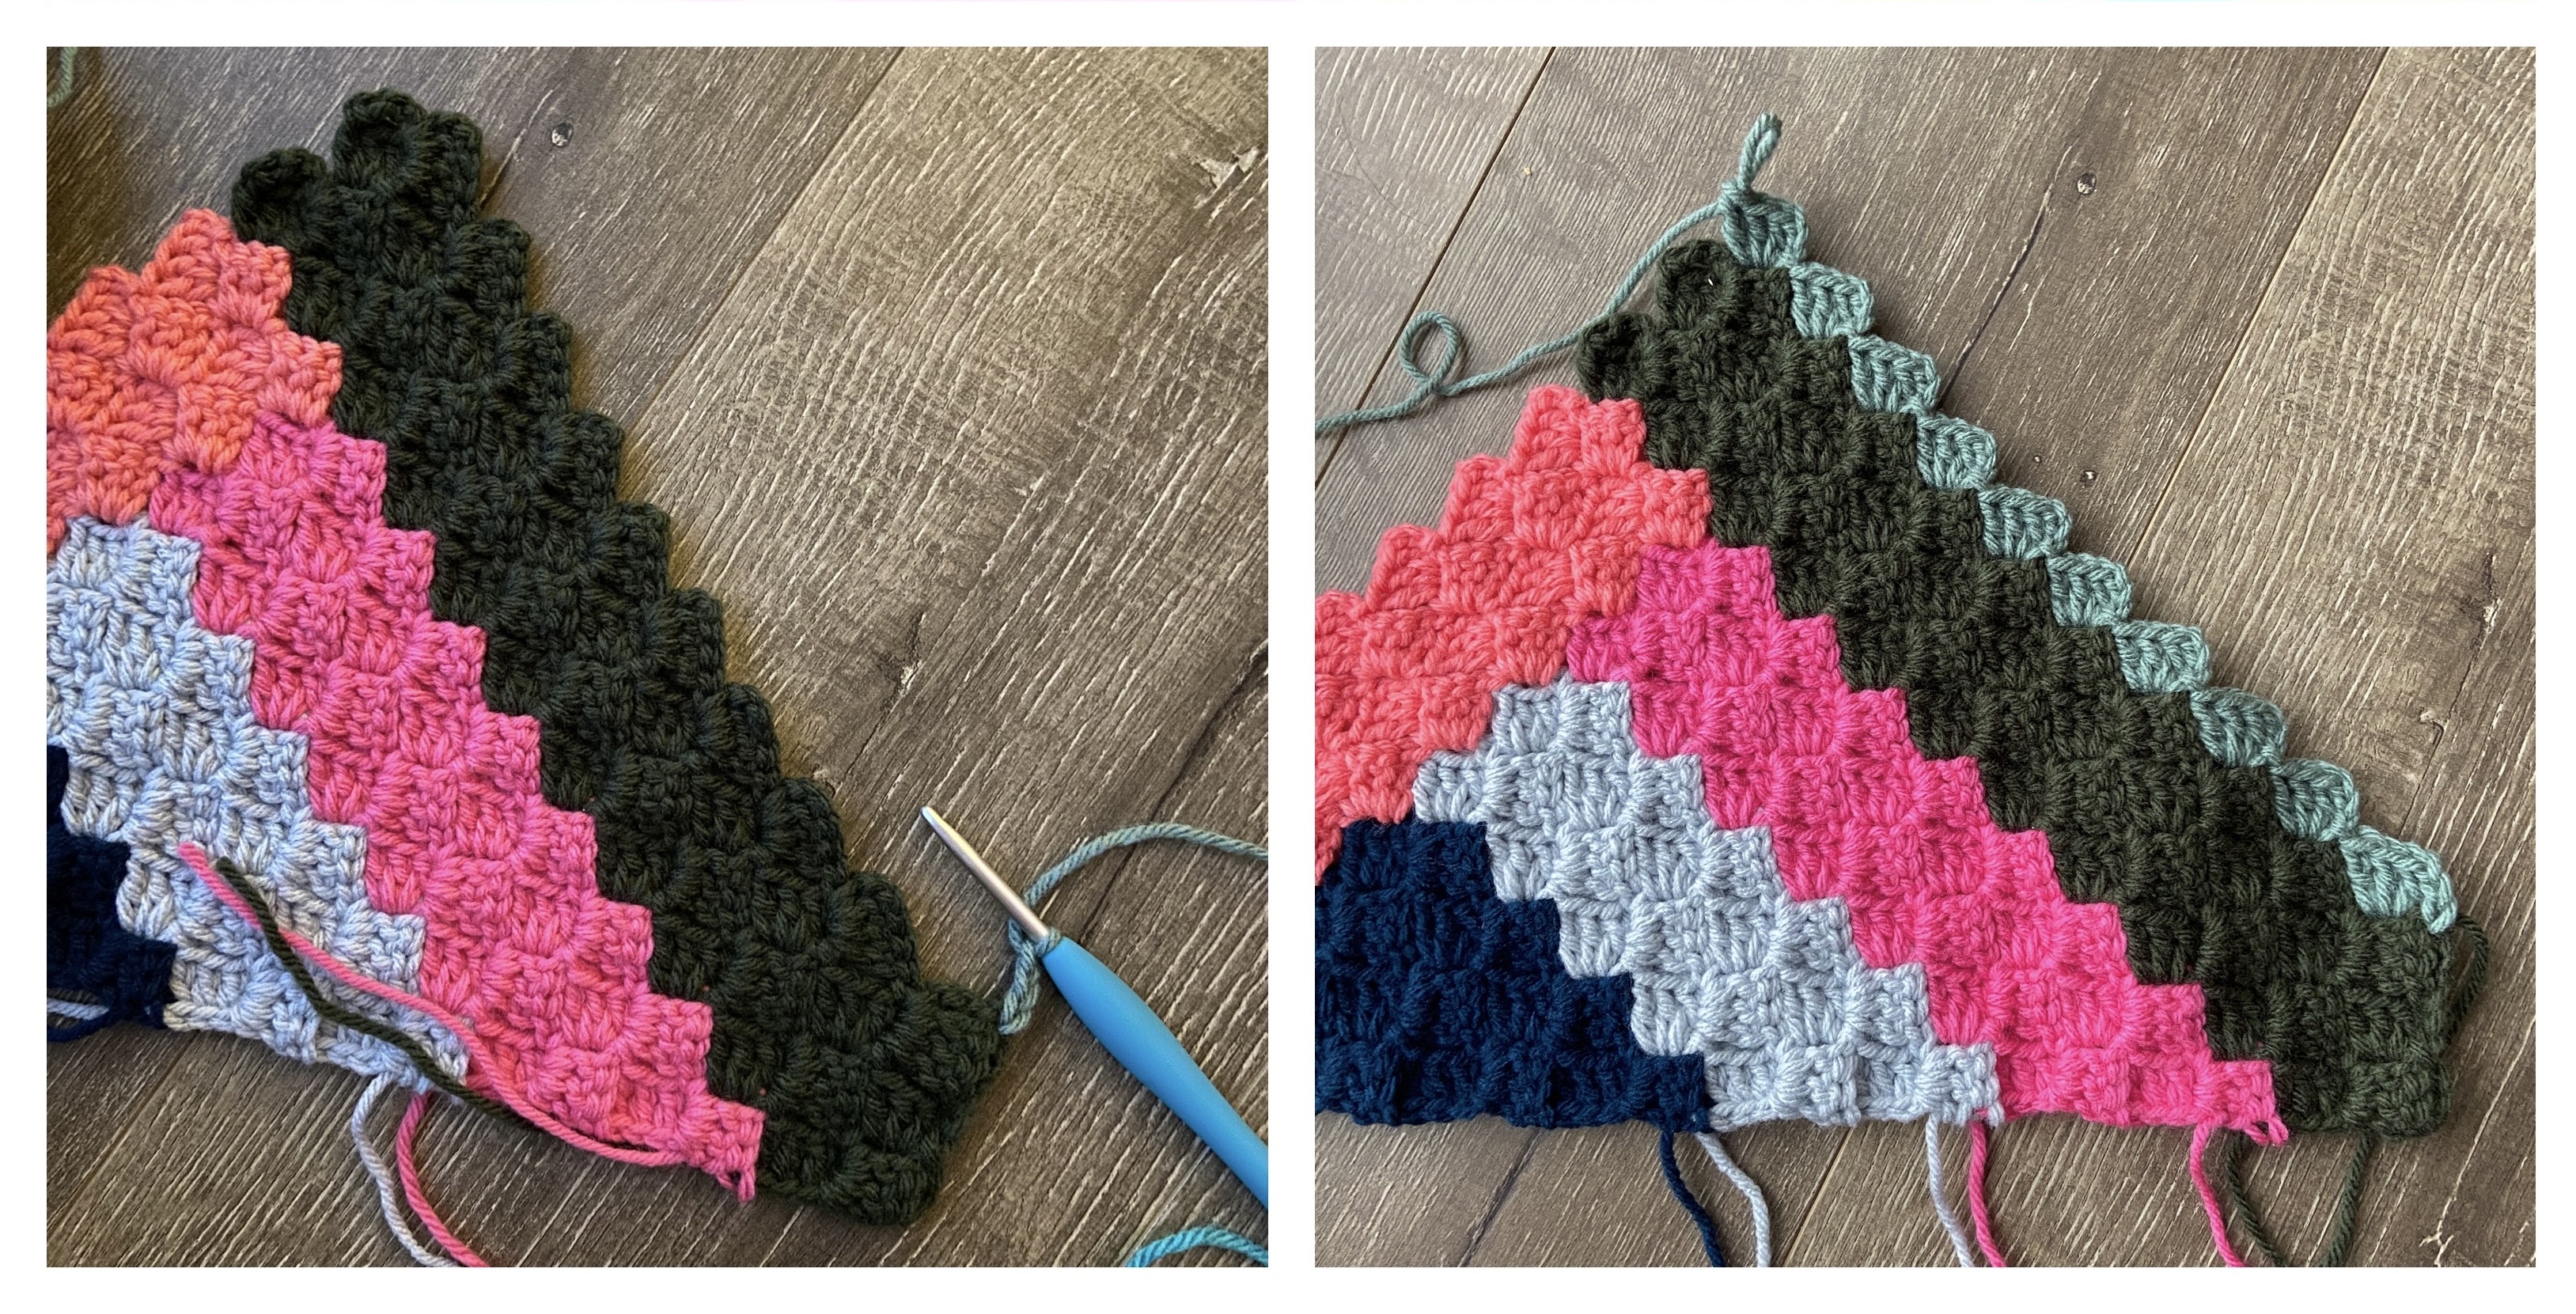
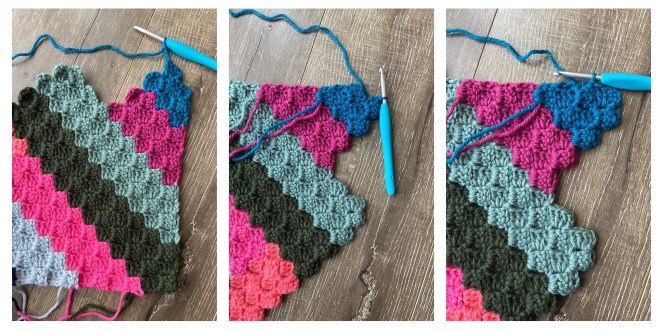
PART 6: Last two short blocks of Side A as pictured below. {Aqua, Sapphire}
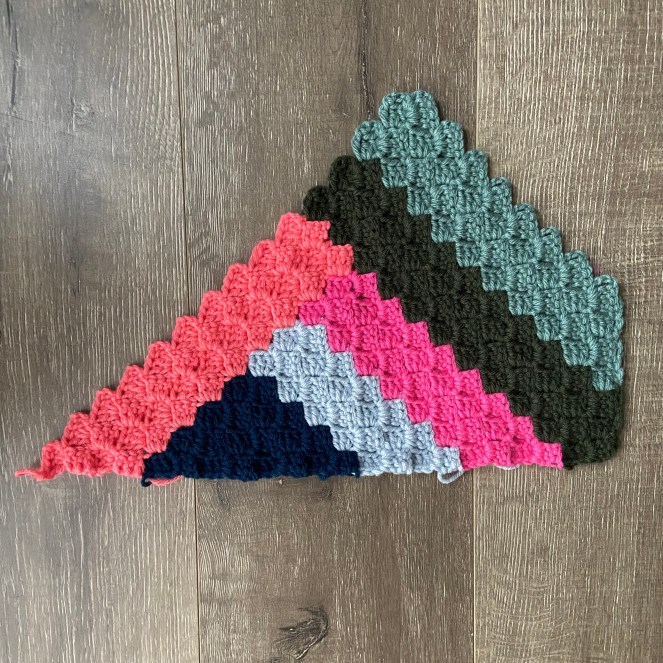
This is what the right side of your work should look like after finishing this section.
Orient your work with the WRONG SIDE up and attach new color as indicated below.
Row 38: Work 5 C2C stitches of the row. (5)
Attach yarn and begin the first stitch by CH 3 and 3 DC into the same loop. *SS into the next stitch, CH 3 and work 3 DC. Repeat from * 3 more times.

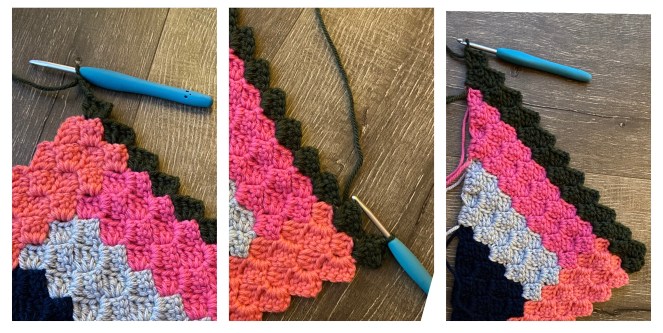
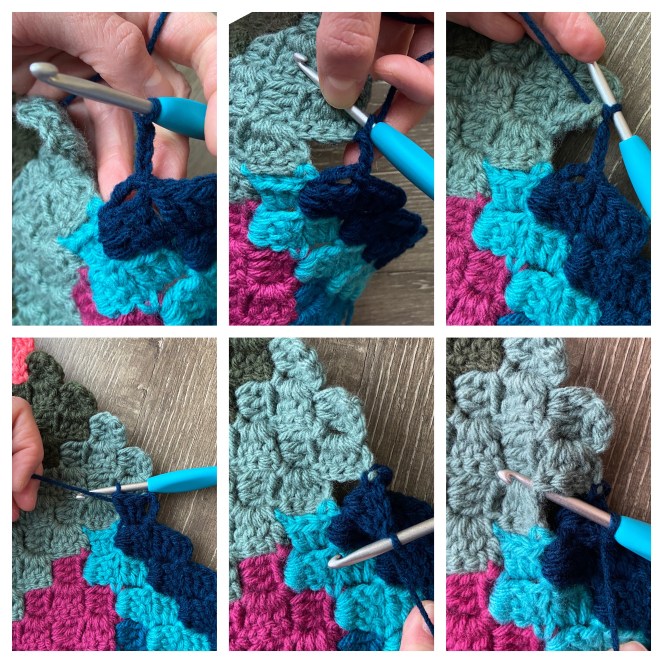
Row 39: INC and work 5 C2C ***joining to adjacent C2C while working final stitch – see below***. (6)
CH 6 and work a DC into the 4th, 5th and 6th CH from the hook. SS into the first CH 3 loop and work 4 of the 5 remaining stitches of the row.
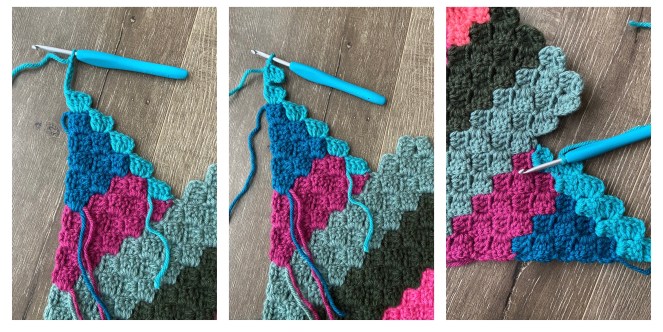
The final stitch needs to be joined to the adjacent stitch while it’s being built. If you think about C2C stitches as little squares, then we want to make a join at the top two corners of the square you are making. Begin by making a SS into the final stitch and begin your last C2C stitch by working a CH 3. SS into the adjacent stitch. Finish the C2C stitch by working 3 DC. Finish the join by making one more SS into the adjacent stitch. Fasten off.

Orient your work with the WRONG SIDE up and attach new color as indicated below.
Row 40: Work 6 C2C stitches of the row. (6)
Attach yarn and begin the first stitch by CH 3 and 3 DC into the same loop. *SS into the next stitch, CH 3 and work 3 DC. Repeat from * 4 more times.

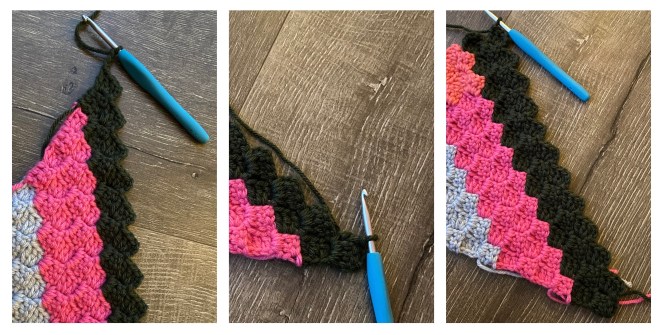
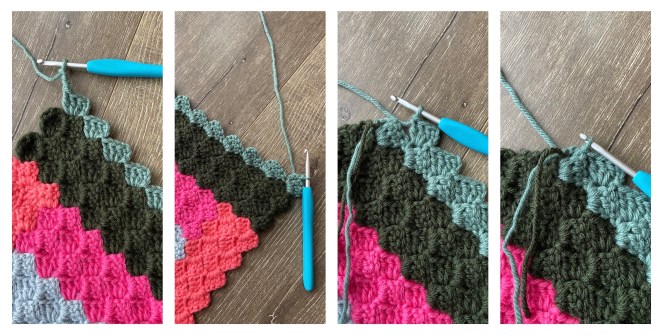
Row 41: INC and work 6 C2C ***joining to adjacent C2C while working final stitch – see below***. (7)
CH 6 and work a DC into the 4th, 5th and 6th CH from the hook. SS into the first CH 3 loop and work 5 of the remaining 6 stitches of the row.

Like before, SS into the final stitch and begin your C2C stitch by working a CH 3. SS into the adjacent stitch. Finish the C2C stitch by working 3 DC. Finish the join by making one more SS into the adjacent stitch.
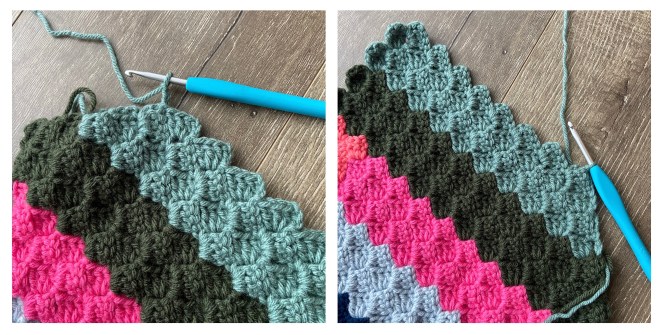
Row 42: DEC and work 7 C2C. (7)
This may feel odd because you aren’t at the edge of your panel. However, trust the process and continue to do the same thing you have done for every other decrease. CH 3 and SS into the CH 3 loop of the previous stitch – the C2C stitch you just made. Now you should be ready to work back up the block. Finish the row by working 7 C2C stitches.

Row 43: INC and work 7 C2C joining to adjacent C2C while working final stitch. (8)
CH 6 and work a DC into the 4th, 5th and 6th CH from the hook. SS into the first CH 3 loop and work the remaining 7 stitches of the row. SS into the adjacent stitch. Fasten off. Note: There are 2 green stitches on the left and you will work the SS into the top of the bottom green stitch (which is upside down) or in other words, in the middle along the right edge where those 2 green stitches meet.

Repeat this process for each of your panels.
That’s it for Part 2! I hope you are enjoying this project. Please be sure to share your progress so I can see your beautiful creations. Part 3 will be released on Thursday, June 2nd.
You are free to share your finished work, to include selling your finished products, but please credit me – SheMakesCrochet – as the pattern designer. Please do not distribute this pattern or any portion of it, instead direct people to my blog. THANK YOU!


hi, I am really having fun with this but got stuck on row 39. I can’t figure out what you mean by the block being attached to the adjacent stitch.. please help.
Instructions above:
Begin by making a SS into the final stitch and begin your last C2C stitch by working a CH 3. DONE
SS into the adjacent stitch. WHICH STITCH?
Finish the C2C stitch by working 3 DC. Finish the join by making one more SS into the adjacent stitch. WHICH STITCH?
or maybe there is a place in the original Felix blanket video I can follow?
Thank you.
Hi Joy, I’m sorry I’m so late to respond. I hope you have figured it out.
If you continue reading the step in the pattern, I offer a more wordy explanation, as well as a series of 6 photos that (I think) clearly show which stitch the “adjacent stitch” is. You may find it helpful to watch some Felix blanket videos (if you never made one before) as I walk through that technique in there.
You could just make the last stitch without the slip stitches. And then, hopefully you will easily notice that it’s not connected to the stitch right next to it – and that “adjacent stitch” should be connected to the stitch you just made along the edge they share. (You would have to frog the stitch and remake it with the slip stitches so your finished blanket doesn’t have holes.) I know that sounds crazy, but if you tried that I think you would notice something was off especially if you’ve done c2c before.
Does any of that help?