

Lets get started with part 4! As always if you love this pattern and would like it all together in one document or maybe you are getting tired of all the pictures and want more concise instructions, head over to Ravelry to grab the downloadable pattern now! Please share your blankets so I can see them. Be sure to use #FelixBlanketRemixed or tag me so I can admire your work.
If you are just starting, please jump back to the Introduction post for supplies and relevant pattern notes. You can find Parts 1, 2 and 3.
Pattern:
PART 9: Three short blocks of Side B as pictured below. {Green Lagoon, Rich Orchid, Teal}

Orient your work with the RIGHT SIDE up and attach new color as indicated below.
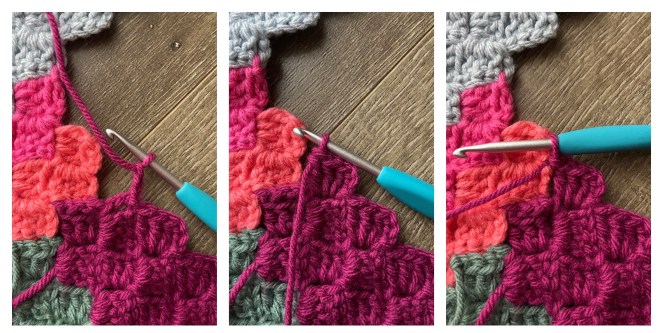
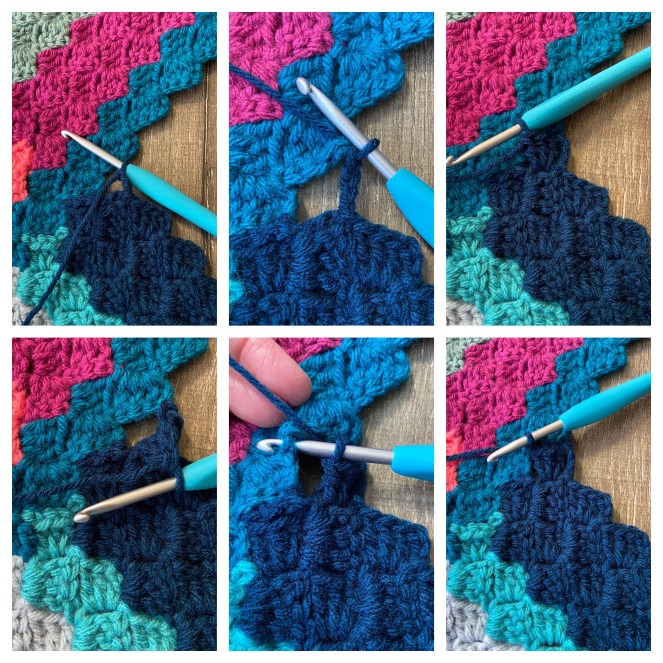
Row 57: Work 3 C2C stitches of the row. (3)
Attach yarn and begin the first stitch by CH 3 and 3 DC into the same loop. *SS into the next stitch, CH 3 and work 3 DC. Repeat from * 1 more time.

Row 58: INC and work 3 C2C joining to adjacent C2C while working final stitch. (4)
CH 6 and work a DC into the 4th, 5th and 6th CH from the hook. SS into the first CH 3 loop and work 2 of the 3 remaining stitches of the row.
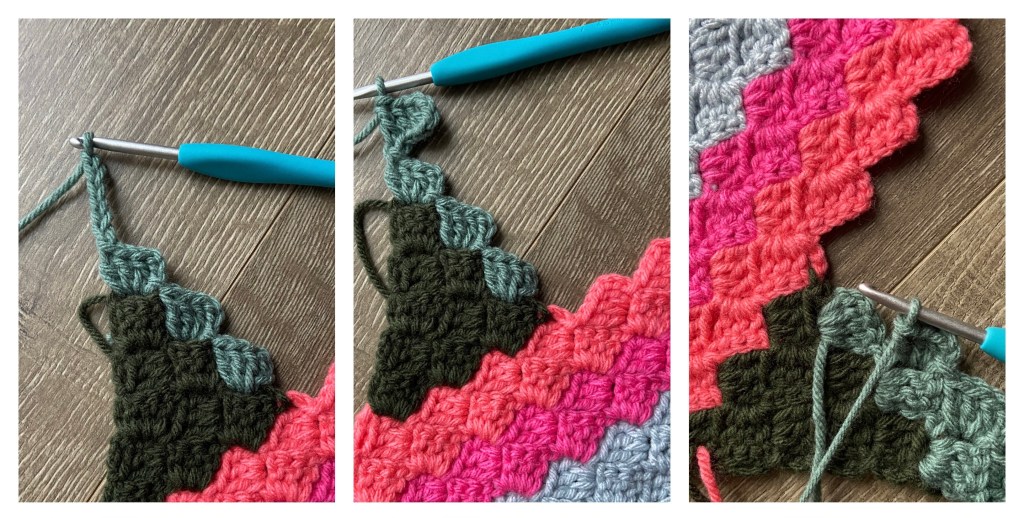
Like before, SS into the final stitch and being your C2C stitch by working a CH 3. SS into the adjacent stitch. Finish the C2C stitch by working 3 DC. Finish the join by making one more SS into the adjacent stitch.
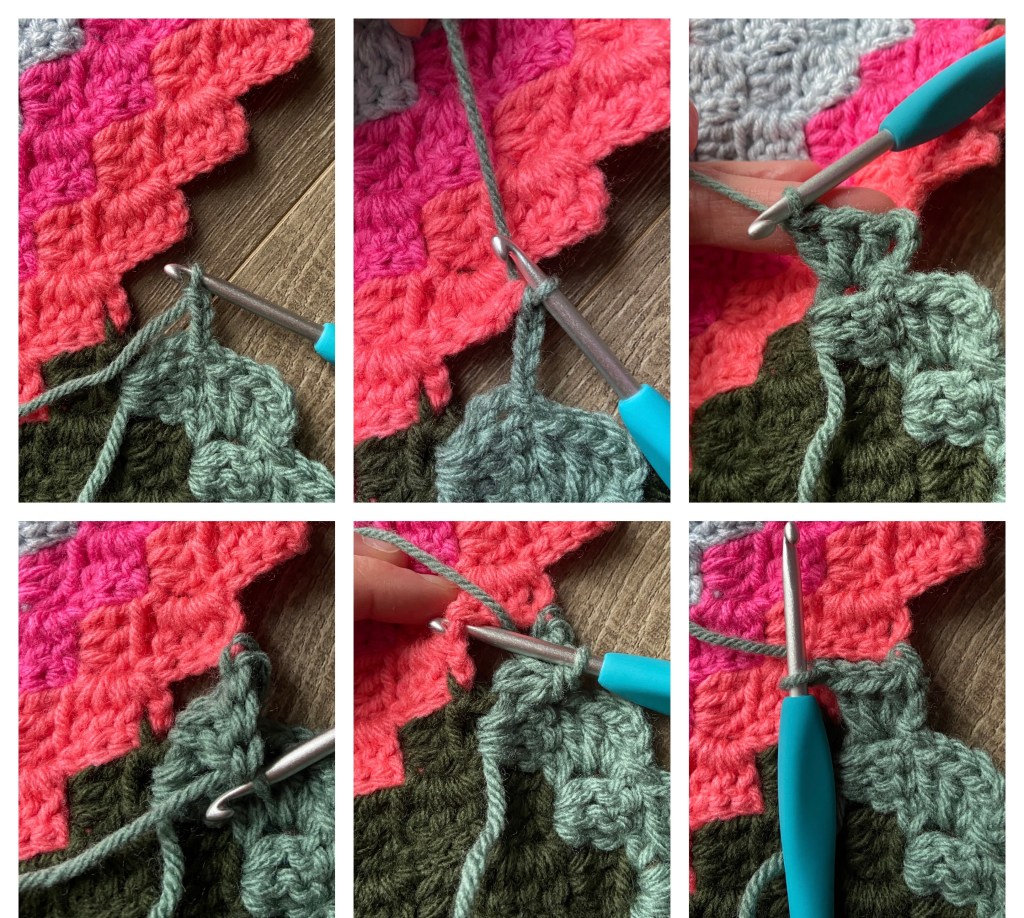
Row 59: DEC and work 4 C2C. (4)
This may feel odd because you aren’t at the edge of your panel. However, like before, do the same thing you have done for every other decrease. CH 3 and SS into the CH 3 loop of the previous stitch – the C2C stitch you just made. Now you should be ready to work back up the block. Finish the row by working 4 C2C stitches.

Row 60: INC and work 4 C2C joining to adjacent C2C while working final stitch. (5)
CH 6 and work a DC into the 4th, 5th and 6th CH from the hook. SS into the first CH 3 loop and work the 3 of the 4 remaining stitches of the row.

Like before, SS into the final stitch and begin your C2C stitch by working a CH 3. SS into the adjacent stitch. Finish the C2C stitch by working 3 DC. Finish the join by making one more SS into the adjacent stitch. Fasten off.

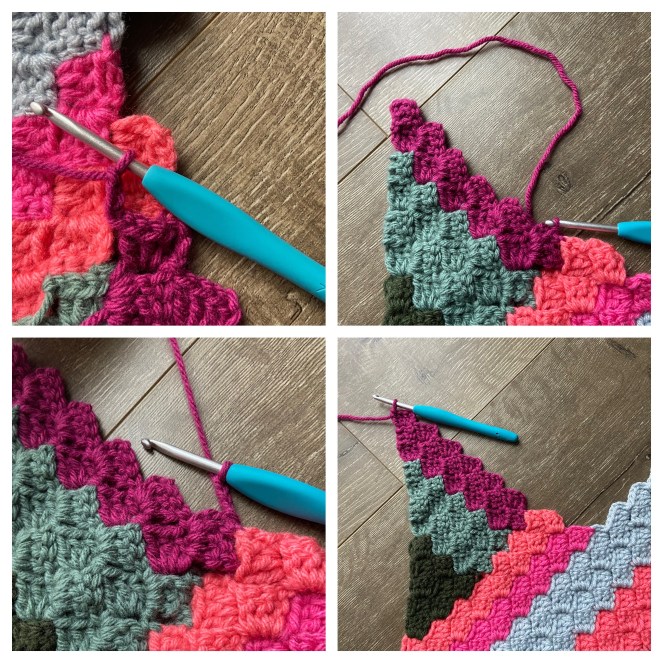
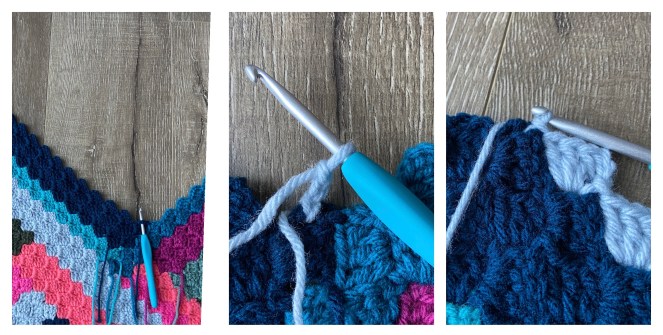
Orient your work with the RIGHT SIDE up and attach new color as indicated below.
Row 61: Work 5 C2C stitches of the row. (5)
Attach yarn and begin the first stitch by working CH 3 and 3 DC into the same loop. *SS into the next stitch, CH 3 and work 3 DC. Repeat from * 3 more times.

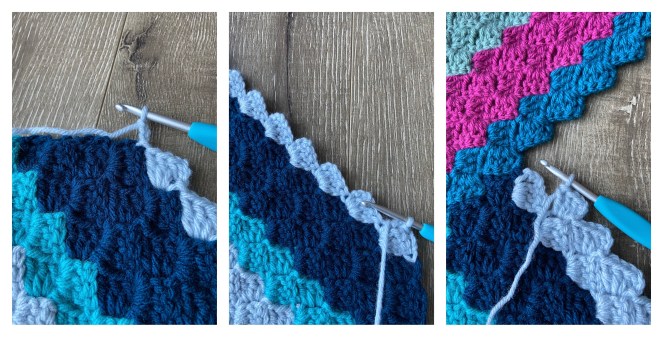
Row 62: INC and work 5 C2C joining to adjacent C2C while working final stitch. (6)
CH 6 and work a DC into the 4th, 5th and 6th CH from the hook. SS into the first CH 3 loop and work 4 of the remaining 5 stitches of the row.

Like before, SS into the final stitch and begin your C2C stitch by working a CH 3. SS into the adjacent stitch. Finish the C2C stitch by working 3 DC. Finish the join by making one more SS into the adjacent stitch.

Row 63: DEC and work 6 C2C. (6)
Like before, do the same thing you have done for every other decrease. CH 3 and SS into the CH 3 loop of the previous stitch – the C2C stitch you just made. Now you should be ready to work back up the block. Finish the row by working 6 C2C stitches.
Row 64: INC and work 6 C2C. SS to join to adjacent C2C. (7)
CH 6 and work a DC into the 4th, 5th and 6th CH from the hook. SS into the first CH 3 loop and work 5 of the remaining 6 stitches of the row.
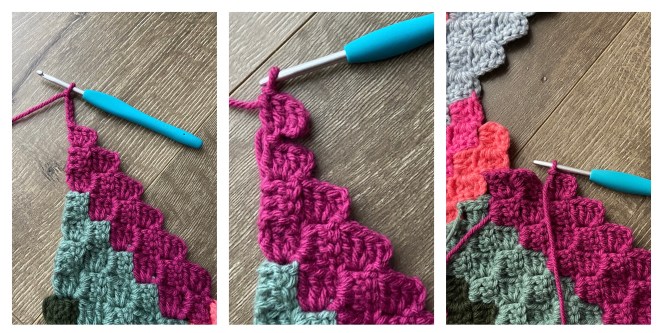
SS into the final stitch and work the last C2C stitch. SS into the adjacent stitch. Fasten off. Note: This join is similar to the one you did earlier in the patter. Just SS into the top of that bottom C2C stitch (which is upside down).
Orient your work with the RIGHT SIDE up and attach new color as indicated below.
Row 65: Work 9 C2C stitches of the row. (9)
Attach yarn and begin the first stitch by working CH 3 and 3 DC into the same loop. *SS into the next stitch, CH 3 and work 3 DC. Repeat from * 7 more times.
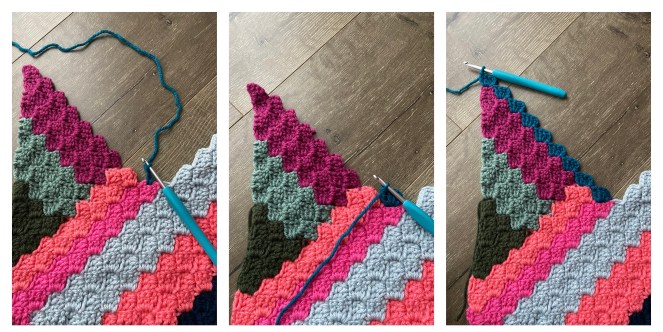
Row 66: INC and work 9 C2C joining to adjacent C2C while working final stitch. (10)
CH 6 and work a DC into the 4th, 5th and 6th CH from the hook. SS into the first CH 3 loop and work 8 of the remaining 9 stitches of the row.

Like before, SS into the final stitch and begin your C2C stitch by working a CH 3. SS into the adjacent stitch. Finish the C2C stitch by working 3 DC. Finish the join by making one more SS into the adjacent stitch. Fasten off.

Repeat this process for each of your panels.
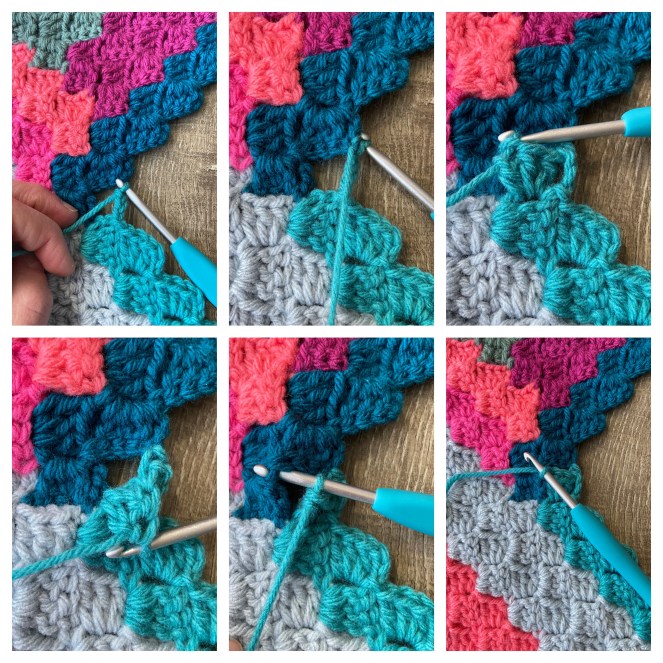
PART 10: Three long blocks of Side C as pictured below. {Aqua, Sapphire, Smoke}
From here on out, you will be closing up the panel by layering blocks along the remaining edge of the very long block created in Part 7 – I will refer to blocks built on this side as SIDE C. The other side will continue to be referred to as side B.
Orient your work with the WRONG SIDE up and attach new color as indicated below.
Row 67: Work 18 C2C stitches of the row. (18)
Attach yarn and begin the first stitch by working CH 3 and 3 DC into the same loop. *SS into the next stitch, CH 3 and work 3 DC. Repeat from * 16 more times.

Row 68: INC and work 18 C2C joining to adjacent C2C while working final stitch. (19)
CH 6 and work a DC into the 4th, 5th and 6th CH from the hook. SS into the first CH 3 loop and work 17 of the remaining 18 stitches of the row.

Like before, SS into the final stitch and begin your C2C stitch by working a CH 3. SS into the adjacent stitch. Finish the C2C stitch by working 3 DC. Finish the join by making one more SS into the adjacent stitch. Fasten off.
Orient your work with the WRONG SIDE up and attach new color as indicated below.
Row 69: Work 18 C2C stitches of the row. SS to adjacent stitch. (18)
Attach yarn and begin the first stitch by working CH 3 and 3 DC into the same loop. *SS into the next stitch, CH 3 and work 3 DC. Repeat from * 16 more times. Then SS into the adjacent stitch.

Row 70: DEC and work 18 C2C joining to adjacent C2C while working final stitch. (18)
CH 3 and SS into the CH 3 loop of the previous stitch – the C2C stitch you just made. Now work the 17 of the remaining 18 stitches of the row.

Like before, SS into the final stitch and begin your C2C stitch by working a CH 3. SS into the adjacent stitch. Finish the C2C stitch by working 3 DC. Finish the join by making one more SS into the adjacent stitch.

Row 71: DEC and work 17 C2C. SS to the adjacent stitch. (17)
DEC like usual, by working a CH 3 and SS into the CH 3 loop of the previous stitch – the C2C stitch you just made. Now you should be ready to work back up the block. Finish the row by working 17 C2C stitches. SS to the adjacent stitch.
Row 72: DEC and work 17 C2C joining to adjacent C2C while working final stitch. (17)
CH 3 and SS into the CH 3 loop of the previous stitch – the C2C stitch you just made. Now work 16 of the remaining 17 stitches of the row.

Like before, SS into the final stitch and begin your C2C stitch by working a CH 3. SS into the adjacent stitch. Finish the C2C stitch by working 3 DC. Finish the join by making one more SS into the adjacent stitch. Fasten off.
Orient your work with the WRONG SIDE up and attach new color as indicated below.
Row 73: Work 16 C2C stitches of the row. SS to adjacent stitch. (16)
Attach yarn and begin the first stitch by working CH 3 and 3 DC into the same loop. *SS into the next stitch, CH 3 and work 3 DC. Repeat from * 14 more times. Then SS into the adjacent stitch.
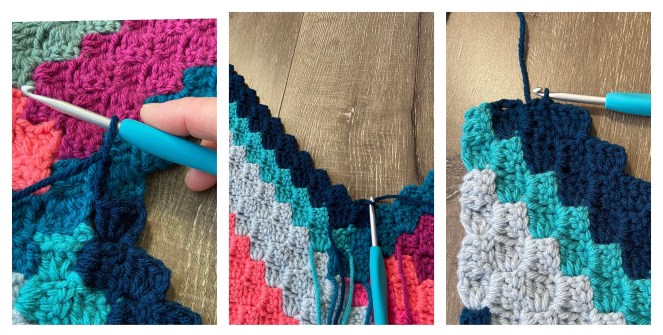
Row 74: DEC and work 16 C2C joining to adjacent C2C while working final stitch. (16)
CH 3 and SS into the CH 3 loop of the previous stitch – the C2C stitch you just made. Now work 14 of the remaining 15 stitches of the row. Then refer to pictures below for the last stitch.
Like before, SS into the final stitch and begin your C2C stitch by working a CH 3. SS into the adjacent stitch. Finish the C2C stitch by working 3 DC. Finish the join by making one more SS into the adjacent stitch. Fasten off.

Repeat this process for each of your panels.
That’s it for Part 4! I hope you are enjoying this project. We’ve only got 2 more weeks left. Please be sure to share your progress so I can see your beautiful creations. Part 5 will be released on Thursday, June 16th.
You are free to share your finished work, to include selling your finished products, but please credit me – SheMakesCrochet – as the pattern designer. Please do not distribute this pattern or any portion of it, instead direct people to my blog. THANK YOU!

