

Lets get started with part 5! During this section, we will complete all of your panels. Next week, our last week, we will assemble everything and add the border. As always, head over to Ravelry to grab the downloadable pattern now if you prefer. Please share your blankets so I can see them. Be sure to use #FelixBlanketRemixed or tag me so I can admire your work.
If you are just starting, please jump back to the introduction post for supplies and relevant pattern notes. You can find Parts 1, 2, 3 and 4 in earlier posts.
Pattern:
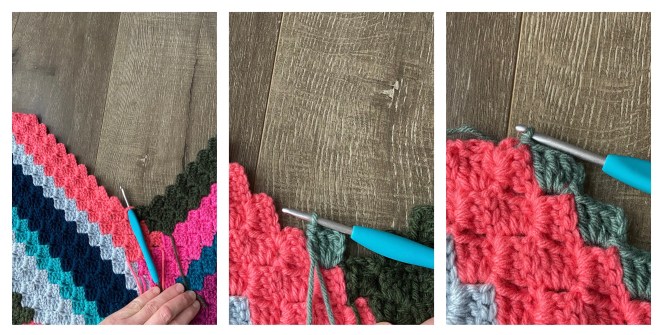
PART 11: Alternating repetitive blocks. {Lippy, Coral, Deep Forest, Green Lagoon}
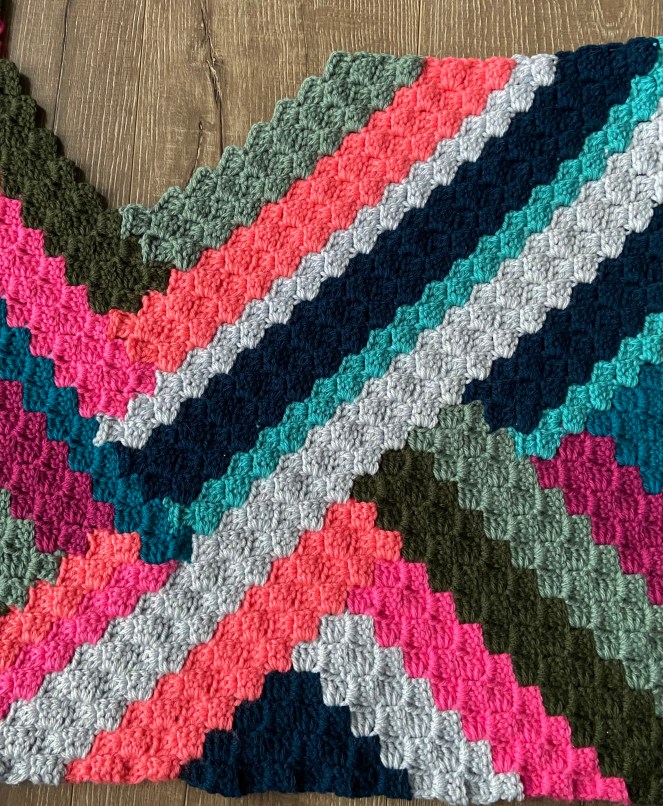
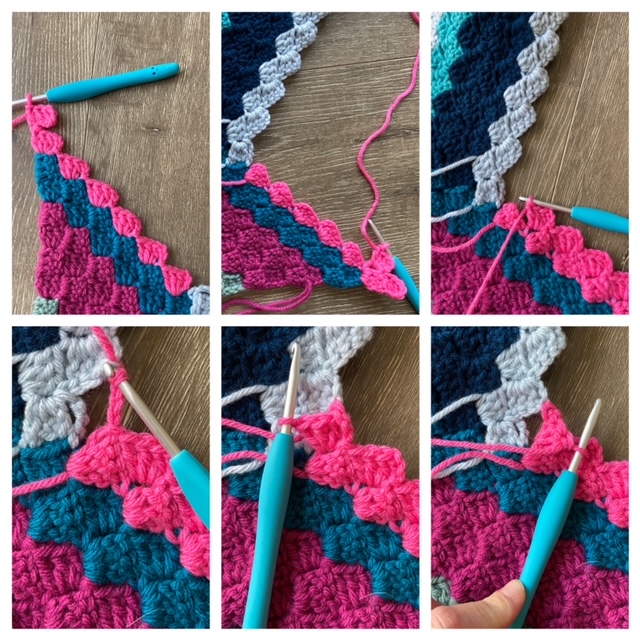
We will alternately build a block on SIDE B, followed by SIDE C and so on.
Orient your work with the RIGHT SIDE up and attach new color as indicated below.
Row 75: Work 6 C2C stitches of the row. (6)
Attach yarn and begin the first stitch by CH 3 and 3 DC into the same loop. *SS into the next stitch, CH 3 and work 3 DC. Repeat from * 4 more times.

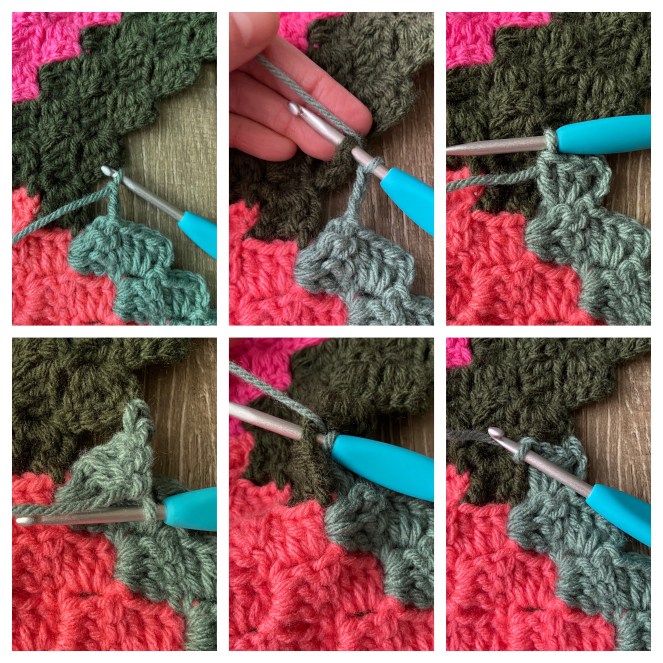
Row 76: INC and work 6 C2C joining to adjacent C2C while working final stitch. (7)
CH 6 and work a DC into the 4th, 5th and 6th CH from the hook. SS into the first CH 3 loop and work 5 of the remaining 6 stitches of the row. SS into the final stitch and begin your C2C stitch by working a CH 3. SS into the adjacent stitch. Finish the C2C stitch by working 3 DC. Finish the join by making one more SS into the adjacent stitch.
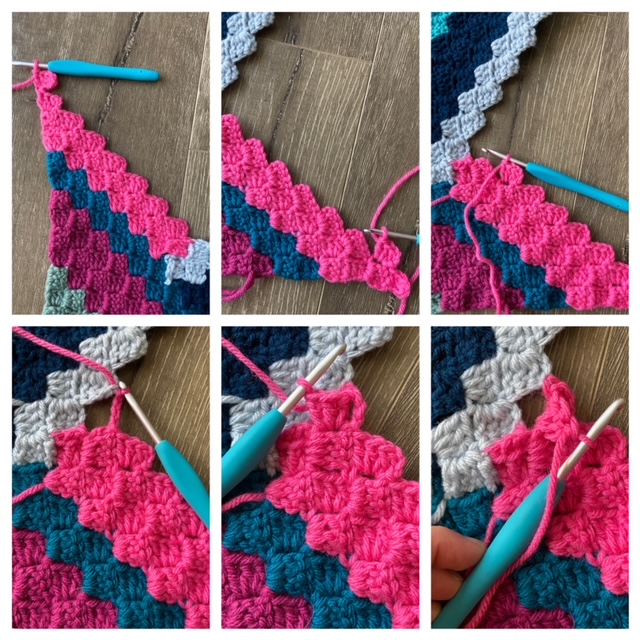
Row 77: DEC and work 7 C2C. (7)
CH 3 and SS into the CH 3 loop of the previous stitch – the C2C stitch you just made. Now you should be ready to work back up the block. Finish the row by working 7 C2C stitches.

Row 78: INC and work 7 C2C joining to adjacent C2C while working final stitch. Fasten off. (8)
CH 6 and work a DC into the 4th, 5th and 6th CH from the hook. SS into the first CH 3 loop and work 6 of the remaining 7 stitches of the row. SS into the final stitch and begin your C2C stitch by working a CH 3. SS into the adjacent stitch. Finish the C2C stitch by working 3 DC. Finish the join by making one more SS into the adjacent stitch. Fasten off.
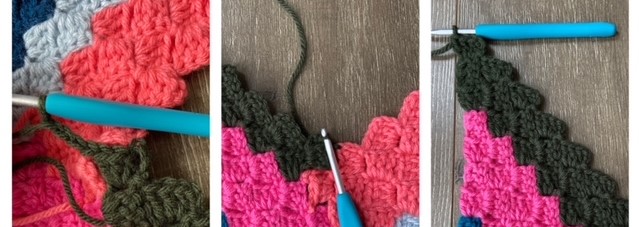
We will build a block on SIDE C. Orient your work with the WRONG SIDE up and attach new color as indicated below.
Row 79: Work 13 C2C stitches of the row. SS to adjacent stitch. (13)
Attach yarn and begin the first stitch by CH 3 and 3 DC into the same loop. *SS into the next stitch, CH 3 and work 3 DC. Repeat from * 11 more times. Then SS into the adjacent stitch.

Row 80: DEC and work 13 C2C joining to adjacent C2C while working final stitch. (13)
CH 3 and SS into the CH 3 loop of the previous stitch – the C2C stitch you just made. Now work 12 of the 13 stitches of the row. SS into the final stitch and begin your C2C stitch by working a CH 3. SS into the adjacent stitch. Finish the C2C stitch by working 3 DC. Finish the join by making one more SS into the adjacent stitch.


Row 81: DEC and work 12 C2C. SS to the adjacent stitch. (12)
CH 3 and SS into the CH 3 loop of the previous stitch – the C2C stitch you just made. Now you should be ready to work back up the block. Finish the row by working 12 C2C stitches. SS to the adjacent stitch.

Row 82: DEC and work 12 C2C joining to adjacent C2C while working final stitch. Fasten off. (12)
CH 3 and SS into the CH 3 loop of the previous stitch – the C2C stitch you just made. Now work 11 of the 12 stitches of the row. SS into the final stitch and begin your C2C stitch by working a CH 3. SS into the adjacent stitch. Finish the C2C stitch by working 3 DC. Finish the join by making one more SS into the adjacent stitch. Fasten off.


We will build a block on SIDE B. Orient your work with the RIGHT SIDE up and attach new color as indicated below.
Row 83: Work 6 C2C stitches of the row. (6)
Attach yarn and begin the first stitch by CH 3 and 3 DC into the same loop. *SS into the next stitch, CH 3 and work 3 DC. Repeat from * 4 more times.

Row 84: INC and work 6 C2C joining to adjacent C2C while working final stitch. (7)
CH 6 and work a DC into the 4th, 5th and 6th CH from the hook. SS into the first CH 3 loop and work 5 of the remaining 6 stitches of the row. SS into the final stitch and begin your C2C stitch by working a CH 3. SS into the adjacent stitch. Finish the C2C stitch by working 3 DC. Finish the join by making one more SS into the adjacent stitch.

Row 85: DEC and work 7 C2C. (7)
CH 3 and SS into the CH 3 loop of the previous stitch – the C2C stitch you just made. Now you should be ready to work back up the block. Finish the row by working 7 C2C stitches.
Row 86: INC and work 7 C2C joining to adjacent C2C while working final stitch. Fasten off. (8)
CH 6 and work a DC into the 4th, 5th and 6th CH from the hook. SS into the first CH 3 loop and work 6 of the remaining 7 stitches of the row. SS into the final stitch and begin your C2C stitch by working a CH 3. SS into the adjacent stitch. Finish the C2C stitch by working 3 DC. Finish the join by making one more SS into the adjacent stitch. Fasten off.

We will build a block on SIDE C. Orient your work with the WRONG SIDE up and attach new color as indicated below.
Row 87: Work 9 C2C stitches of the row. SS to adjacent stitch. (9)
Attach yarn and begin the first stitch by CH 3 and 3 DC into the same loop. *SS into the next stitch, CH 3 and work 3 DC. Repeat from * 7 more times. Then SS into the adjacent stitch.
Row 88: DEC and work 9 C2C joining to adjacent C2C while working final stitch. (9)
CH 3 and SS into the CH 3 loop of the previous stitch – the C2C stitch you just made. Now work 8 of the 9 stitches of the row. SS into the final stitch and begin your C2C stitch by working a CH 3. SS into the adjacent stitch. Finish the C2C stitch by working 3 DC. Finish the join by making one more SS into the adjacent stitch.

Row 89: DEC and work 8 C2C. SS to the adjacent stitch. (8)
CH 3 and SS into the CH 3 loop of the previous stitch – the C2C stitch you just made. Now you should be ready to work back up the block. Finish the row by working 8 C2C stitches. SS to the adjacent stitch.

Row 90: DEC and work 8 C2C joining to adjacent C2C while working final stitch. Fasten off. (8)
CH 3 and SS into the CH 3 loop of the previous stitch – the C2C stitch you just made. Now work 7 of the 8 stitches of the row. SS into the final stitch and begin your C2C stitch by working a CH 3. SS into the adjacent stitch. Finish the C2C stitch by working 3 DC. Finish the join by making one more SS into the adjacent stitch. Fasten off.

Repeat this process for each of your panels.
PART 12: Last three blocks. {Rich Orchid, Teal, Aqua}

We will build a block on SIDE B. Orient your work with the RIGHT SIDE up and attach new color as indicated below.
Row 91: Work 6 C2C stitches of the row. (6)
Attach yarn and begin the first stitch by CH 3 and 3 DC into the same loop. *SS into the next stitch, CH 3 and work 3 DC. Repeat from * 4 more times.

Row 92: INC and work 6 C2C joining to adjacent C2C while working final stitch. (7)
CH 6 and work a DC into the 4th, 5th and 6th CH from the hook. SS into the first CH 3 loop and work 5 of the remaining 6 stitches of the row. SS into the final stitch and begin your C2C stitch by working a CH 3. SS into the adjacent stitch. Finish the C2C stitch by working 3 DC. Finish the join by making one more SS into the adjacent stitch.

Row 93: DEC and work 6 C2C stitches of the row. SS to adjacent stitch. (6)
CH 3 and SS into the CH 3 loop of the previous stitch – the C2C stitch you just made. Now you should be ready to work back up the block. Finish the row by working 6 C2C stitches. SS to join to the adjacent stitch.

Row 94: DEC and work 6 C2C joining to adjacent C2C while working final stitch. Fasten off. (6)
CH 3 and SS into the CH 3 loop of the previous stitch – the C2C stitch you just made. Work 5 of the remaining 6 stitches of the row. SS into the final stitch and begin your C2C stitch by working a CH 3. SS into the adjacent stitch. Finish the C2C stitch by working 3 DC. Finish the join by making one more SS into the adjacent stitch.

We will build a block on SIDE C. Orient your work with the WRONG SIDE up and attach new color as indicated below.
Row 95: Work 5 C2C stitches of the row. SS to adjacent stitch. (5)
Attach yarn and begin the first stitch by CH 3 and 3 DC into the same loop. *SS into the next stitch, CH 3 and work 3 DC. Repeat from * 3 more times. Then SS into the adjacent stitch.

Row 96: DEC and work 5 C2C joining to adjacent C2C while working final stitch. Fasten off. (5)
CH 3 and SS into the CH 3 loop of the previous stitch – the C2C stitch you just made. Now work 4 of the 5 stitches of the row. SS into the final stitch and begin your C2C stitch by working a CH 3. SS into the adjacent stitch. Finish the C2C stitch by working 3 DC. Finish the join by making one more SS into the adjacent stitch. Fasten off.

We will build a block on SIDE B. Orient your work with the RIGHT SIDE up and attach new color as indicated below.
Row 97: Work 4 C2C stitches of the row. SS to adjacent stitch. (4)
Attach yarn and begin the first stitch by CH 3 and 3 DC into the same loop. *SS into the next stitch, CH 3 and work 3 DC. Repeat from * 2 more times. SS to adjacent stitch.

Row 98: DEC and work 4 C2C joining to adjacent C2C while working final stitch. (4)
CH 3 and SS into the CH 3 loop of the previous stitch – the C2C stitch you just made. Now work 3 of the 4 stitches of the row. SS into the final stitch and begin your C2C stitch by working a CH 3. SS into the adjacent stitch. Finish the C2C stitch by working 3 DC. Finish the join by making one more SS into the adjacent stitch.

Row 99: DEC and work 3 C2C. SS to adjacent stitch. (3)
CH 3 and SS into the CH 3 loop of the previous stitch – the C2C stitch you just made. Now you should be ready to work back up the block. Finish the row by working 3 C2C stitches and then SS to the adjacent stitch.

Row 100: DEC and work 3 C2C joining to adjacent C2C while working final stich. (3)
CH 3 and SS into the CH 3 loop of the previous stitch – the C2C stitch you just made. Now work 2 of the 3 stitches of the row. SS into the final stitch and begin your C2C stitch by working a CH 3. SS into the adjacent stitch. Finish the C2C stitch by working 3 DC. Finish the join by making one more SS into the adjacent stitch.

Row 101: DEC and work 2 C2C stitches. SS to adjacent stitch. (2)
CH 3 and SS into the CH 3 loop of the previous stitch – the C2C stitch you just made. Now you should be ready to work back up the block. Finish the row by working 2 C2C stitches and then SS to the adjacent stitch.

Row 102: DEC and work 2 C2C joining to adjacent C2C while working final stich. (2)
CH 3 and SS into the CH 3 loop of the previous stitch – the C2C stitch you just made. Now work 1 of the 2 stitches of the row. SS into the final stitch and begin your C2C stitch by working a CH 3. SS into the adjacent stitch. Finish the C2C stitch by working 3 DC. Finish the join by making one more SS into the adjacent stitch.

Row 103: DEC and work 1 C2C stitch. SS to adjacent stitch. (1)
CH 3 and SS into the CH 3 loop of the previous stitch – the C2C stitch you just made. Now you should be ready to work back up the block which is only 1 stitch. Work the 1 C2C stitch and then SS to the adjacent stitch.

Row 104: DEC and work 1 C2C joining to adjacent C2C while working this final stich. Fasten off. (1)
CH 3 and SS into the CH 3 loop of the previous stitch – the C2C stitch you just made. Start your final C2C stitch by working a CH 3. SS into the adjacent stitch. Finish the C2C stitch by working 3 DC. Finish the join by making one more SS into the adjacent stitch. Fasten off.

Repeat this process for each of your panels.
That’s it for Part 5! I’m super excited to see everyone’s finished blankets. Only 1 more week to go. Part 6 will be released on Thursday, June 23rd and that last part will describe how to assemble your panels and work the border. See you next week!
You are free to share your finished work, to include selling your finished products, but please credit me – SheMakesCrochet – as the pattern designer. Please do not distribute this pattern or any portion of it, instead direct people to my blog. THANK YOU!

