
I have loved watching all of your beautiful creations unfold; thank you so much for sharing them. I’m absolutely terrible at waiting for exciting things! I think I did an excellent job of sticking with the planned course of action throughout this fun experience. And so with that, I decided this afternoon that in the spirit of the last day of school and the start to summer break, I’m posting this early. I’m super excited to see these all finished. I hope you all enjoyed this project as much as I did.
Lets wrap up our blankets with part 6! During this section, we will join the panels and add the border! I hope that you all loved this project. One last time, I have compiled all of these blog posts into one giant PDF file to make scrolling and viewing on a device easier. As a BONUS, I have also created another file where I consolidated all of the instructions and removed the images to provide a printer friendly file for those that prefer paper patterns. As a second BONUS, I have assembled a couple of charts – a colored version, as well as black and white – I even labeled the blocks if you’d rather work this project that way. And because I know you will adore this fun border, I also included those instructions as a separate document to make accessing it easier. Please share your blankets so I can see their marvelous reveals. Be sure to use #FelixBlanketRemixed or tag me so I can admire your work.
If you are just starting, please jump back to the introduction post for supplies and relevant pattern notes. You can find Parts 1, 2, 3 4 and 5 in earlier posts.
Pattern:
Important Note about the Border:
It was my hope to design a blanket that would provide mix and match opportunities to keep this fun! I love when people are able to add their own touches and personalize things. And much like my original Felix Blanket, no two blankets will be alike. With that, I designed a super fun border that continues the patchwork feel and I wanted to bring that to your attention now because you’ve got options! You can work this border around each panel before stitching them together, or you could join them into strips, use the border and then join the strips. After joining panels (or strips) you can use this to border the entire blanket. You can even work several rounds of the border if you like! Figure that piece out. I’m going to move on to joining the panels and then I will cover the border tutorial, so skip ahead if you would like to do that first.
Join Method:
These panels should be relatively square in size (depending on your tension) and are 28 C2C stitches along each side. If you added one round of the border, then they will be 34 stiches. This means you can rotate your blocks any way you want before joining them together, to include flipping them over to use the mirror image. The possibilities are endless when it comes to assembling these and that’s what I really love about his project. I recommend laying everything out and figuring out which configuration you like best! I chose to leave all of mine facing the same way, but I rotated them before joining.
STITCH

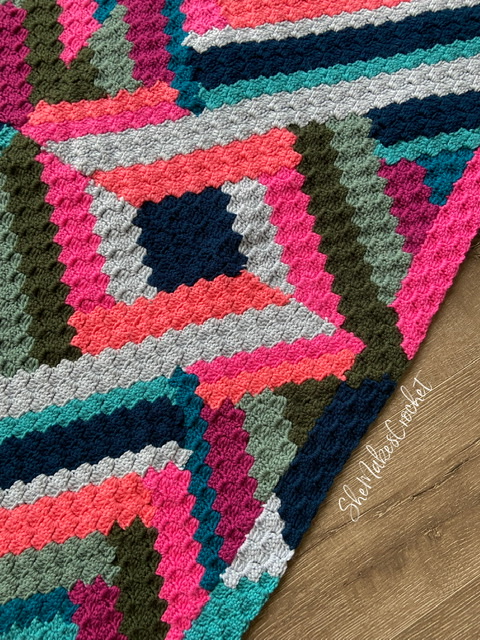
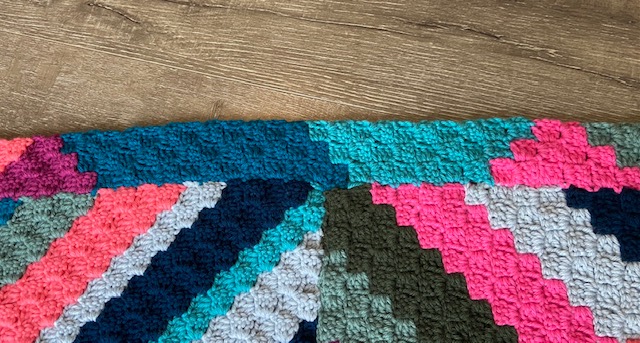
The image on the left is the front side of my finished blanket and the image on the right is the wrong side.
When I first started getting into crochet, I could not understand why anyone would choose to hand stitch granny squares together. I thought it was such a pain! One reason why it was a pain for me was because I used yarn that was way too long and eventually all that friction causes damage to the fibers which creates tangling and decreases the integrity of your seams. Lesson learned! Moreover, it felt tedious, but this method is really great because it has a very seamless appearance which works well with this busy design. Plus, you can totally use some of those long tails you still have hanging off your project to stitch portions of the panel together before weaving into place.
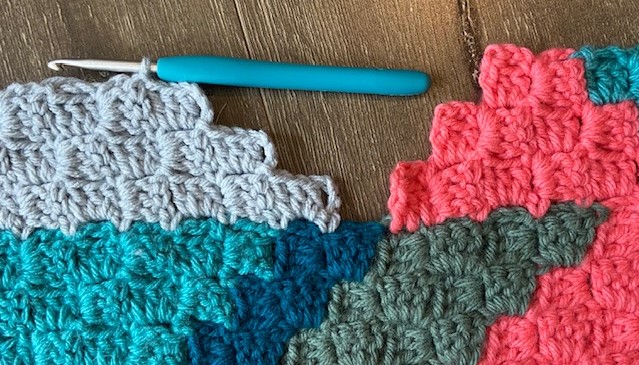
Align two panels side by side. I think it’s best to have them wrong sides facing up. Thread a needle with a piece of yarn; I wouldn’t go longer than approximately 18-24 inches. Being sure to match each C2C stitch up perfectly, work your needle from right to left, then left to right, picking up a loop from both panels every pass. The trick is to only pick up a loop on the wrong side – the side facing you. After every 1-2 C2C stitches, stop and pull the ends tightly. The thread should become minimally noticeable and when you flip your work over, you shouldn’t see it at all.

After you pull tightly on the yarn, it will become less apparent. If you are careful to only pick up loops along your working (wrong) side of the panel, you won’t see the stitches at all on the right side. See images posted earlier (above).
Border:
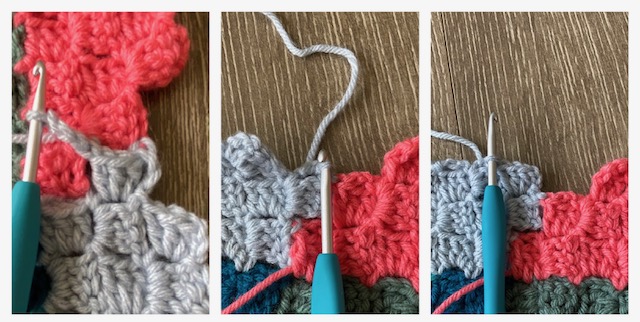
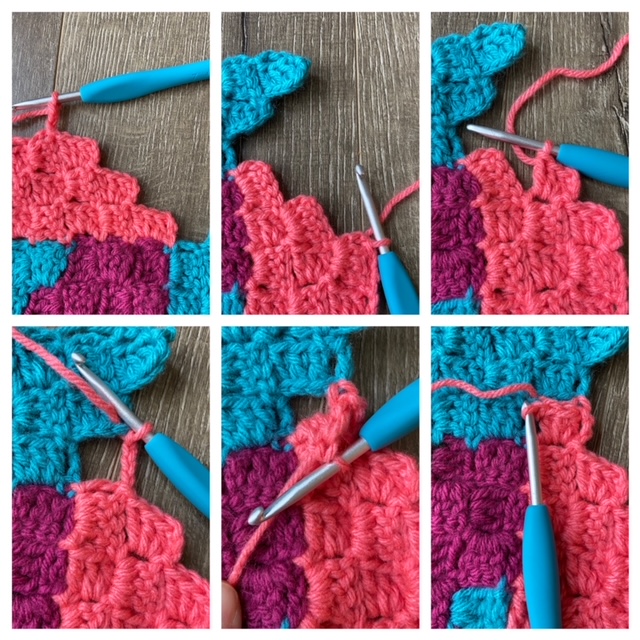
Row 1: Make your starting stitch. (1)
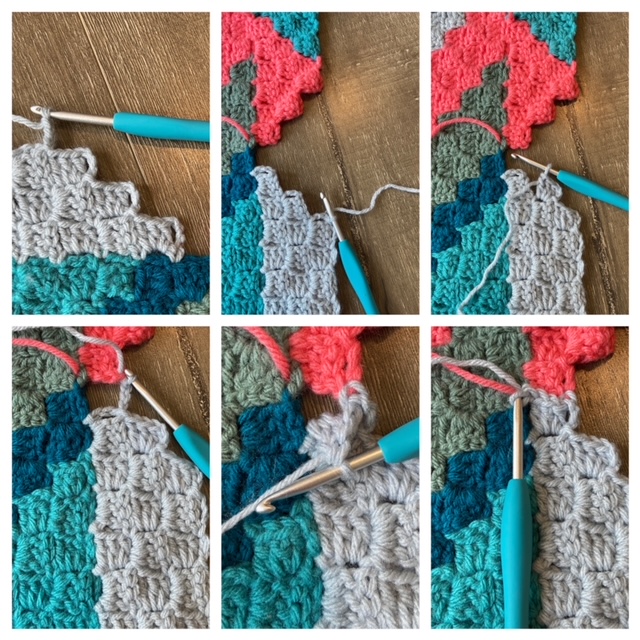
With the right side of your blanket or panel facing up, scan the top edge and choose a stitch that is an even number of stitches away from the top, left corner at random. (If you are left handed, use the right corner instead.) Then insert your hook, CH 3 and work 3 DC stitches into the selected stitch. Please note that depending on the stitch you choose, you may be working into a CH 3 loop, you may be working around a DC stitch that is oriented sideways, or you may be working into the top of 3 DC stitches (and if that is the case, make the CH 3 and first DC into the top of the first stitch). We will be making a Mini Odd Shape. If needed, pull out the stitch marker and place it into the CH3 loop of this stitch.

Row 2: DEC and work 1 C2C. SS to adjacent stitch. (1)
CH 3 and SS into the CH 3 loop of the previous stitch – the loop with the stitch marker. Now work the 1 stitch of the row by CH 3 and DC 3 times into the CH 3 loop (the one with the stitch marker). After working the last DC, SS into the adjacent stitch of the panel. Remove the stitch marker and place it into the CH 3 loop you just made.
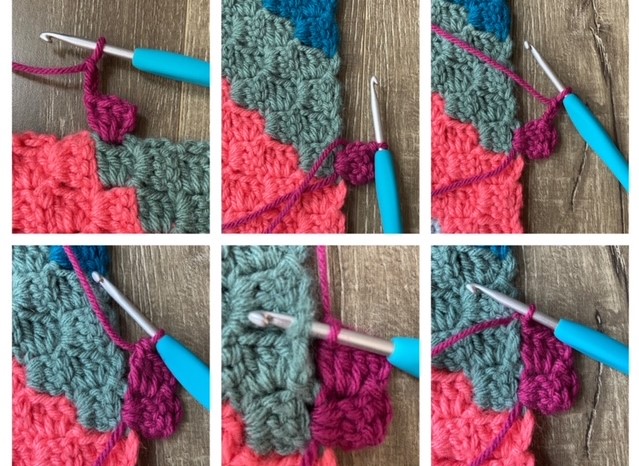
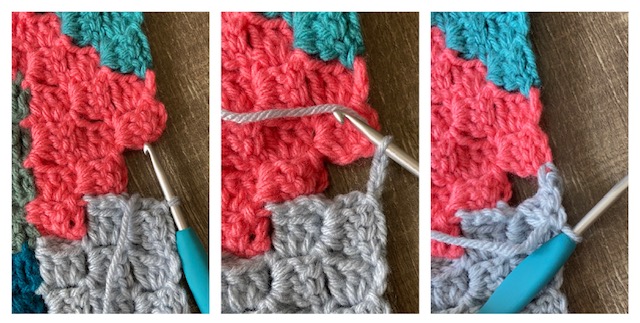
Row 3: INC (but this isn’t a normal increase because you need to join) and work 1 C2C. (2)
CH 3 and SS to the adjacent panel creating a CH 3 loop. Then CH 3 more. Turn and rotate your work and make 3 DC stitches into the CH 3 loop you just created. (An increase has been made). SS into the CH 3 loop of the marked stitch and work the remaining stitch of the row by CH 3 and DC 3 times into the CH 3 loop (the one with the stitch marker). Remove the stitch marker and place it into the CH 3 loop you just made when working this last stitch.

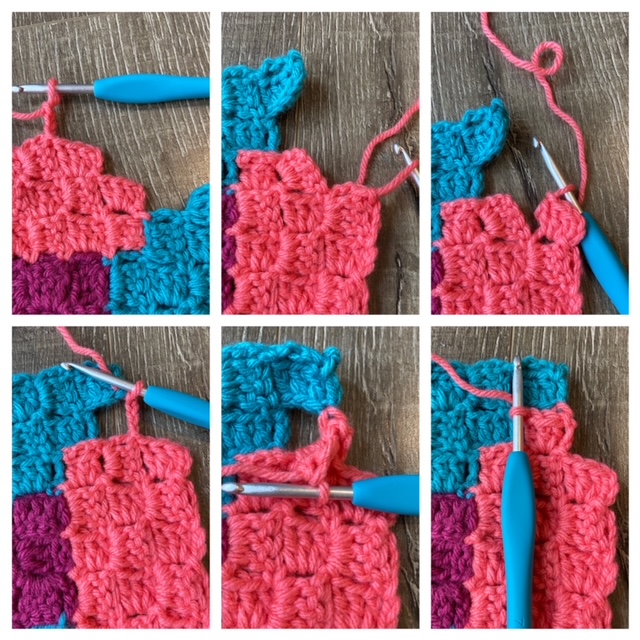
Row 4: DEC and work 2 C2C. SS to adjacent stitch. (2)
CH 3 and SS into the CH 3 loop of the previous stitch – the loop with the stitch marker. Now work the 2 stitches of the row by CH 3 and DC 3 times into the CH 3 loop (the one with the stitch marker). Remove the stitch marker. SS into the next stitch, CH 3 and work 3 DC. SS into the adjacent stitch of the panel. Place the stitch marker into the CH 3 loop you just made working this last stitch.
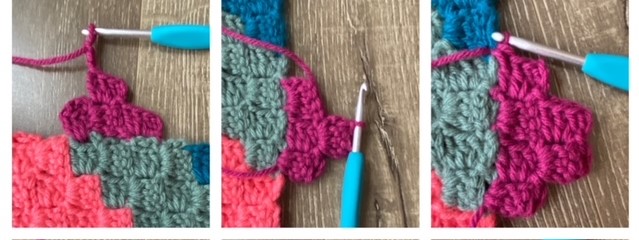
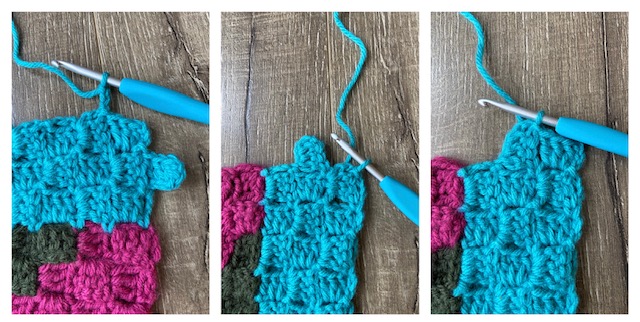
Row 5: INC (again, this is not a normal increase because you need to join) and work 2 C2C. (3)
CH 3 and SS to the adjacent panel creating a CH 3 loop. Then CH 3 more. Turn and rotate you work and make 3 DC stitches into the CH 3 loop you just created. SS into the CH 3 loop of the marked stitch and work the remaining 2 stitches of the row. So you will CH 3 and DC 3 times into the CH 3 loop (the one with the stitch marker). Remove the stitch marker. SS into the next CH3 loop, CH 3 and work 3 DC. Place the stitch marker into the CH 3 loop you just made when working this last stitch.

Row 6: DEC and work 3 C2C. SS to adjacent stitch. Fasten off. (3)
CH 3 and SS into the CH 3 loop of the previous stitch – the loop with the stitch marker. Now work the 3 stitches of the row. So you will CH 3 and DC 3 times into the CH 3 loop (the one with the stitch marker). Remove the stitch marker. SS into the next stitch, CH 3 and work 3 DC. SS into the next stitch, CH 3 and work 3 DC. SS into the adjacent stitch of the panel. Fasten off.

Please note my pictures were not taken in sequential order so colors of pieces from section to section are not accurate.
NOTE BEFORE CONTINUING
You may choose to make several more of these Mini Odd Shapes along your current working edge. Please note if you make more than 1, they all must be an even number of stitches away from the left corner. Also, each Mini Odd Shape is 6 stitches wide so you need to make sure you have space to complete the block as you approach the right edge.

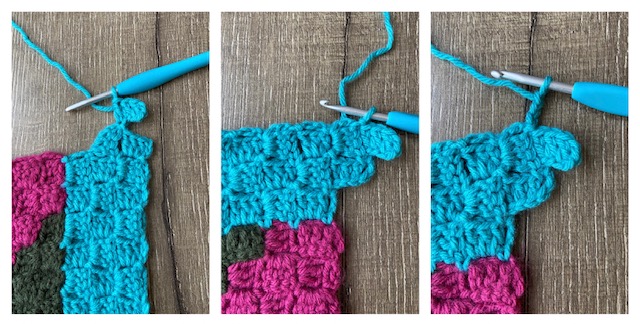
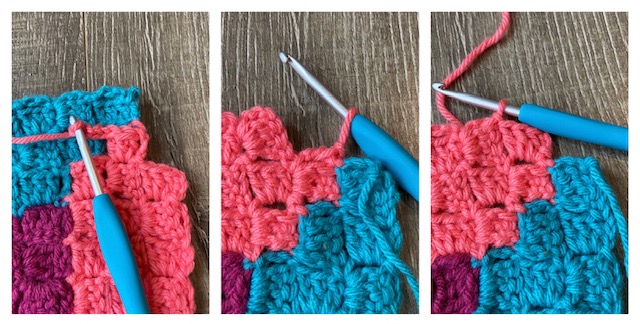
Now you will work along the right edge of each Mini Odd Shape (left edge for left handed crocheters) joining to any additional Mini Odd Shape you made and creating the first half of the right corner of the border.
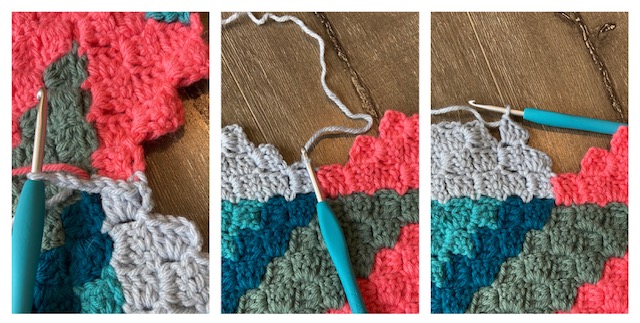
Identify the bottom right corner of your first Mini Odd Shape. You will need to turn your blanket over to the wrong side. Then attach your next color right in the corner of the Mini Odd Shape where it attaches to your blanket – see below images.
Row 7: INC (again, this is not a normal increase because you need to join) and work 2 C2C (3)
CH 3 and SS to the adjacent panel creating a CH 3 loop. Then CH 3 more. Turn and rotate you work and make 3 DC stitches into the CH 3 loop you just created. Work 2 more C2C stitches back up the side of the Mini Odd Shape. SS to join to the adjacent stitch.

Row 8: DEC and work 3 C2C. SS to adjacent to stitch. (3)
CH 3 and SS into the CH 3 loop of the previous stitch. Now work the 3 stitches of the row. So you will CH 3 and DC 3 times into the CH 3 loop. SS into the next stitch, CH 3 and work 3 DC. SS into the next stitch, CH 3 and work 3 DC. SS into the adjacent stitch of the panel.
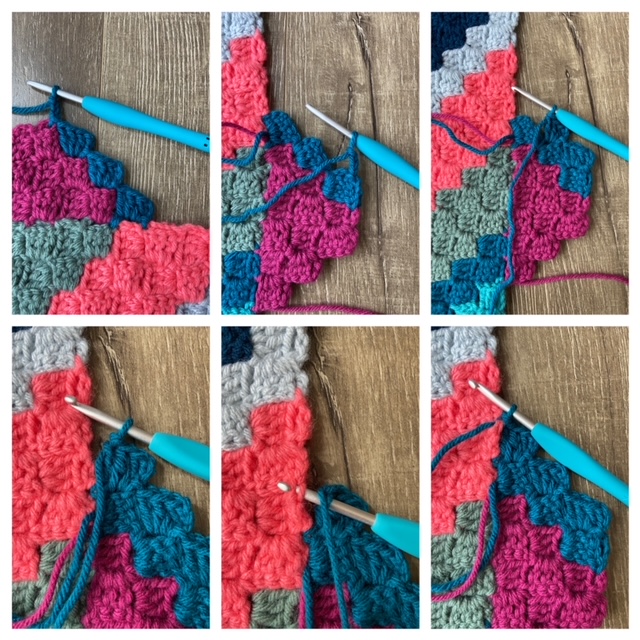
And that’s it! Continue repeating Rows 7 and 8 until either you arrive at your next Mini Odd Shape OR you arrive at the corner. While working these blocks, feel free to change colors if desired. It will look something like this if you do.
I will describe joining to the next Mini Odd Shape first; skip ahead if you don’t have any more of those.
It should look like this when you get to the next Mini Odd Shape.
Row 9: DEC and work 3 C2C joining on the last stitch. (3)
CH 3 and SS into the CH 3 loop of the previous stitch. Now work 2 of the 3 stitches of the row. SS into the next stitch, CH 3. SS into the adjacent stitch. Finish the C2C stitch by working 3 DC. Finish the join by making one more SS into the adjacent stitch.
Row 10: DEC and work 2 C2C. SS to adjacent stitch. (2) CH 3 and SS into the CH 3 loop of the previous stitch. Now work the 2 stitches of the row. SS into the adjacent stitch.
Row 11: DEC and work 2 C2C joining on the last stitch. (2)
CH 3 and SS into the CH 3 loop of the previous stitch. Now work 1 of the 2 stitches of the row. SS into the next stitch, CH 3. SS into the adjacent stitch. Finish the C2C stitch by working 3 DC. Finish the join by making one more SS into the adjacent stitch.

Row 12: DEC and work 1 C2C. Join to adjacent stitch (1)
CH 3 and SS into the CH 3 loop of the previous stitch. Now work 1 C2C stitch. SS to the adjacent stitch.
Row 13: DEC and work 1 C2C joining on that stitch. Fasten off. (1)
CH 3 and SS into the CH 3 loop of the previous stitch. Now work the 1 stitch of the row being sure to join when you work that C2C stitch. So you will CH 3. SS into the adjacent stitch. Finish the C2C stitch by working 3 DC. Finish the join by making one more SS into the adjacent stitch. Fasten off.
If you made multiple Mini Odd Shapes, jump back to Rows 7 and 8, filling in the right side of all Mini Odd Shapes. Continue along until you reach another Mini Odd Shape (Rows 9-13) or the right corner (Rows 14-18) described below.
When you reach the right corner, it should look like this:

Row 14: DEC and work 2 C2C. SS to adjacent stitch. (2)
CH 3 and SS into the CH 3 loop of the previous stitch. Now work the 2 stitches of the row. SS into the adjacent stitch.

Row 15: INC and work 1 C2C. SS to adjacent stitch. (2)
CH 6 and DC into the 4th, 5th and 6th CH from the hook. SS into the first CH 3 loop and work the last stitch of the row. SS into the adjacent stitch.

Row 16: DEC and work 1 C2C stitch. SS to adjacent stitch. (1)
CH 3 and SS into the CH 3 loop of the previous stitch. Now work the 1 stitch of the row. SS to join to adjacent stitch.
Row 17: INC. SS to adjacent stitch. Create CH 3 loop and fasten off. (1)
CH 6 and DC into the 4th, 5th and 6th CH from the hook. SS into the first CH 3 loop as if you were going to work a stitch. The corner is complete. CH 3 to create a final CH 3 loop by working a CH 3 and SS into the CH 3 loop of the stitch you just made before fastening off.
Now you will repeat these directions for the remaining 3 sides of your panel/blanket. So orient your work with the right side facing up, rotate your work one quarter turn and return to the beginning of the border pattern to work the next side.
After you have completed all 4 sides, you will have one more unworked space remaining on each of the 4 sides. The method to work along the left side of the Mini Odd Shape is exactly the same, only you will flip your blanket around and start with the RIGHT SIDE facing instead of the wrong side. So go back to Rows 7 and 8 and fill in the remaining side of your Mini Odd Shapes. When you arrive at the corner, jump below.
It should look like this when you are ready to join the last corner of each side.

Row 18: DEC and work 3 C2C joining to adjacent C2C while working final stitch. (3)
CH 3 and SS into the CH 3 loop of the previous stitch. Now work 2 of the 3 stiches of the row. SS into the final stitch and begin your C2C stitch by working a CH 3. SS into the adjacent stitch. Finish the C2C stitch by working 3 DC. Finish the join by making one more SS into the adjacent stitch.
Row 19: DEC and work 2 C2C. SS to adjacent stitch. (2)
CH 3 and SS into the CH 3 loop of the previous stitch. Now work the 2 stitches of the row. SS to join to adjacent stitch.

Row 20: DEC and work 2 C2C joining to adjacent C2C while working final stitch. (2)
CH 3 and SS into the CH 3 loop of the previous stitch. Now work 1 of the 2 stiches of the row. SS into the final stitch and begin your C2C stitch by working a CH 3. SS into the adjacent stitch. Finish the C2C stitch by working 3 DC. Finish the join by making one more SS into the adjacent stitch.
Row 21: DEC and work 1 C2C. SS to adjacent stitch. (1)
CH 3 and SS into the CH 3 loop of the previous stitch. Now work the 1 stitch of the row. SS to join to adjacent stitch.
Row 22: DEC and work 1 C2C. SS to adjacent stitch. Create CH 3 loop and fasten off. (1)
CH 3 and SS into the CH 3 loop of the previous stitch. Now work the 1 stitch of the row. SS to join to adjacent stitch. Finish off by creating one last CH 3 loop. So CH 3 and SS into the CH 3 loop of the stitch you just made. Fasten off.

Continue repeating Rows 7 and 8 again remembering you must start with the RIGHT SIDE showing this time for that last block. Every time you reach the corner, jump back to these directions (Rows 19-22).
Remember you may work additional rounds of the border and if you stagger the Mini Odd Shapes, I think that will create a really fun design. Don’t forget to post your pictures of your creation. Please be sure to tag me if you do! I hope you LOVED this design.
You are free to share your finished work, to include selling your finished products, but please credit me – SheMakesCrochet – as the pattern designer. Please do not distribute this pattern or any portion of it, instead direct people to my blog. THANK YOU!


thank you for the article